Sunday 15 September 2024

Merry Everything


Good Morning
I'm happy to say that I have a good start on creating my holiday cards. 
This new stencil from A Colorful Life Designs added a great look to my wreath card.
Meet the new for September stencil called:

So, here's what I did to create my card.
  • I love combining older stencils with the new one, so for my wreath I got out the older stencil called Leaf Frame.  I placed that over a piece of white cardstock and inked it up with some Cracked Pistachio Distress Oxide ink.  To add some dimension to the leaves, I added just a hint of Salty Ocean DOX ink.
  • I removed that stencil and then added the Simple Leafy Frame stencil, layering it over the Leaf Frame and inked that with some Rustic Wilderness DOX ink.
  • Next, I used just the berries from the Holly Wreath stencil and inked those over the leaves with some Lumberjack Plaid ink.
  • I die cut the wreath using my circle dies and set aside.
  • I cut a piece of dark red cardstock and embossed it with a plaid embossing folder and splattered with my white Posca pen.
  • I stamped the sentiment onto a piece of white cardstock and die cut it out.  I die cut the word outline 4 more times and then glued them all together.
  • I glued the embossed red plaid cardstock onto a 4 1/4 square white card base and then added the wreath over that.  
  • I used some more foam tape to add the sentiment over the middle of the wreath.

Here are the stencils I used:
NEWEST

OLDER

Holly Wreath

Discount Code for A Colorful Life Designs
(Affiliate with no extra cost to you) 

Thanks so much for coming by and taking a look.

Adding my card to these challenges:
My Time to Craft- ADD TEXTURE
Peace on Earth- CHRISTMAS
Krafty Chicks- CHRISTMAS

Supplies
Stamps- Holiday Sentiments (Photoplay)
Inks- DOX
Paper- heavy white (Scribes Nook- Waterloo, Ont.)
Accessories and Tools- stencils (A Colorful Life Designs); white Posca pen;
Infinity Circle dies (HA)

Saturday 14 September 2024

Fright Night

Welcome
I'm creating some cards for Halloween and today's card features the newly released stencil from A Colorful Life Designs that is called:
This stencil is really a fun one since it has 3 sizes of moons to use.

So, here's what I did to create my card.
  • I cut a piece of white cardstock and secured the Moon Man stencil over my paper...I used the middle sized image.  I inked that up with some Hickory Smoke and some Black Soot Distress Oxide ink.
  • I wanted the background to have lots of interest so I masked off the moon and then placed the Cloud Edger stencil (an older release) over the moon and inked with some Villainous Potion Distress Oxide ink. I kept shifting the cloud stencil down until the entire panel was all inked up.
  • I splattered with water and then set aside to dry.
  • Next, I die cut the sentiment with some black cardstock and sprayed with some Peeled Paint Distressed stain.  I cut the sentiment 3 more times and glued them all together so the sentiment would be raised.
  • I glued my card front onto a piece of black cardstock, then onto a white A2 sized card base.
  • I added the sentiment along the bottom and then added the black bats.

Here are the stencils I used:


Discount Code for A Colorful Life Designs
(Affiliate with no extra cost to you) 

Thanks so much for taking a look.

Adding my card to these challenges:
The Paper Funday- CREATE YOUR OWN BKG
Crazy is Our Fame- Stencils are Our Game- FALL FRENZY/ANYTHING GOES
Shopping Our Stash- DON'T REALLY NEED ANOTHER ONE

Supplies
Stamps- none
Inks- DOX; Distressed Spritz
Paper- heavy white (Scribes Nook- Waterloo, Ont.)
Accessories and Tools- stencil (A Colorful Life Designs); TE Blending Brushes;
Vault Gothic Portraits die (TH)

Sunday 8 September 2024

Celebrate Fall

Good Morning
Fall is in the air with cooler mornings.  The leaves are turning colours which inspired my card.
Meet the newly released stencil from A Colorful Life Designs called

So, here's what I did to create my card.
  • I put a piece of white cardstock onto my Make Art Station and added the Blowing Leaves stencil over that.  
  • Next, I inked over the whole stencil using some Fossilized Amber, Ripe Persimmon and some Lumberjack Plaid Distress Oxide ink. I thought these colours were perfect for the colours of the changing leaves.
  • I used a rectangle die to cut right from the center of the stenciled leaves and set aside.
  • I glued my large card front panel onto a piece of rust coloured cardstock, then onto an A2 sized white card base.
  • I glued the smaller die cut panel onto the same rust cardstock and used some foam tape to position it back into place over my card front.
  • I die cut the sentiment from the rust cardstock and then cut it again 4 more times with some white. I glued them all together, offsetting a bit to help the sentiment show up better against the colourful background.  I glued that over the middle of  my card front.
  • Finally, I added 3 red gems under the sentiment to finish off my card

Here is the stencil I used:

Check out the bling too:

Discount Code for A Colorful Life Designs
(Affiliate with no extra cost to you) 

Thanks so much for coming by and taking a look.

Adding my card to these challenges:
Allsorts- AUTUMN COLORS or ANYTHING GOES
Inkspirational- MAKE YOUR MARK

Supplies
Stamps- none
Inks- DOX
Paper- heavy white (Scribes Nook- Waterloo, Ont.)
Accessories and Tools- stencil and gems (A Colorful Life Designs); TE Blending Brushes;
Infinity Rectangle dies (HA); Celebrate die (MFT)

Saturday 7 September 2024

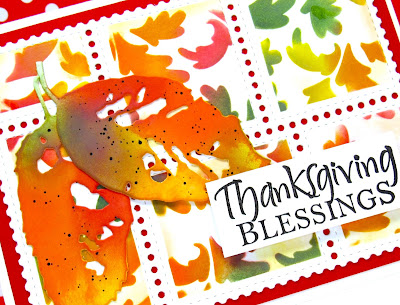
We Are Blessed

Welcome
Here in Canada, we celebrate Thanksgiving at the beginning of October, so I decided to use the new for September stencil called 
from A Colorful Life Designs to make a card.

So, here's what I did to create my card.
  • I cut a piece of white cardstock and then used the Postal Collage die to cut it out.
  • I placed that onto my Make Art Station and put the Blowing Leaves stencil onto the die cut and inked it up with these Distress Oxide colours:  Ripe Persimmon, Fossilized Amber, Rustic Wilderness, Lumberjack Plaid and Rusty Hinge.
  • Next, I added the above mentioned colours onto a scrap piece of white cardstock and die cut the leaves from that.
  • I glued my stenciled card front onto a piece of dark red cardstock, then onto an A2 sized card base.
  • I glued the die cut leaves to one side and then use some foam tape to pop the sentiment into the corner.

Here is the stencil I used:

Discount Code for A Colorful Life Designs
(Affiliate with no extra cost to you) 

Thanks so much for coming by and taking a look.

Adding my card to these challenges:
Just Add Ink- TEXTURE/FOLIAGE/STRING (choose 2)
My Time to Craft- ADD TEXTURE
As You Like It- TO LAYER, OR NOT and why?
(I love to layer, it adds a lot of interest)

Supplies
Stamps- Thanksgiving Blessings (Stampabilities)
Inks- Versafine Clair; Distress Oxides
Paper- heavy white (Scribes Nook- Waterloo, Ont.)
Accessories and Tools- stencil (A Colorful Life Designs); Make Art Station (Ranger);
Leaf Fragments dies (TH); Postal Collage die (Waffle Flower); 
TE Blending Brushes

Friday 6 September 2024

Your Special Day!

Welcome
Today's card features this beautiful butterfly and the new stencil from A Colorful Life Designs called:

So, here's what I did to create my card. 
  • I cut a piece of white cardstock and placed the Flower Globe stencil over that.  I inked with these Distress Oxide colours:  Salty Ocean, Uncharted Mariner, Shaded Lilac and some Villainous Potion.
  • Next, I cut the stenciled flower circle in half and die cut the background of the wings from each side of the circle.
  • I die cut the outline of the butterfly with some black cardstock and then glued it over the piece I had cut from the circles to complete the look of the butterfly.
  • I glued the 2 halves of the circles onto a piece of white cardstock and then onto a piece of black and then onto an A2 sized card base.
  • I used some foam tape to add the butterfly over the circles, matching up the pattern.
  • I added some bling all along the butterfly body and then stamped the sentiment with Versamark and white heat embossed it.  I used some foam tape to pop the sentiment underneath the butterfly.

Here is the stencil I used:

Discount Code for A Colorful Life Designs
(Affiliate with no extra cost to you) 

Thanks so very much for coming by and taking a look.

Adding my card to these challenges:
A Cut Above- ANYTHING GOES
Try It On Tues.- MAKE IT COLORFUL
Crazy is our Fame- Stencils are our Game- ANYTHING GOES (option: Fall)

Supplies
Stamps- Simple Sentiment Strips (TE)
Inks- Versamark; DOX
Paper- heavy white (Scribes Nook- Waterloo, Ont.)
Accessories and Tools- stencil and gems (A Colorful Life Designs); TE Blending Brushes;
Detailed Butterflies die (TH- Sizzix); foam tape

Sunday 1 September 2024

Leaves, Sunflowers and Pumpkins


Happy September!
Fall is right around the corner and the leaves are turning colours.
So meet 2 of the new stencils from A Colorful Life called:

I decided to use these 2 stencils together, so here's what I did.
  • I cut a piece of white cardstock and put the pumpkin from the Layered Sunflower Pumpkin stencil over that. I inked up the pumpkin first using some Ripe Persimmon Distress Oxide ink.  To add some shading, I added just a touch of Lumberjack Plaid DOX ink to the top of the pumpkin.
  • I cleaned the stencil off and then moved it to stencil the sunflowers with Fossilized Amber and some Mustard Seed DOX ink.
  • I moved the stencil again and then finally inked the flower centers and the leaves of the flower.
  • Next, I stenciled some of the leaves from the Blowing Leaves stencil just under and around the pumpkin.  I did have to mask it off in a few areas to add the leaves around the base of the pumpkin.
  • I splattered just the pumpkin with my white Posca pen and set it aside to dry.
  • I cut another piece of white cardstock and placed the Blowing Leaves stencil over that.  I inked them up with some Ripe Persimmon, Fossilized Amber, Lumberjack Plaid and some Rustic Wilderness DOX ink.
  • I glued the Blowing Leaves stenciled panel onto a piece of red cardstock, then onto an A2 sized card base.
  • I fussy cut out the pumpkin and sunflower portion of my cardstock out next and used some foam tape to pop it over the leaf background.

Here are the stencils I used:

Discount Code for A Colorful Life Designs
(Affiliate with no extra cost to you) 
p.s. Some good sales on now too!

Thanks so much for coming by and taking a look.

Adding my card to these challenges:
Simon Says Wed.- ANYTHING GOES
TICTACTOE- LEAVES/INK BLENDING/ MULTIPLES
Krafty Chicks- ANYTHING GOES

Supplies
Stamps- none
Inks- DOX
Paper- heavy white (Scribes Nook- Waterloo, Ont.)
Accessories and Tools- stencils (A Colorful Life Designs); TE Blending Brushes;
white Posca pen; foam tape