Thursday, 31 August 2023

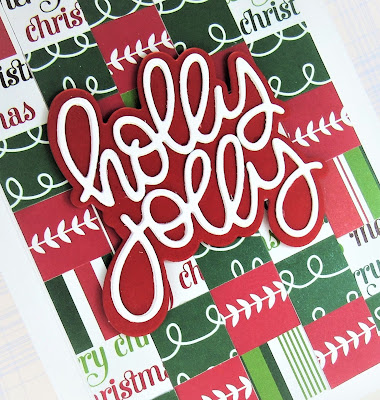
Holly Jolly


Good Morning
I'm working on getting some Christmas cards done and this one uses a technique called Bargello.
It is such a great way to use some of the paper strips we all have saved in our stash.
I went with some Christmas papers I had on hand.

So, here's what I did to create my card.
  • To do this technique, first, you cut scraps of paper into strips.  I cut my strips into 1/2".
  • Next, I glued the strips from top to bottom onto another piece of cardstock, placing them right beside one another.
  • After the glue was dry, I cut another piece of cardstock to use as the base for my finished strips.  I cut the strips panel into more strips again and glued them onto the cardstock, OFFSETTING them to create the look.  If that doesn't make sense go watch this video:  Bargello technique - YouTube
  • I added the finished panel to an A2 sized card base.
  • I die cut the sentiment from white cardstock, then glued that onto a red shadow base.  I used some foam tape to pop it over the finished background.

Thanks so much for coming by and taking a look.

Adding my card to these challenges:
Simon Says WED.- ANYTHING GOES
Little Red Wagon- SMALL or BIG (big sentiment)

Supplies
Stamps- none
Inks- none
Paper- heavy white (Scribes Nook- Waterloo, Ont.); various scraps of Christmas paper
Accessories and Tools- die (Catherine Pooler)

Wednesday, 30 August 2023

Snowflake Wishes


Welcome
Today's card was part of a challenge over at Splitcoast Stampers called Split Negative Technique.
This technique is to SPLIT a symmetrical image or pattern, while mirroring the colors.
I've never used this technique before, so I was all for trying it out.

So, here's what I did to create my card.
  • I began by choosing the colours I wanted to use and the stamps, then got out my Misti. Using my Misti for the image placement really helped to get the images to line up the way I wanted.
  • I placed the blue cardstock into my Misti first and stamped the snowflake using some Unicorn White ink.
  • I removed that and replaced it with a piece of white cardstock and stamped the snowflake again using some Tumbled Glass Distress Oxide ink.  
  • I cut both panels right down the center and glued them back together over a piece of lighter blue cardstock.
  • Next, I stamped some of the dots that are included with the snowflake set, around the snowflake to add interest.
  • I glued the stamped panel onto an A2 sized card base and then used some foam tape to add the sentiment over the center of the snowflake.

Thanks for coming by and taking a look.

Adding my card to these challenges:
Little Red Wagon- LARGE or SMALL
Try it On Tuesday- LET'S GO OUTDOORS
Simon Says- ANYTHING GOES

Supplies
Stamps- Let it Snow (Visible Image)
Inks- Hero Arts White Unicorn; DOX
Paper- heavy white (Scribes Nook- Waterloo, Ont.)
Accessories and Tools- Misti (My Sweet Petunia)

Monday, 28 August 2023

Comfort and Peace


Hello and Welcome
Today's card were part of a challenge to create one inked or stamped piece of cardstock, then cut in half to create 2 cards.

So, here's what I did to create my cards.
  • On my walk, I collected some grasses and leaves that I wanted to use on my cards.
  • I got out my Gel Plate and pressed some Bundled Sage, Cracked Pistachio and some Lucky Clover Distress Oxide ink directly onto my Gel Plate.  I used my brayer to blend the colours together.
  • Next, I carefully laid the grasses I had picked up onto the plate, then rubbed a piece of white cardstock over the Plate to create the print. 
  • I used my black Posca pen and splattered over the images.
  • When it was all dry, I cut the piece of white cardstock in half to create 2 A2 sized card.
  • I placed the inked panel into my Misti and one at a time, stamped the sentiment onto them.
  • I glued each finished panel onto a piece of green cardstock before adding it to the base.


Thanks so much for coming by and taking a look.

Adding my cards to these challenges:
A Place to Start- ANYTHING GOES- OPTION TREES or LEAVES
The Paper Funday Challenge- ANYTHING GOES- OPTION OUTDOORS

Supplies
Stamps- Comfort and Peace (Penny Black); Treasure (Verses)
Inks- DOX, Versafine Clair
Paper- heavy white (Scribes Nook- Waterloo, Ont.)
Accessories and Tools- Gel Plate; Speedball Brayer; grasses picked on a walk; 
black Posca pen; black gems

Saturday, 26 August 2023

Sleek Deco


Welcome
Meet today's card using one of the new stencils from A Colorful Life Designs called

So, here's what I did to create my card.
  • I cut some white paper strips the same size that would fit across the front of my A2 sized card.
  • I got out my Waffle Flower Stencil Mat and placed the first paper strip in place with the Sleek Deco stencil over that and inked it up with some Villainous Potion Distress Oxide ink.
  • I repeated that process with each paper strip, cleaning the stencil off each time as not to muddy the colours.  I used some Cracked Pistachio, Picked Raspberry and Peacock Feathers DOX inks for the rest of the strips.
  • I used some foam tape to pop up the strips onto a piece of white cardstock, then glued that onto an A2 sized card base.
  • I die cut the 'celebrate' sentiment with white 3 times and glued it together for more stability.
  • I inked the bottom part of the letters with the same colours as were on the strips.
  • Finally, I added 3 silver gems around the sentiment.

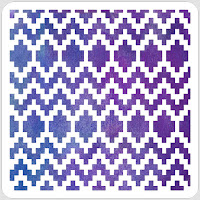
Here is the stencil I used:

Discount Code for A Colorful Life Designs
(Affiliate with no extra cost to you) 

Many thanks for coming by and taking a look.

Supplies
Stamps- none
Inks- DOX
Paper- heavy white (Scribes Nook- Waterloo, Ont.)
Accessories and Tools- stencil (A Colorful Life Designs); Stencil Mat (Waffle Flower); 
TE Blending Brushes; silver gems; Celebrate die (MFT)

Friday, 25 August 2023

Warm Wishes


Welcome
As a card maker, I am thinking ahead and I want to get started on making some cards for the holidays.  
This new Sleek Deco stencil from A Colorful Life Designs worked great as a background for my snowflakes.

So, here's what I did to create my card.
  • I cut a piece of white cardstock and got out my Gel Plate.
  • I press some Uncharted Mariner in the middle and some Peacock Feathers Distress Oxide ink along the edges of my Plate and using my brayer, I blended the colours together.
  • I laid the Sleek Deco stencil onto the plate and rubbed my white cardstock over it to take the first print.  
  • I removed the stencil and rubbed the cardstock over the plate again, picking up the leftover pattern and ink for my background.  It gave me a nice offset pattern.
  • Next, I placed the stenciled panel into my Misti to stamp the snowflake collage and the sentiment along the bottom.  I heat embossed them to help them pop against the blue background.
  • I added a few black splatters with my Posca pen for interest.
  • I glued the panel onto a piece of blue cardstock, then onto an A2 sized card base.
  • I added 3 blue gems to the centers of the snowflakes.

Here is the stencil I used:

Discount Code for A Colorful Life Designs
(Affiliate with no extra cost to you) 

Thanks so much for taking a look.

Adding my card to these challenges:
Krafty Chicks- ALL OCCASIONS
The Holly and Ivy Challenge- ANYTHING CHRISTMAS GOES
Try it On Tues.- LET'S GO OUTSIDE

Supplies
Stamps- Shake Your Flakes (Unity)
Inks- DOX, Versafine Clair
Paper- heavy white (Scribes Nook- Waterloo, Ont.)
Accessories and Tools- stencil (A Colorful Life Designs); Gel Plate; Speedball brayer;
Misti (My Sweet Petunia); blue gems; black Posca pen

Wednesday, 23 August 2023

Take the Journey


Hello and Welcome
Many of the new releases from A Colorful Life Designs this month are graphic designs.
I find these work so well when trying to create masculine looking cards, something many struggle with.
The stencil I am using today is called 

So, here's what I did to create my card.
  • As always, I cut a piece of white cardstock and placed it onto my Make Art Station.  I centered the Curtain Call stencil over my cardstock and inked it up with some Cracked Pistachio Distress Oxide ink.
  • I removed the stencil, cleaned it off and then shifted it so it went in the other direction.  I then inked it up with some Broken China DOX ink.
  • While that dried, I stamped the sentiment and arrow and die cut them out.
  • I glued the stenciled panel onto a piece of blue cardstock, then onto an A2 sized card base.
  • I used some foam tape to pop the sentiment and the arrow up in the center of the card.

Here is the stencil I used:

Discount Code for A Colorful Life Designs
(Affiliate with no extra cost to you) 

Thanks so very much for coming by and taking a look.

Adding my card to these challenges:
Crazy is Our Fame- Stencils are Our Game- ANYTHING GOES/option Butterflies
Use Your Stuff- VINTAGE (billboard sign)

Supplies 
Stamps- Roadside Messages (Hero Arts)
Inks- DOX
Paper- heavy white (Scribes Nook)
Accessories and Tools- stencil (A Colorful Life Designs); Make Art Station (Ranger);
TE Blending Brushes

Monday, 21 August 2023

Have a Grateful Heart


Good Morning.
Today's card has a great summery feeling to it.
I'm combining the new Dynamic Lines and the Dot Square Grid stencils from A Colorful Life Designs to create my design.

So, here's what I did to create my card.
  • I cut a piece of cardstock 4 inches square and placed it onto my Make Art Station.
  • I decided to use just the corners of the stencil, so I placed just the corner edge of the Dynamic Lines stencil onto one of the corners of my cardstock.  I inked that up with some Peacock Feathers Distress Oxide ink.
  • I repeated that process until all 4 corners were inked up.
  • When I was finished, there was a large white area in the center of the card panel, so I masked it off and stenciled it using the Dot Square Grid with some Blueprint Sketch DOX ink to add a bit of colour variation and interest.
  • I splattered the whole panel with my white Posca pen and set aside to dry.
  • When the panel was dry, I placed it into my Misti to stamp the sentiment.

Here are the stencils I used:


Discount Code for A Colorful Life Designs
(Affiliate with no extra cost to you) 

Thanks a lot for coming by and taking a look.

Adding my card to these challenges:
Simon Says Wed.- CLEAN AND SIMPLE
Happy Little Stampers- ANYTHING GOES STENCILED
The Crafting Challenge- YOUR FAB COLOUR

Supplies
Stamp- Start Each Day (CTMH)
Inks- Versafine Clair, DOX
Paper- heavy white (Scribes Nook- Waterloo, Ont.)
Accessories and Tools- stencils (A Colorful Life Designs); Make Art Station (Ranger);
TE inking brushes; white Posca pen, Misti (My Sweet Petunia)

Sunday, 20 August 2023

Let's Create


Hello and Welcome
Today's card features another wonderful geometric shaped stencil from A Colorful Life Designs called 

So, here's what I did to create my card.
  • I began by looking through my stash of inky backgrounds and found this one.  It was one that I had rolled my brayer off onto while I was Gel Plate printing.  It had some orange in the center and pink along the edges.  That was my starting point.
  • I took the panel and placed it onto my Make Art Station and positioned the Mid Century Angles stencil over that.
  • Next, I inked up the middle area with some Ripe Persimmon Distress Oxide ink and then used some Picked Raspberry DOX ink along the edges.
  • I removed the stencil and splattered with my white Posca pen.
  • To add a bit more interest to the design, I stamped a star into some of the open areas of the stenciled background.
  • When the ink was all dry, I placed the panel into my Misti to stamp the sentiment into the middle and clear heat embossed it.
  • I glued it onto a piece of pink cardstock, then onto an A2 sized card base.
  • Lastly, I added 3 black gems around the sentiment.

Here is the stencil I used:

Thanks so much for coming by and taking a look.

Adding my card to these challenges:
Simon Says Mon.- USE YOUR FAV TECHNIQUE (stenciling)
Shopping Our Stash- HOT, HOT, HOT (I used hot colours)

Supplies
Stamps- Just Be Happy (Visible Image); Feelin Fizzy (stars- Catherine Pooler)
Inks- DOX; Versafine Clair
Paper- heavy white (Scribes Nook)
Accessories and Tools- stencil (A Colorful Life Designs); Speedball brayer; white Posca pen,
Make Art Station (Ranger); Misti; TE Blending Brushes; clear eb powder; black gems

Friday, 18 August 2023

Floral Wishes


Hello and Welcome
Today's card features the new for August stencil from A Colorful Life Designs called 

So, here's what I did to create my card.
  • I cut a piece of white cardstock and placed it onto my Make Art Station.  I positioned the Halftone stencil over that and inked it up with some Lumberjack Plaid Distress Oxide ink.
  • I rotated the stencil from the top to the bottom and inked again.
  • I removed the stencil and inked around the edges with some more DOX ink.
  • I stamped the flower onto a scrap piece of white cardstock, stenciled it with the same stencil as above, then inked it with some Ripe Persimmon and Lumberjack Plaid DOX ink.
  • I splattered the flower head with my white Posca pen and when dry, I fussy cut it out.
  • In the meantime, I placed the stenciled panel into my Misti and stamped the whole flower to one side and the sentiment beside the flower.
  • I glued the panel onto a piece of red cardstock, then onto an A2 sized card base.
  • Finally, I used some foam tape to pop the flower head into place.


Here is the stencil I used:

Discount Code for A Colorful Life Designs
(Affiliate with no extra cost to you) 

Thanks so much for coming by and taking a look.

Adding my card to these challenges:
Simon Says Wed.- CLEAN AND SIMPLE
Crafting Happiness- ANYTHING GOES

Supplies
Stamp- Creative Chaos (Visible Image); Smile, Sparkle, Shine (Sizzix)
Inks- Versafine Clair, DOX
Paper- heavy white (Scribes Nook, Waterloo, Ont.)
Accessories and Tools- stencil (A Colorful Life Designs); white Posca pen,
Make Art Station (Ranger); Misti (My Sweet Petunia); foam tape

Wednesday, 16 August 2023

Monochromatic Celebrate


Welcome
Today's card features the new for August stencil from A Colorful Life Designs called 
Such an innovative look with a great geometric design.

So, here's what I did to create my simple card.
  • I cut a piece of white cardstock and placed it onto my Make Art Station.  I positioned the Mid Century Angles stencil over it, centering it from side to side and top to bottom.
  • I added some Lucky Clover Distress Oxide ink into the middle of the shapes and then some Cracked Pistachio around the edges to give a 2-tone effect.
  • I removed the stencil and placed it into my Misti to stamp the sentiment along the bottom.
  • I glued the stenciled panel onto a piece of green cardstock, then onto an A2 sized card base.
  • I added some black gems for extra interest.

Here is the stencil I used:

Discount Code for A Colorful Life Designs
(Affiliate with no extra cost to you) 

I so appreciated that you came by to take a look.

Adding my card to these challenges:
Simon Says Monday- USE YOUR FAV TECHNIQUE- (stenciling)
Crafting Happiness- ANYTHING GOES
Crazy is Our Fame- Stencils are Our Game- ANYTHING STENCILED/OPT BUTTERFLIES

Supplies
Stamp- Celebrate (IO- retired)
Inks- DOX, Versafine Clair
Paper- heavy white (Scribes Nook- Waterloo, Ont.)
Accessories and Tools- stencil (A Colorful Life Designs); TE Blending Brushes; 
Make Art Station (Ranger); black gems

Sunday, 13 August 2023

Rainy Day in NY


Good Morning
I made today's card for a challenge over at Splitcoast.
The challenge was to create a monochromatic scene.

So, here's what I did to create my card.
  • I cut a piece of white cardstock, then placed it into my Misti with the stamp.  
  • Next, I inked the stamp up with some Peacock Feathers Distress Oxide ink and stamped it.
  • Leaving the stamp in place, I moved my card panel slightly up and over, then inked up the stamp again with some Uncharted Mariner DOX ink and stamped to get the offset, repeated image.
  • Using a wet paintbrush, I went over the ink to blur out the lines and make it look more like a rainy, wet day. 
  • I decided not to add a sentiment so I could use this card for any occasion.
  • After the panel was dry, I glued it onto a piece of blue cardstock, then onto a white A2 sized card base.

Many thanks for coming by and taking a look.

Adding my card to these challenges:
Sweet Stampin'- BASED ON A BOOK/SONG/FILM (song- NY< NY)
We Love Stamping- MASCULINE
Time Out- MONOCHROMATIC

Supplies
Stamp- Watercolor NY (Technique Junkies)
Inks- DOX
Paper- heavy white (Scribes Nook- Waterloo, Ont.)
Accessories and Tools- Misti (My Sweet Petunia); paintbrush

Saturday, 12 August 2023

Bold Birthday


Good Morning
Here's another card I made using some of the patterned paper I have in my stash.
I used the Blowout stencil from A Colorful Life Designs.

So, here's what I did to create my card.
  • I began by looking through my stash of patterned papers until I found this fun striped one.
  • I cut a piece for my card front, set it onto my Make Art Station and positioned the Blowout stencil over that.
  • I inked up the stencil with some Lumberjack Plaid Distress Oxide ink, then splattered with my white Posca pen.  The red worked very well with the stripes.
  • While that dried, I stamped out the sentiment with some more DOX ink and then die cut it out.
  • I glued the finished panel onto a piece of red cardstock, then onto a whiter A2 sized card base.
  • I used some foam tape to pop the sentiment up and put 3 red gems around it.

Here is the stencil I used:

Many thanks for stopping by and taking a look.

Adding my card to these challenges:
Simon Says Mon.- HAPPY BIRTHDAY
My Time to Craft- STENCILING
The Male Room- DOTS and/or STRIPES

Supplies
Stamp- Big and Bold Sentiments (SSS)
Ink- DOX
Paper- patterned??  heavy white (Scribes Nook- Waterloo, Ont.)
Accessories and Tools- stencil (A Colorful Life Designs); Make Art Station (Ranger); 
red gems (Dollar Store); white Posca pen

Friday, 11 August 2023

You Are a Classic


Happy Friday and Welcome!
Today's card is a simple one using and old pair of jeans and my Gel Plate.
A good masculine card to have on hand.

So, here's what I did to create my card.
  • I cut a piece of white cardstock first and got out my Gel Plate.
  • I pressed some Uncharted Mariner Distress Oxide ink onto my Gel Plate and using a brayer, I smoothed it all out on the plate. 
  • Next, I took an old pair of my husband's jeans and pressed them onto the plate to transfer the details of the pants.
  • I lifted the pants off and took my white cardstock and rubbed over my plate to take the print.
  • When the piece was dry, I stamped the sentiment into the corner.
  • I glued the card front onto a piece of black cardstock, then onto an A2 card base.
  • To finish the card off, I added 5 silver gems under the sentiment.

Thanks so much for coming by and taking a look.

Adding my card to these challenges:
Simon Says Monday- Happy Birthday
Use Your Stuff- RECYCLED/ UPCYCLED
Time Out- MONOCHROMATIC

Supplies
Stamp- Feelin Fizzy (Catherine Pooler)
Ink- Distress Oxide
Paper- heavy white- (Scribes Nook- Waterloo, Ont.)
Accessories and Tools- old jeans; Gel Plate; brayer; silver Gems

Thursday, 10 August 2023

The Best of Wishes


Good morning.
Today's clean and simple card combines 2 new for August stencils from A Colorful Life Designs called  
I just love playing with stencil layering.

So, here's what I did to create my card.
  • I began by cutting a piece of white cardstock and placed it onto my Make Art Station.  I placed the Dots In and Out stencil over that and inked it up with some Ripe Persimmon Distress Oxide ink.
  • Leaving that stencil in place, I laid the Square Line Up stencil over that and inked again with some Lumberjack Plaid DOX ink.  It really added such extra interest to the graphic design.
  • I removed both stencils and placed the panel onto my Misti to stamp the sentiment.  I clear embossed it to help make it pop against the background.
  • I glued the stenciled card front onto a piece of orange cardstock, then onto an A2 sized card base.
  • Finally, I added 3 black gems around the sentiment.

Here are the stencils I used:


Discount Code for A Colorful Life Designs
(Affiliate with no extra cost to you) 

\Thanks so very much for coming by and taking a look.

Adding my card to these challenges:
The Male Room- DOT and/or STRIPES

Supplies
Stamp- Scripted Bold Sentiments (Pinkfresh Studios)
Inks- Versafine Clair; DOX
Paper- heavy white (Scribes Nook)
Accessories and Tools- stencils (A Colorful Life Designs); Make Art Station (Ranger);
TE blending Brushes; black gems

Tuesday, 8 August 2023

Wishes


Welcome
I made today's card as an experiment to see how stenciling would look over some patterned paper that I have so much of and never use.
This new stencil called Aztec Pattern from A Colorful Life Designs was calling for me to try it out.

So, here's what I did to create my card.
  • I looked through my stash of patterned paper and picked out this one that had some yellow and green dots on it.  
  • I cut a piece of the patterned paper, placed it onto my Make Art Station and positioned the Aztec Pattern stencil over it, then I inked it up with some Rustic Wildness Distress Oxide ink.  The designs blended together so well.
  • I splattered with my white Posca pen and set aside to dry.
  • When dry, I die cut the sentiment from some white cardstock and then the sentiment shadow from the center of the inked panel.  I glued those 2 together.
  • I glued the stenciled panel onto a piece of yellow cardstock, then onto an A2 card base.
  • I used some foam tape to pop the sentiment back into place in the center of the card front.
  • I added 3 silver gems around the sentiment.

Here is the stencil I used:

Discount Code for A Colorful Life Designs
(Affiliate with no extra cost to you) 

Thanks so much for coming by and taking a look.

Adding my card to these challenges:
Simon Says Mon.- HAPPY BIRTHDAY
Crafting Happiness- ANYTHING GOES
AAA Birthday- ANYTHING GOES

Supplies
Stamps- none
Inks- DOX
Paper- heavy white (Scribes Nook- Waterloo, Ont.); patterned paper ??
Accessories and Tools- stencil- (A Colorful Life Designs); Make Art Station (Ranger);
TE Blending Brushes, white Posca pen, silver gems