Friday 29 September 2023

A Big Hello


HELLO!
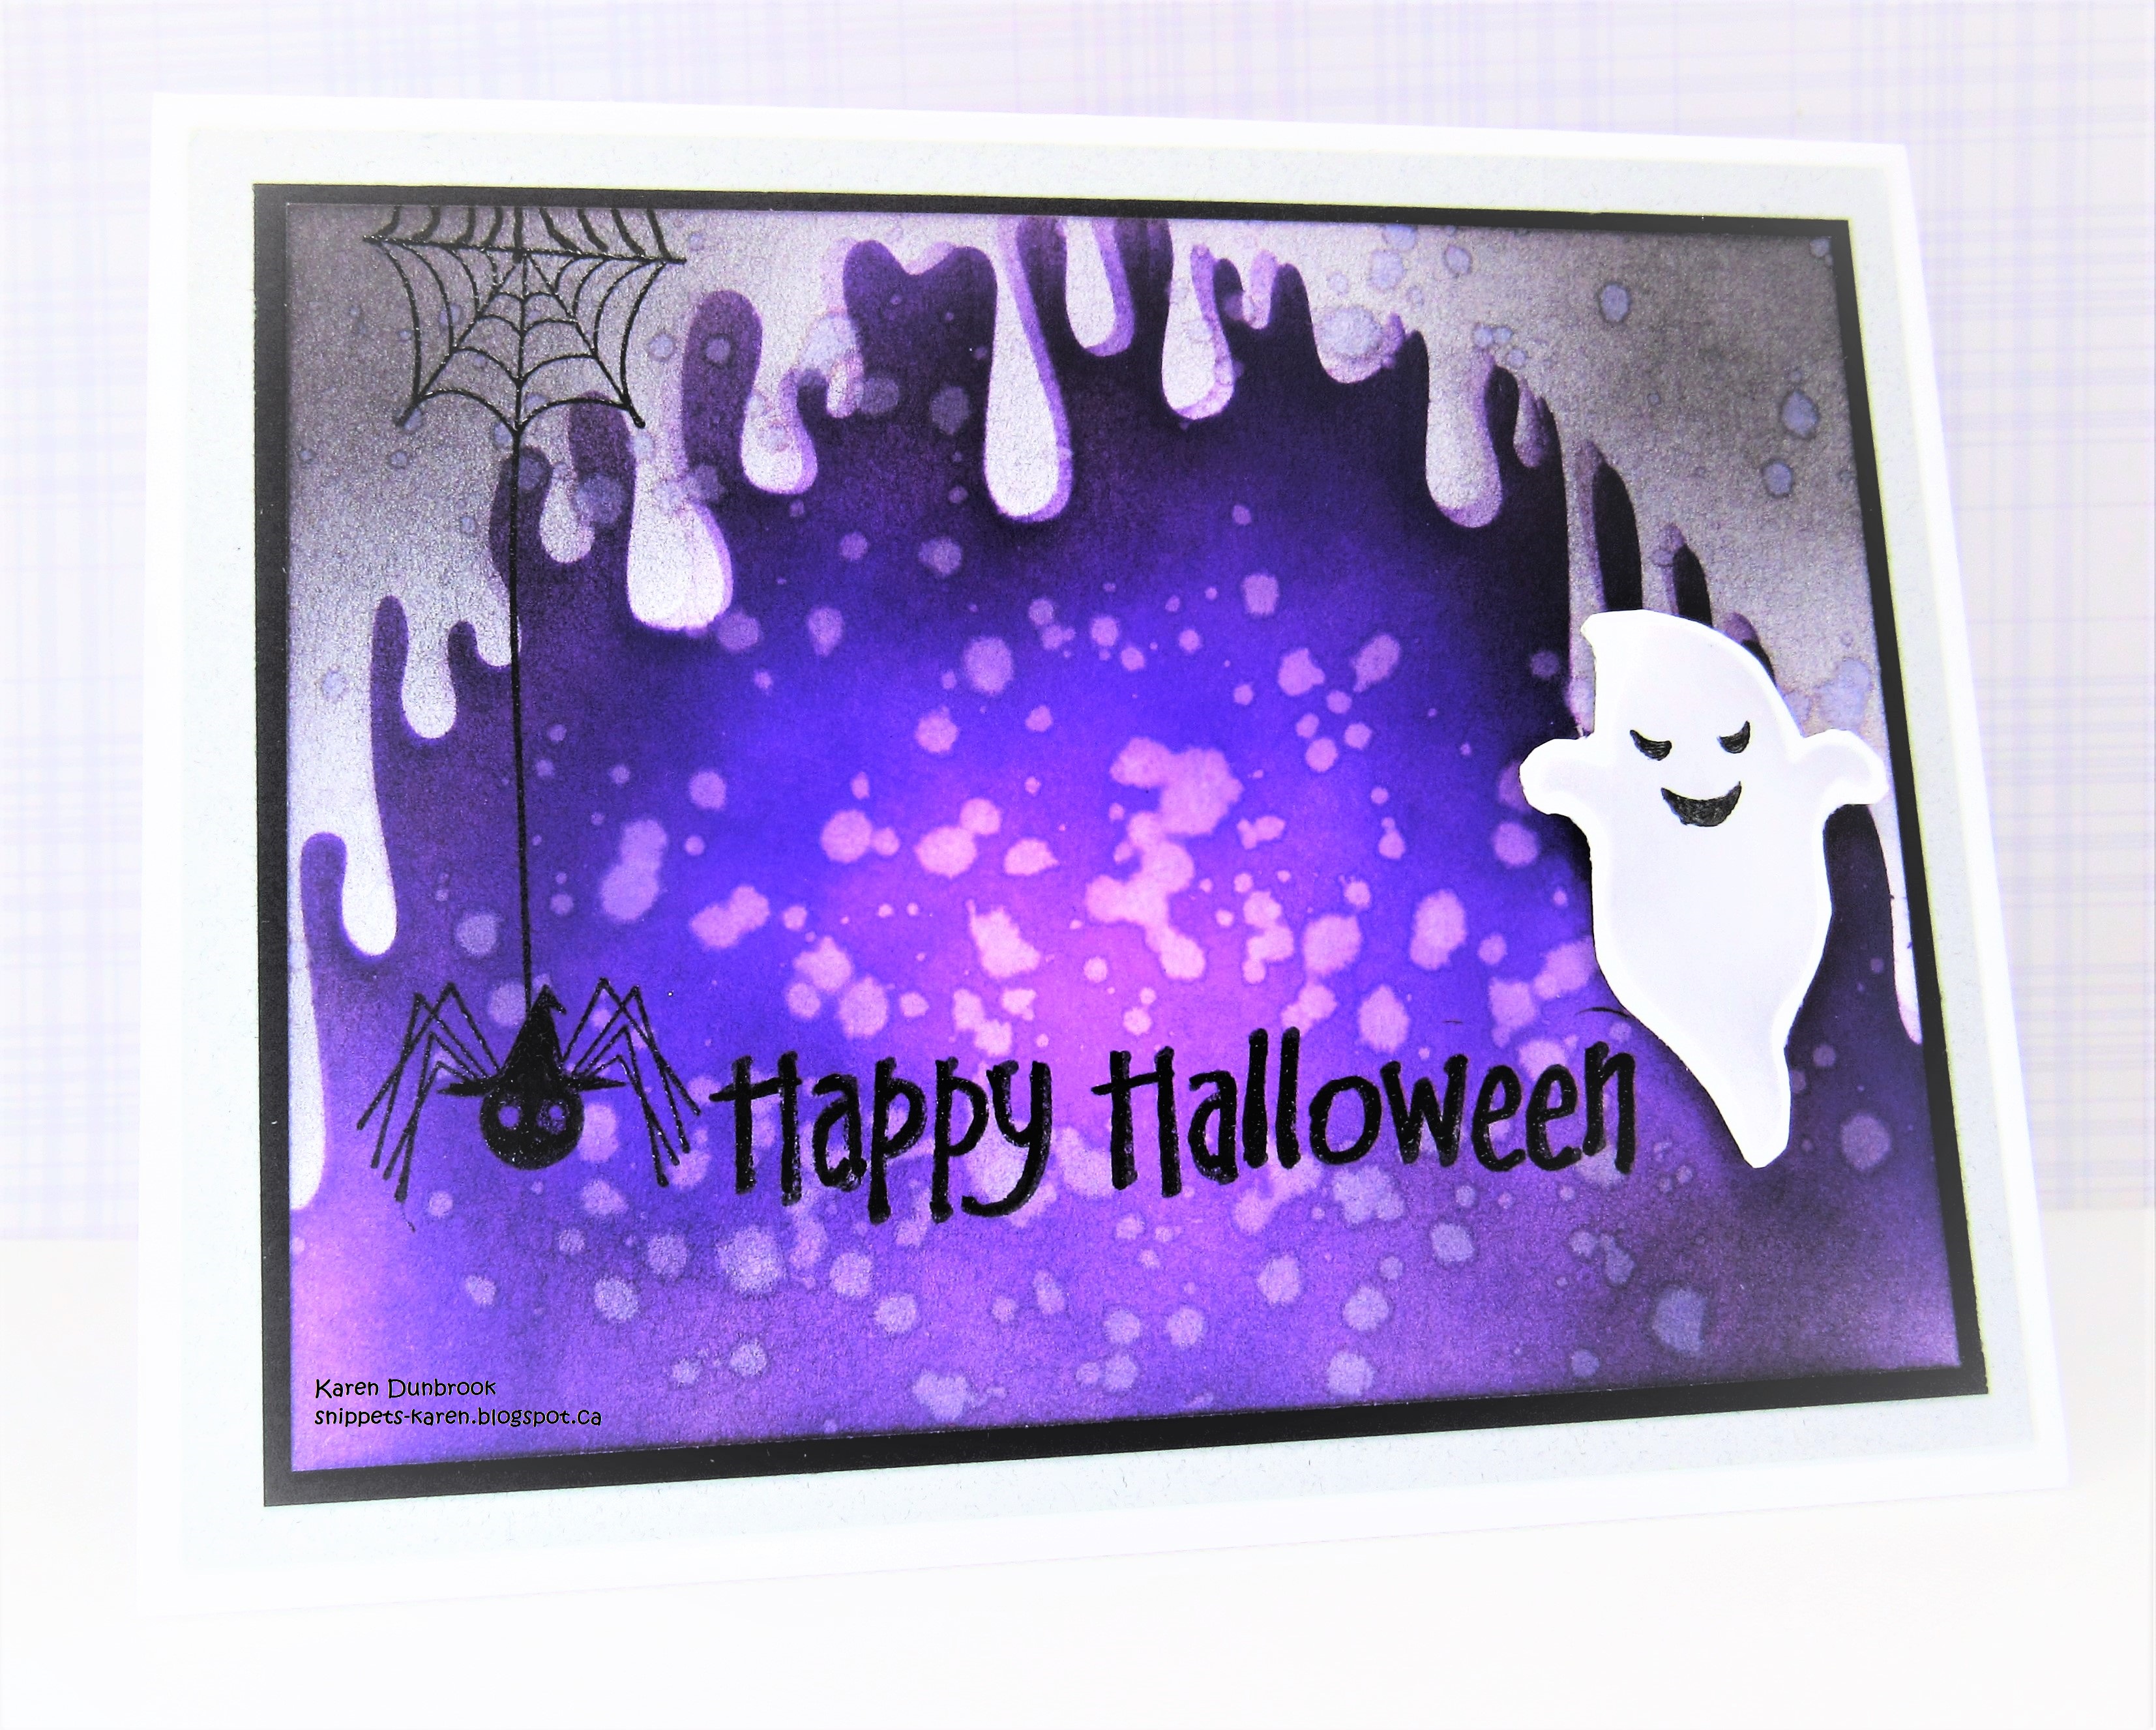
This bright and vibrant card was created using my Salad Spinner technique.
So fun and very easy to do.

To see the short video I did go here:

So, here's what I did to create my card.
  • First I got out my salad spinner....an inexpensive one found at the Dollar Store and then I cut a piece of Yupo paper.
  • I placed the Yupo into my salad spinner and dropped in some blue Alcohol ink and some Rubbing Alcohol, put the lid on and spun away.
  • I opened the salad spinner and repeated that process using some purple Alcohol ink.
  • I splattered with my white Posca pen and set aside to dry.
  • I die cut the 'HELLO' sentiment from white cardstock and used some Peacock Feathers, Uncharted Mariner and some Shaded Lilac Distress Oxide ink to add the same colours as the background.  I die cut a piece of vellum to use as the shadow and glued that together with the sentiment. 
  • I glued the panel onto an A2 sized card base and popped the sentiment across the front on an angle.

Thanks so much for coming by and taking a look.

Adding my card to these challenges:
Simon Says Wed.- ANYTHING GOES
The Crafty Addicts- ANYTHING GOES
Make My Monday- CREATE YOUR OWN BKG

Supplies
Stamps- none
Inks- AI (Ranger); DOX
Paper- Yupo, white paper scraps, vellum
Accessories and Tools- salad spinner; white Posca pen, 
Hello Word die and Shadow (Whimsy Stamps)

Thursday 28 September 2023

BOO!


Welcome!
Meet today's card using a stencil from A Colorful Life Designs called
A fun one for sure.

So, here's what I did to create my card.
  • I placed a piece of white cardstock onto my Make Art Station and placed stencil #1 (body) from the Layered Monsters and inked them up with some Villainous Potion Distress Oxide ink.
  • After they were all inked, I removed that stencil and placed stencil #2 (face features) into position and inked those up with some Black Soot DOX ink.
  • Next, using the eraser on the end of my pencil, I stamped the little black circles into the white spaces between the little monsters to add more interest.
  • I splattered with my Black Posca pen over the whole panel.
  • Using my white Posca pen, I gave all the eyes a spot of white.
  • I die cut the 'BOO' letters from the stenciled panel and gave the edges some inking with more of the Black Soot to help them stand out a bit.
  • I cut the letters again with some white cardstock, stacked and glued them all together so they would pop on my card front.
  • I glued the panel onto a piece of black, then purple cardstock, then onto an A2 sized card base.
  • Finally, I positioned and glued the letters back into place on the front of the panel for an 'eclipse style' card.

Here is the stencil I used:

Discount Code for A Colorful Life Designs
(Affiliate with no extra cost to you) 

Thanks so much for coming by and taking a look.

Adding my card to these challenges:
Simon Says Wed.- ANYTHING GOES
Make My Monday- CREATE YOUR OWN BKG
Little Red Wagon- LAYER UPON LAYER

Supplies
Stamps- none
Inks- DOX
Paper- heavy white (Scribes Nook- Waterloo, Ont.)
Accessories and Tools- stencil (A Colorful Life Designs); TE Blending Brushes;
black and white Posca pen; Alphabet letters (Scrapbook.com)

Friday 22 September 2023

Spooky Nights


Hello and Welcome
This month at A Colorful Life Designs, we are showing some Halloween fun stencils.
New for this month is the Interactive Drippy Ghosts stencil.
I paired it up with some older released stencils for my spooky card.  

So, here's what I did to create my card.
  • I cut a piece of white cardstock and placed it onto my Make Art Station.  I placed the Pumpkin Patch stencil along the bottom of my panel and then inked with some Ripe Persimmon Distress Oxide ink.
  • I removed that stencil and placed the large Fancy Web stencil over the background and inked with Black Soot DOX ink.  I splattered with water to lift some of the colour and set aside to dry.
  • While that dried, I stenciled one of the little ghosts from the Drippy Ghosts stencil wish a bit of Weathered Wood DOX ink and fussy cut it out.
  • Next, I stamped the spider and the sentiment using my Misti.
  • I added a bit more of the Black Soot DOX ink along the edges to give a more 'spooky' look.
  • I glued the stenciled panel onto a piece of black cardstock and then onto an A2 sized card base.
  • Lastly, I used some foam tape to pop up the little ghost over to the side.

Here are the stencils I used:


Discount Code for A Colorful Life Designs
(Affiliate with no extra cost to you) 

Thanks so much for taking a look.

Adding my card to these challenges:
The Crafty Addicts- ANYTHING GOES
Crafty Gals- SIGNS OF FALL

Supplies
Stamps- Halloween (Craft Smart), Halloween Spider (Recollections)
Inks- DOX, Versafine Clair
Paper- heavy white (Scribes Nook- Waterloo, Ont.)
Accessories and Tools- stencils (A Colorful Life Designs); Make Art Station (Ranger);
TE Blending Brushes

Thursday 21 September 2023

Let's Gather Leaves


Good Morning and Welcome
The new releases for September are great at A Colorful Life Designs.  
The one I used on this card is called

So, here's what I did to create my card.
  • I cut a piece of white cardstock and placed it onto my Make Art Station.  The Layered Fall Foliage is a 2- part stencil but I just used stencil #1 for my card.
  • I inked up the stencil with some Fossilized Amber and some Ripe Persimmon.  
  • I wanted to add some different looking interest to my card, so I looked through my other stencils from older releases and got out the Stained Glass stencil.  
  • Leaving the leaf stencil in place, I put the Stained Glass right over the top and inked that up with some Lumberjack Plaid DOX ink.  It gave some really unusual interest to the leaves.
  • I removed the stencils, added a bit of the red ink along the card edges and then splattered with my white Posca pen.
  • I placed the stenciled panel into my Misti to stamp the sentiment.
  • I glued the finished piece onto some red cardstock, then onto an A2 sized white card base.
  • Finally, I cut 2 red strips of paper, glued them to the side and added 3 black gems around the sentiment.   

Here are the stencils I used:


Discount Code for A Colorful Life Designs
(Affiliate with no extra cost to you) 

Thanks so much for coming by and taking a look.

Supplies
Stamp- Gather (Impression Obsession)
Inks- Versafine Clair; DOX
Paper- heavy white (Scribes Nook- Waterloo, Ont.)
Accessories and Tools- stencils (A Colorful Life Designs); white Posca pen;
Make Art Station (Ranger); Misti (My Sweet Petunia); black gems

Tuesday 19 September 2023

Flurries


Hello and Welcome
As most of us don't want to think about snow flurries (me included!!) I really want to get some of my holiday cards done and set aside before the rush is on.
So, how about some mid-month inspiration and a sale with this new released stencil called 
Classic Snowflake from A Colorful Life Designs.

So, here's what I did to create my card.
  • I thought I would try this cute Classic Snowflake stencil out on my Gel Plate, so I got that out and set it up.
  • I pressed some Tumbled Glass Distress Oxide ink onto the plate by pressing the pad right onto it.  I used a brayer to roll it all smooth.
  • I placed the stencil onto my Gel Plate, then using a piece of white cardstock I rubbed over the plate to print the darkest blue snowflakes you see in my card first.
  • I carefully lifted the stencil off and rubbed the cardstock over the plate again, giving me the lighter white snowflakes in the background.  
  • I splattered with my white Posca pen and used the pen to also add a white dot to the center of all the darker snowflakes.
  • When it was all dry, I used a Braided Oval die to cut the oval from the center.  I placed that piece into my Misti to stamp the sentiment and clear heat embossed it.
  • I glued the stenciled piece onto an A2 sized card base, used some foam tape to pop up the oval back into place and then finally added 5 silver gems under the sentiment.

Here is the stencil I used:
(on sale right now)

Discount Code for A Colorful Life Designs
(Affiliate with no extra cost to you) 

Thanks so much for coming by and taking a look.

Adding my card to these challenges:
Simon Says Monday- WHAT'S YOUR FAV COLOUR?
Stamp & Fun=Creativity- ANYTHING GOES
Peace on Earth- INSPIRATION BOARD

Supplies
Stamp- Christmas Cheer (Technique Tues.- retired)
Inks- Versafine Clair; DOX
Paper- heavy white (Scribes Nook- Waterloo, Ont.)
Accessories and Tools- stencil (A Colorful Life Designs); Gel Plate; Speedball Brayer; 
Braided Oval die (Pinkfresh Studio); clear eb powder; silver gems

Monday 18 September 2023

Spooky Halloween


Welcome
I created another Halloween card using 2 new fun stencils from A Colorful Life Designs called

So, here's what I did to create my card.
  • I took a piece of white cardstock and placed the Drippy Arch stencil over it on my Make Art Station. Using some Villainous Potion Distress Oxide ink, I inked up the whole panel.
  • This stencil has 2 parts, a stencil and a mask so I masked the bottom purple area and then went over the top area that was still white with some Weathered Wood DOX ink.
  • I shifted the stencil slightly and added just a hint of the purple along the edges to give a shadow effect.
  • Next, using some Black Soot DOX ink, I inked around all the edges just to add to the effect.
  • I splattered is all with water to lift some of the colour and set aside to dry.
  • While that dried, I stenciled one of the cute little ghost from the Drippy Ghosts set with some Weathered Wood and fussy cut it out.
  • I stamped the little spider and the sentiment and then glued it onto a piece of black cardstock, then onto an A2 sized card base.
  • I used some foam tape to pop the little ghost to the side.

Here are the stencils I used:

Interactive Drippy Ghosts 

Discount Code for A Colorful Life Designs
(Affiliate with no extra cost to you) 

Thanks so much for coming by and taking a look.

Adding my card to these challenges:
Two Old Bats Halloween- ANYTHING HALLOWEEN
Simon Says Wed.- MAKE IT CUTE
2 Sisters on the Blog- AUTUMN or THANKSGIVING

Supplies
Stamps- Halloween (Studio G), Halloween Spider (Recollections)
Inks- DOX; Versafine Clair
Paper- heavy white (Scribes Nook- Waterloo, Ont.)
Accessories and Tools- stencils (A Colorful Life Designs); Make Art Station (Ranger)

Sunday 17 September 2023

Peeking Pumpkin


Welcome
Today's card features the new for September stencil called
from A Colorful Life Designs. A cute one for sure.
I paired it up with an older stencil release called Mid Century Shadow. They worked perfectly together.

So, here's what I did to create my card.
  • I placed a piece of white cardstock onto my Make Art Station, then placed the Mid Century Shadow stencil down and inked that up with some Carved Pumpkin and Ripe Persimmon Distress Oxide ink. 
  • Leaving that stencil in place, I inked up the Happy Pumpkin right over that with some Black Soot Distress Oxide ink.
  • I removed the pumpkin, but left the Mid Century stencil in place and I added a bit of shadowing with more of the Black Soot.
  • I stamped the sentiment, then glued the panel onto a piece of black cardstock, then onto an A2 sized card base.
  • I added 2 black gems on either side of the sentiment.

Here are the stencils I used:


Discount Code for A Colorful Life Designs
(Affiliate with no extra cost to you) 

Thanks so much for coming by and taking a look.

Adding my card to these challenges:
Simon Says WED.- MAKE IT CUTE
Colorful Options- OUTRAGEOUS ORANGE
Two Old Bats Halloween- ANYTHING HALLOWEEN

Supplies
Stamp- Happy Halloween (Studio G)
Inks- DOX; Versafine Clair
Paper- heavy white (Scribes Nook- Waterloo, Ont.)
Accessories and Tools- stencils (A Colorful Life Designs), Make Art Station (Ranger);
TE Blending Brushes

Saturday 16 September 2023

Artichoke Rose


Welcome
Today's card is featuring 2 new stencils for September called

So, here's what I did to create my card. 
  • I cut a piece of white cardstock and place it onto my Make Art Station. 
  • I positioned the Artichoke Rose stencil over my cardstock and inked it up.  I started at the center of the flower with some Cracked Pistachio, then moved outwards with some Worn Lipstick, Shaded Lilac and finally some Villainous Potion Distress Oxide ink along the outer edges.
  • I splattered with my white Posca pen and set aside to dry.
  • I cut another piece of white cardstock, placed it onto my Make Art Station and inked up the top portion using the Lined Leaves stencil with some Worn Lipstick DOX ink.
  • Next, I fussy cut out the Rose and glued it over the stenciled background.
  • I glued the finished panel onto a piece of purple cardstock, then onto an A2 sized card base.
  • I stamped and die cut the sentiment and used some foam tape and placed it at the top of the flower.

Here are the stencils I used:


Discount Code for A Colorful Life Designs
(Affiliate with no extra cost to you) 

Thanks so much for coming by and taking a look.

Adding my card to these challenges:
Addicted to Stamping- ANY OCCASION
The Crafty Addicts- ANYTHING GOES
Tic Tac Toe- SEE BOARD (stencil, free, foliage)

Supplies
Stamps- Big and Bold Sentiments (SSS)
Inks- DOX
Paper- heavy white (Scribes Nook)
Accessories and Tools- stencil (A Colorful Life Designs); TE Blending Brushes;
Make Art Station (Ranger); white Posca pen

Friday 15 September 2023

For Your Birthday


Welcome
Today's card features the new for September stencil from A Colorful Life Designs called
A great one for this time of year.

So, here's what I did to create my card.
  • I found a piece of cardstock that I had rolled ink onto with my brayer while Gel Plate printing.  I thought the yellow would work well for the background.
  • I put that inked up piece onto my Make Art Station, placed stencil #1 from the Layered Fall Foliage onto my cardstock and inked it up with some Carved Pumpkin and some Ripe Persimmon Distress Oxide ink.
  • I removed that stencil and placed stencil #2 (leaf details) into place and inked it up with some Lumberjack Plaid Distress Oxide ink.
  • I removed the stencil and then used my white Posca pen to add the dots.
  • When it was all dry, I placed it into my Misti to stamp the sentiment and clear heat embossed it.
  • To add more definition to the main panel, I drew a red line around the edge using a Tombow marker and a ruler.
  • When it was all dry, I glued it onto a piece of red cardstock, then onto an A2 sized card base.
  • Finally to finish off my card, I added 3 black gems around the sentiment.

Here is the stencil I used:

Discount Code for A Colorful Life Designs
(Affiliate with no extra cost to you) 

Thanks so much for coming by and taking a look.

Adding my card to these challenges:
Cardz 4 Galz- LEAVES
Seize the Birthday- USE FALL COLORS

Supplies
Stamp- Birthday Blessings (IO)
Inks- Versafine Clair, DOX; Tombow Marker
Paper- heavy white (Scribes Nook- Waterloo, Ont.)
Accessories and Tools- stencils (A Colorful Life Designs); Make Art Station (Ranger);
white Posca pen; Misti (My Sweet Petunia); black gems; 
clear eb powder; TE Blending Brushes

Monday 11 September 2023

Lined Leaves

Good Morning
Today's card is in honour of those lost in the 911 tragedy.
I'm using a new stencil from A Colorful Life Designs called

So, here's what I did to create my card.
  • I began by embossing my white cardstock with the Angled Mosaic Embossing folder, then I placed it onto my Make Art Station and placed the Lined Leaves stencil over that.
  • I inked over the whole stencil with some Bundled Sage Distress Oxide ink.  I wanted to add a bit of shadow and add to the interest of the background, so I shifted the stencil slightly and inked over it again but this time with some Weathered Wood DOX ink.
  • I removed the stencil and splattered with my white Posca pen.
  • While that dried, I stamped the sentiment and then die cut it out.
  • I glued the dried panel onto a piece of black cardstock, then onto an A2 sized card base.
  • I used some foam tape to pop the sentiment up over the background.

Here is the stencil I used:

Discount Code for A Colorful Life Designs
(Affiliate with no extra cost to you) 

Thanks so very much for coming by and taking a look.

Adding my card to these challenges:
Crafting Happiness- ANYTHING GOES

Supplies
Stamp- Big and Bold Sentiments (SSS)
Inks- DOX
Paper- heavy white (Scribes Nook- Waterloo, Ont.)
Accessories and Tools- stencil (A Colorful Life Designs); Make Art Station (Ranger);
TE Blending Brushes; white Posca pen; Angled Mosaic EB folder (Altenew)

Sunday 10 September 2023

Bike Ride


Hello
Meet today's card featuring the new Lined Leaves stencil from A Colorful Life Designs.
I used some stamping foam with my stencil to create the fun background.

So, here's what I did to create my card.
  • I got out my Simon Hurley Stamping Foam and heated it up until it was all smooth.
  • I pressed it onto the Lined Leaves stencil to transfer the pattern onto the foam.  It's so fun to use!
  • I inked up the foam with some Cracked Pistachio, gave a spritz of water and pressed it onto my white cardstock.  It left a lovely impression of the leaves.
  • I placed the panel into my Misti to stamp the Bicycle, then clear heat embossed it.
  • I added some white features to the bike using my Posca pen.
  • I glued the finished piece onto some matching green cardstock, then onto an A2 sized card base.

Here is the stencil I used:

Discount Code for A Colorful Life Designs
(Affiliate with no extra cost to you) 

Thanks so much for coming by and taking a look.

Adding my card to these challenges:
Simon Says Wed.- STAMP IT
Simon Says Mon.- STAMP IT
Stamping Sensations- Garden Delights

Supplies
Stamp- Bicycle and Flowers (Dollar Tree)
Inks- Versafine Clair, DOX
Paper- heavy white (Scribes Nook- Waterloo, Ont.)
Accessories and Tools- stencil (A Colorful Life Designs); Misti (My Sweet Petunia); 
clear eb powder; heat tool; white Posca pen; Stamping Foam (Simon Hurley)

Saturday 9 September 2023

Lots of Candy Corn


Welcome
Today's fun card was created using 2 new stencil releases for September from A Colorful Life Designs called

So, here's what I did to create my card.
  • I placed a piece of white cardstock onto my Make Art Station and placed stencil #1 from the Layered Candy Corn stencil and inked that up with some Fossilized Amber Distress Oxide ink.
  • I removed that stencil and continued with Stencil #2 and 3 using some Ripe Persimmon and some Fossilized Amber DOX ink.
  • After the whole panel was stenciled, I die cut it using a Layered Chevron die and set aside.
  • Next, I stenciled one of the pumpkins from the Lots of Pumpkins stencil with some Ripe Persimmon Distress Oxide ink and added a hint of Black Soot DOX ink just to add some shading. This stencil has such a great variety of images to choose from.  I fussy cut that out and set aside.
  • I figured out how much space I needed for my little pumpkin on the largest piece of my background, then stamped the sentiment so it would be under the pumpkin.
  • I glued the stenciled panel onto a piece of cardstock, offsetting the chevrons a bit, then glued all that onto an A2 sized card base.
  • I used some foam tape to pop the pumpkin at the top over the sentiment.

Here are the stencils I used:


Discount Code for A Colorful Life Designs
(Affiliate with no extra cost to you) 

Thanks so much for coming by and taking a look.

Adding my card to these challenges:
As You Like It- AUTUMN or WINTER AND WHY?
(Autumn....the leaves changing colours, the cooler temps.)
Allsorts- ANYTHING GOES/or/ USE DIE CUTS
Send a Smile 4 Kids- CUTE FALL/HALLOWEEN CARDS 4 KIDS
Two Old Bats Halloween- ANYTHING HALLOWEEN

Supplies
Stamp- Happy Halloween (Craft Smart)
Inks- DOX, Versafine Clair
Paper- heavy white (Scribes Nook, Waterloo, Ont.)
Accessories and Tools- stencil (A Colorful Life Designs); Make Art Station (Ranger); 
Layered Chevrons die (Paper Rose)