Showing posts with label alcohol inks. Show all posts

Friday, 29 September 2023

A Big Hello


HELLO!
This bright and vibrant card was created using my Salad Spinner technique.
So fun and very easy to do.

To see the short video I did go here:

So, here's what I did to create my card.
  • First I got out my salad spinner....an inexpensive one found at the Dollar Store and then I cut a piece of Yupo paper.
  • I placed the Yupo into my salad spinner and dropped in some blue Alcohol ink and some Rubbing Alcohol, put the lid on and spun away.
  • I opened the salad spinner and repeated that process using some purple Alcohol ink.
  • I splattered with my white Posca pen and set aside to dry.
  • I die cut the 'HELLO' sentiment from white cardstock and used some Peacock Feathers, Uncharted Mariner and some Shaded Lilac Distress Oxide ink to add the same colours as the background.  I die cut a piece of vellum to use as the shadow and glued that together with the sentiment. 
  • I glued the panel onto an A2 sized card base and popped the sentiment across the front on an angle.

Thanks so much for coming by and taking a look.

Adding my card to these challenges:
Simon Says Wed.- ANYTHING GOES
The Crafty Addicts- ANYTHING GOES
Make My Monday- CREATE YOUR OWN BKG

Supplies
Stamps- none
Inks- AI (Ranger); DOX
Paper- Yupo, white paper scraps, vellum
Accessories and Tools- salad spinner; white Posca pen, 
Hello Word die and Shadow (Whimsy Stamps)

Wednesday, 9 March 2022

Happy Thoughts


Welcome
Meet today's card.
I got out my salad spinner again to create my card.
For anyone that may have missed my little video using the salad spinner and Alcohol inks, please check it out.


So here's what I did to create my card.
  • I began by getting out my salad spinner, an inexpensive one that I got at the Dollar Store.  It must be a dedicated spinner and not ok for food after using it with inks.
  • I cut a piece of Yupo paper and placed it into the bottom of my spinner.  I dropped in some Ranger Alcohol inks....green and a hint of blue (sorry I didn't write down the colours I used).... then sprayed in some Rubbing Alcohol to help the inks move.  I placed the lid onto the spinner and then spun away.  DO NOT SPRAY BLENDING SOLUTION, you can drip it in to help get the inks moving as well.  
  • I repeated that process to fill my whole piece of Yupo with ink.
  • When the panel was dry which took almost no time at all, I splattered with my black Posca pen and set aside.
  • I stamped the sentiment in my Misti and used a hexagon die to cut it out.  I cut a piece of green cardstock as well and glued them together.
  • When the inked piece was dry, I used a larger hexagon die to add an impression around the area that I was going to add the sentiment. It gave a framed look without cutting into the Yupo.  (I did cut a hexagon from the Yupo right where my sentiment is, but changed my mind and left it off.)
  • I glued the panel onto some white cardstock, then onto a piece of green cardstock and finally onto a white card base.
  • I pop dot mounted the sentiment over the front of my card and added 3 silver gems under the sentiment.  

Thanks so much for coming by and taking a look.

Adding my card to these challenges:
Simon Says Wed.- ADD A DIE CUT
Get Creative- USE GREEN
Simon Says Mon.- USE GREEN

Supplies
Stamps- Hexagon Greetings (SSS)
Inks- Ranger Alcohol ink; Versafine Clair
Paper- Yupo (Amazon); heavy white (Scribes Nook- Waterloo, Ont.)
Accessories and Tools- salad spinner (Dollar Store); Hexagon Infinity dies (Hero Arts);
silver gems; black Posca pen; Misti (My Sweet Petunia); foam tape

Wednesday, 29 December 2021

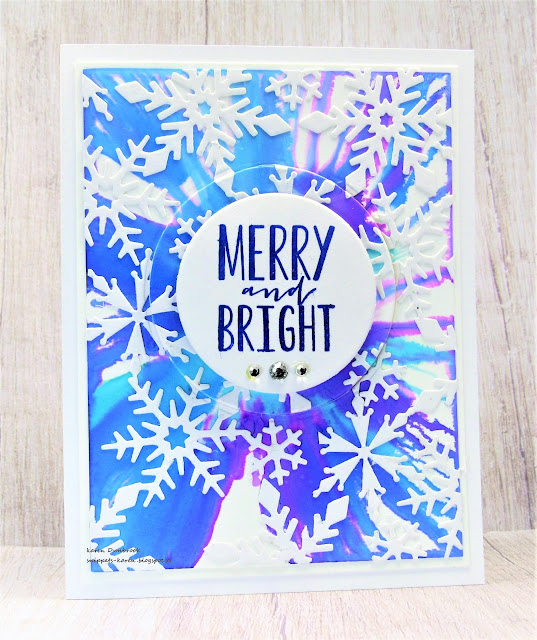
Merry and Bright


Hello and Welcome
Posting a few last minute cards.  
I ran out of time after being so busy with my daycare kids and having the stomach flu.  

So here's what I did to create my card.
  • I pulled out a piece of Yupo paper, my salad spinner and some Alcohol inks.  **For any of you that missed my 'Salad Spinner Alcohol inks' video, you can see it HERE.
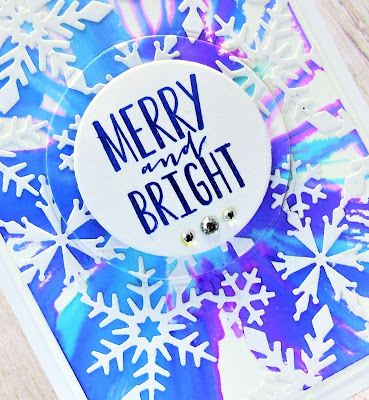
  • After creating my background with the Alcohol inks, I glued on the snowflakes that I had die cut from the Blizzard Corner with some white cardstock. It cuts a corner but I altered it to fit cover the panel.
  • When I was happy with the design, I die cut a circle from the center and set it aside.
  • I glued the AI inked panel onto a heavy white card base, then pop dotted the circle back into place, matching up the snowflakes.
  • I cut another circle from some white cardstock, smaller then the first one, stamped the sentiment onto that, then glued them together.
  • I added 3 silver gems under the sentiment. 


Thanks so much for coming by and taking a look.

Supplies
Stamps- Tis the Season (PTI)
Inks- Ranger Alcohol Inks; Versafine Clair
Paper- Yupo; heavy white: Scribes Nook- Waterloo, Ont.
Accessories and Tools- Salad Spinner; rubbing alcohol, Blizzard Corner (Poppy Stamps);
Infinity Circle die (HA)

Saturday, 15 May 2021

Special Thanks


Good Morning
I needed a special thank-you card for one of my daycare families that so graciously gifted me with a gift certificate for Mother's Day...so appreciated.
So, I'm back again with another SALAD SPINNER card.  
Honestly, it is so fun and easy to do and quite addictive.
To see my previous card, look here.

So here's what I did to create my card.
  • I began by cutting a piece of Yupo paper.  For those who are not familiar with Yupo, it is a plastic coated paper and is used with Alcohol inks.
  • I placed the Yupo into my salad spinner and dropped some Alcohol inks onto the paper.  I added some blending Solution to help the colours move.

  • I placed the lid securely onto my salad spinner and spun away.  If you aren't getting the coverage you want, just add more inks, Blending Solution or some Rubbing Alcohol
  • Ok...now the fun part, open the lid to see what you have got.
  • I let the piece dry and in the meantime, I die-cut the 'thanks' 4 times.  I inked one of them with my Distress Oxide inks (Tumbled Glass, Salty Ocean) and then glued them all together.
  • By now the piece was dry so I splattered with my white Posca pen to help add more interest. 
  • I glued the inked panel onto a piece of blue then onto a white card base.  I glued the 'thanks' in the center and added the little pearls.
**If you want to clean your salad spinner when finished, I just used more Rubbing Alcohol, then rinsed it out with some soap and water.**


Thanks so much for coming by and taking a look.

Supplies
Stamps- none
Inks- Ranger AI, Distress Oxides
Paper- Yupo; white cardstock (Scribes Nook- Waterloo, Ontario)
Accessories and Tools- Ranger Blending Solution, Rubbing Alcohol, Thanks die (MFT)
Rubbing Alcohol, salad spinner, Spellbinder Platinum, white Posca pen, pearls

Wednesday, 5 May 2021

Good Vibes


Welcome
Meet today's card and you will never believe what I used to create it.  
A SALAD SPINNER!!
Yes, you heard me right.  


So here's what I did to create my fun card.
  • I began by cutting a piece of Yupo paper 3 3/4 x 5 and got out the salad spinner.  *I bought mine at the Dollar Store.  You could also find them at the Second Hand stores too but I couldn't find one that didn't have a post in the center of it *
  • I laid my Yupo paper into the spinner and then dropped on some Ranger Alcohol inks.  

  • I squeezed on some Blending Solution, placed on the lid and spun away.  If you aren't getting a good blend, just add more AI's or even some Rubbing Alcohol and spin again.  That's the fun of this technique.  When I lifted off the lid, here's what I was left with.  Isn't it pretty?

  • I removed the paper from the spinner and when it was totally dry, I die-cut the word 'friend' from it and set it aside.
  • I die-cut the 'friend' 3 more times from white cardstock, then glued them all together. 
  • I glued the inked panel onto a heavy white card base, then I fitted and glued the sentiment back into the background.  
  • Using my black and white Posca pens, I splattered the card front to add some interest.
  • I place a thin strip of scrap paper into my Misti, and stamped the little sentiment.  I pop dotted that just under the sentiment.  
  • I added three black gems to finish it all off.


Thanks so much for coming by and taking a look.
I hope you get a chance to try it out.

Supplies
Stamps- Tiny Words (Simon Says)
Ink- Ranger Alcohol inks, Versafine
Paper- Yupo, heavy white (Scribes Nook)
Accessories and Tools- salad spinner, Ranger Blending Solution, pop dots, black gems,
Friend die (??); Posca pens, Misti (My Sweet Petunia)

Sunday, 31 January 2021

Special Thanks


Good Morning!
I'm back today with a thank-you card I made using the side fold card design that I really like.
It makes for a change and creates a very sturdy card.  

So here's what I did to create my card.
  • I began by going through my stash.  As I have mentioned in some of my previous posts, I really need to use some of the backgrounds that I have created that are just sitting in a bin.  I found this one I had done with Alcohol inks and Rubbing Alcohol and I was ready to make something with it.
  • Next, I put together my card base to create the side fold card.  To do that please see my instructions HERE.
  • I cut the Alcohol inked piece into a square, glued that onto a piece of navy cardstock, then onto the main card front.  I repeated that process with the small side piece.
  • I die cut the Geometric Cutout 1 from Impression Obsession with some white cardstock.  It cuts the pattern into the paper, then I used a circle die to cut it round and then placed it into my Misti.
  • I stamped one of the shapes from the Hero Arts set called Tie Dye right over the center of the die cut using some coordinating Distress Oxide inks.  
  • I stamped the 'Thanks' from the same set onto some white cardstock and pop dotted that over the center of the circle.
  • To finish off my card, I pop dotted the finished die cut over the inked background.


Thanks so much for coming by and taking a look.

Adding my card to these challenges:
Simon Says Wed.- ANYTHING GOES
The Creative Crafters- ANYTHING GOES
The Sisterhood of Crafters- CREATE YOUR BACKGROUND


Supplies
Stamps- Tie Dye (HA)
Inks- DOX; Alcohol Inks (Ranger); Versafine Clair
Paper- heavy white (Scribes Nook...my local store); Yupo paper
Accessories and Tools- Misti (My Sweet Petunia); Geometric Cutout die (IO); pop dots;
rubbing alcohol (99%); circle die (Spellbinders)


Friday, 28 August 2020

For You

 Good Morning Friends
I hope you are all doing well out there.
I am back to work this week....a first since the middle of March.  
I made this background weeks ago and finally got around to making a card using it inspired by a sketch challenge over at Splitcoast Stampers.


So here's what I did for creating my card.
  • I began with a piece of Yupo paper (yupo is a plastic coated paper and great for alcohol inks)
  • I dropped some blue Ranger Alcohol ink onto the Yupo starting right at the center of my panel.
  • I dropped some Rubbing Alcohol onto the drop of AI then using my small blower, I blew the inks outwards from the middle.  This is what my blower looks like:


  • I repeated that process using some purple Alcohol inks and more Rubbing Alcohol. 
  • I cut the panel down to fit onto my card base and glued it all in place. 
  • Using the Zinnia flower stencil from A Colorful Life Designs, I stenciled the smallest flower using Salty Ocean and Seedless Preserves Distress Oxides onto a piece of white card and die cut it into a circle. I splattered the flower with water to lift some of the ink and when dry, I traced around the flower using a fine line pen. 
  • I stamped the sentiment from Your Next Stamp and then clear heat embossed it.
  • I glued on the sentiment, then pop dotted the flower over to the side.
  • I added a black gem to the flower center.


Thanks so much for coming by and taking a look.

Discount Code for A Colorful Life Designs

Adding my card to these challenges:
Simon Says Wed.- ANYTHING GOES
Cardz 4 Galz- JUST SAYING HELLO


Supplies
Stamps- Everyday Sentiments (YNS)
Inks- DOX, Versafine Clair, Ranger Alcohol ink
Paper- Yupo, heavy white (Scribes Nook)
Accessories and Tools- World's Smallest Blower; Rubbing Alcohol; clear eb powder;
Zinnia Stencil (A Colorful Life Designs); black gem; inking foam, black Signa Pen

Saturday, 1 August 2020

Abstract Poinsettia


Good Morning
Meet today's card.
After seeing some flowers created using Alcohol inks, I decided to try it out and make an abstract poinsettia.  It was fun to do and by adding the silver, it really helped to elevate the look.

So here's what I did to create my card.
  • I began with a piece of Yupo paper.  For those of you that are unfamiliar with Yupo, it is a synthetic, plastic paper that is used when working with AI.  The inks will move so easily on the slippery surface.
  • I picked out my red AI inks and dropped them in the center of my card panel.  Using my little blower and some Rubbing Alcohol, I blew the inks outwards to the edges of my card, repeating that process and turning the paper until the panel was covered.  *My blower is called the World's Smallest Blower and is meant to clean keyboards etc.  It looks like a small leaf blower and plugs in.  I found it on Amazon and have found it easier to use then the bulb style blowers when working with AI inks*
  • When I was happy with the coverage, I dropped some black AI into the center and added a few drops of Rubbing Alcohol.  That created what I thought looked like a flower center.
  • Some areas of the panel felt sticky from the areas where the AI was thicker, so I rubbed some silver foil over those areas to add some sparkle.
  • I die-cut the center of the flower using a circle die, then pop dotted it back into place to add interest.
  • I placed the piece into my Misti and stamped the sentiment.
  • I mounted the panel onto a heavy white card base


Thanks so much for coming by and taking a look.

Adding my card to these challenges:
Simon Says Wed.- ANYTHING GOES
Little Red Wagon- GIVE US YOUR BKG
Fab 'n' Funky- CHRISTMAS


Supplies
Stamps- Peace, Love, Joy (Right at Home)
Inks- Versafine Clair
Paper- Yupo; heavy white (Scribes Nook)
Accessories and Tools- World's Smallest Blower; Rubbing Alcohol; Misti (My Sweet Petunia);
Siver Deco Foil, bone folder

Saturday, 30 May 2020

Transformation


Welcome
Meet today's card.
I've been playing with some Alcohol inks and the Alcohol Lifting re-inker fluid to see what I could come up with. 

So here's what I did to create my card.
I began with a piece of Yupo paper.  Yupo has a plastic type coating on it and works well when using Alcohol Inks and Blending solutions.  The only problem with using Yupo is that when the inks are dry, the background can be tricky to stamp over as the surface is very slippery. 
So to remedy that problem, I created a Alcohol inked background onto Yupo, letting all the colours bloom by adding Rubbing Alcohol and some Ranger Blending Solution.  When I was happy with the colour blends, I let it dry then applied some of the Alcohol Lifting Re-inker along the top, dragged that down using a brayer, then rubbed a piece of heavy white cardstock over the print to lift.  It transferred the inks onto my white cs and I was left with a colourful print.

* helpful tip:  keep the piece of Yupo that you inked and lifted from.  You can wipe it clean using some Rubbing Alcohol and use it again and again for this technique*

My background dried instantly and was ready to be stamped onto.
First, I added some stenciling along the edges using the Meshing Around stencil and some Picked Raspberry Distress ink.  I randomly added stamping along the edges of my panel, then placed the piece into my Misti to stamp the flower in black.  I stamped it again onto another piece of white cardstock and fussy cut out just the flower head.  Using some diluted Distress inks, I lightly painted in the flower petal and then glued it over the stamped image.
I felt like it needed a bit of black, so using the edge of a credit card, I added some lines for interest.
I mounted the panel on some matching coloured cardstock, then onto a heavy white card base.


Thanks so much for coming by and taking a look.

Adding my card to these challenges:
Simon Says Wed.- ANYTHING GOES
Addicted to Stamps and More- ANYTHING GOES
My Time to Craft- USE A STENCIL
Creative Artiste Mixed Media- ANYTHING GOES


Supplies
Stamps- Creative Chaos (Visible Image)
Inks- Versafine Clair Black; Alcohol inks (Ranger); Distress ink (TH); Alcohol Lifting
Paper- heavy white (Scribes Nook)
Accessories and Tools- stencil (Meshing Around VI); brayer; Misti (My Sweet Petunia);
credit card; blending brush; paintbrush

Sunday, 3 November 2019

Snowflake


Good Morning
Trying something new again.  Playing with this gorgeous snowflake as well.

So here's what I did.
I got a piece of Yupo paper and positioned the snowflake mask over it.  For those of you that don't know what Yupo paper is, it is a plastic coated product that works great when using Alcohol inks.
Next, I put on some rubber gloves then I took a baby wipe and squeezed some Ranger Alcohol inks onto it then pressed the baby wipe over my mask.  I kept pressing and pressing being sure to get into all the little nooks and crannies.  
Using a new baby wipe, I applied another colour in the same way, removed the mask, then set it aside to dry. I cleaned my mask right away using some Ranger Blending solution.

I die-cut the sentiment with some heavy white cardstock twice and glued the two pieces together for stability.  I presses the sentiment onto my Versamark ink pad then sprinkled on some silver embossing powder and heat set it with my gun.
I glued the sentiment over the snowflake background, then added a few sequins and glued it all onto a heavy white card base.


Thanks so much for coming by and taking a look.


Discount Code for A Colorful Life Designs

Supplies
Stamps- none
Inks- Ranger Alcohol inks; Versamark
Paper- Yupo; heavy white (Scribes Nook)
Accessories and Tools- Big Snowflake (A Colorful Life Designs); Merry Christmas die (Creative Expressions);
 silver EB powder; heat tool; silver sequins; baby wipes