Wednesday 29 November 2023

Layered Stars


Hello and Good Morning.
This new Layered Star stencil from A Colorful Life Designs made for a quick and easy card using it on my Gel Plate.

So, here's what I did to create my card.
  • I got out my Gel Plate and brayer, then rubbed some Villainous Potion Distress Oxide ink along the top and bottom edges of my plate.  I rubbed some Peacock Feathers DOX ink along the middle area of my plate.
  • Using my brayer, I blended the colours smooth, but kept them separated.
  • I laid Stencil #1 of the Layered Star stencil onto my plate and rubbed over it with a scrap paper to lift some of the ink.  I lifted the stencil off and then rubbed my cardstock front over the plate to get the print.  You can see how the areas in the middle of the stars is left white which is what I wanted to have before adding Stencil #2.
  • Next, I placed Stencil #2 over the inked panel and used some Peacock Feathers DOX to add the detail to the star centers.
  • I die cut the 'joy' from the center of the card front panel and then stamped over that with some Villainous Potion DOX ink.
  • I glued the stenciled panel onto a piece of dark purple, then pale mauve and finally onto an A2 white card base.
  • I used some foam tape to add the sentiment back into place and put 3 silver gems around that.

Here is the stencil I used:

Discount Code for A Colorful Life Designs
(Affiliate with no extra cost to you) 

Thanks so very much for coming by and taking a look.

Adding my card to these challenges:
Use Your Stuff- SHINE BRIGHT

Supplies
Stamps- Oversized Joy (Waffle Flower)
Inks- DOX
Paper- heavy white (Scribes Nook- Waterloo, Ont.)
Accessories and Tools- stencils (A Colorful Life Designs), Gel Plate, brayer, 
silver gems

Sunday 26 November 2023

From Our Home to Yours

 
Good Morning

Today's card is a blend of 2 stencils together.
I used the Merry Christmas stencil at the top and the Christmas Cover stencil at the bottom.
Both are from A Colorful Life Designs.

So, here's what I did to create my card.
  • I began by masking off the center of a white cardstock panel and placed that onto my Make Art Station.  I placed the Merry Christmas stencil over that and inked it up with some Broken China Distress Oxide ink.
  • I moved my mask up over the top area and placed the Christmas Cover Stencil along the bottom of the panel and inked that up with some Peacock Feathers Distress Oxide ink.
  • Next, I placed the stenciled card front into my Misti and stamped the snowflake with some Uncharted Mariner DOX ink right into the center of the panel.
  • I glued the panel onto a piece of navy cardstock and then onto an A2 sized card base.
  • I used some foam tape to pop the pre-printed sentiment over the snowflake.

Here are the stencils I used:


Discount Code for A Colorful Life Designs
(Affiliate with no extra cost to you) 

Thanks so much for coming by and taking a look.

Adding my card to these challenges:
Allsorts- COLORS OF WINTER
Stamping Sensations- CHRISTMAS INSPIRATION
Girlz Creative Christmas- INSPIRED BY A CHRISTMAS SONG (Let it Snow)

Supplies
Stamps- Festive Flurry (SU)
Inks- DOX
Accessories and Tools- stencils (A Colorful Life Designs); Make Art Station (Ranger); 
TE Blending Brushes; Misti (My Sweet Petunia); Christmas Sentiment Strips (SSS);
foam tape

Saturday 25 November 2023

Home for Christmas

Welcome
Meet the newly released Forest of Trees stencil from A Colorful Life Designs.
It's a good one for creating a forest scene.  
When I combined it with this patterned paper, it reminded me of a road and being on the way home for Christmas.

So, here's what I did to create my card.
  • I looked through my patterned papers until I found this one with the stripes.  I placed it onto my Make Art Station and positioned the Forest of Trees over that.
  • Using some Rustic Wilderness Distress Oxide ink, I inked all the trees.
  • I removed the stencil and splattered with my white Posca pen to give a snowy effect and set aside to dry.
  • I placed the little car stamp into my Misti, stamped it with some Versafine Clair black ink and clear heat embossed it.  I fussy cut that out and set aside.
  • I placed the stenciled card front into my Misti and stamped the sentiment with some more black ink and clear heat embossed that to help it pop against the background.
  • I glued the panel onto a piece of beige cardstock, then onto an A2 sized card base.

Here is the stencil I used:

Discount Code for A Colorful Life Designs
(Affiliate with no extra cost to you) 

Thanks so much for coming by and taking a look.

Adding my card to these challenges:
2 Sisters on the Blog- CHRISTMAS TRANSPORT
My Time to Craft- GOT TO BE CHRISTMAS
Time Out Challenge- WINTER/HOLIDAY

Supplies
Stamps- Yuletide (Kaisercraft); Cruisin' to Adventure (CTMH)
Inks- Versafine Clair; DOX
Paper- dp (?); heavy white (Scribes Nook- Waterloo, Ont.)
Accessories and Tools- stencil (A Colorful Life Designs); Misti (My Sweet Petunia);
white Posca pen; Make Art Station (Ranger); TE Blending Brushes

Friday 24 November 2023

Holiday Greetings


Good Morning
I have to confess...once I start creating my Christmas/holiday cards, I can't stop!!
This card features 2 new stencils from A Colorful Life Designs called

So, here's what I did to create my card.
  • I placed a piece of white cardstock onto my Make Art Station.
  • I positioned the Prim Snowflake stencil over my cardstock, secured that and then added the Star Ring stencil over that being sure to line up both stencils layered together.  Then, I inked over both stencils using some Villainous Potion Distress Oxide ink.
  • I removed just the Star Ring stencil, leaving the snowflake in placed and inked over that with some Peacock Feathers DOX ink and a hint of the Villainous Potion just in the center of the snowflake.
  • After I was happy with the inking, I added some ink along the outer edges of the panel to bring it more to life.
  • I die cut the sentiment from some purple cardstock and then the sentiment shadow die from the center of the card front panel.
  • I glued the panel onto a piece of blue cardstock and then onto an A2 sized card base.
  • I glued the sentiment over the shadow and then popped it back into place over the main panel using some foam tape.
  • Last step was to add silver gems around the sentiment.

Here are the stencils I used:


Discount Code for A Colorful Life Designs
(Affiliate with no extra cost to you) 

Thanks so much for coming by and taking a look.

Adding my card to these challenges:
Fab 'n' Funky- BLUE HUES
Double D Challenge- STRIPES and/or DOTS
Crafty Gals Corner- STRIPES and/or DOTS

Supplies
Stamps- none
Inks- DOX
Paper- heavy white (Scribes Nook- Waterloo, Ont.)
Accessories and Tools- stencils (A Colorful Life Designs); Make Art Station (Ranger); 
Snowy Greetings dies (SSS); silver gems, foam tape, TE Blending Brushes

Wednesday 22 November 2023

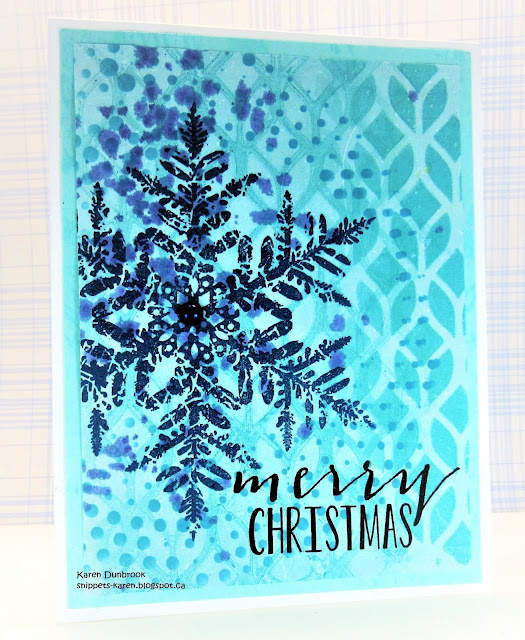
Christmas Collage


Welcome
I hope all is going well in your part of the world.
Today's card is a collage style using stencils and stamps.

So, here's what I did to create my card.
  • I found a blue 'roll off' sheet that I had in my stash.  It was a piece of white cardstock that I rolled excess Tumbled Glass Distress Oxide ink off with my brayer while Gel Plate printing.  
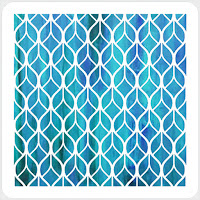
  • I placed the panel onto my Make Art Station and put the Chain Weave stencil over that and inked with some Peacock Feather Distress Oxide ink.  I inked just to the right side of the panel as I wanted to add more stenciling and the snowflake to the left.
  • I removed that stencil and placed the Halftone Circle over to the left side and inked that up with some more Peacock Feathers to create my collage.
  • I got out my Misti to stamp the snowflake with some Uncharted Mariner Distress Oxide ink.  The snowflake set comes with some snowflake dots that I inked with Blueprint Sketch DOX ink and stamped those around the snowflake.
  • I stamped the sentiment into the corner using my Misti again.
  • I glued the card front onto a piece of light blue cardstock, then onto an A2 sized card base.
  • To finish my card off, I added a dark blue gem to the center of the snowflake.

Here are the stencils I used:


.....AND TODAY IS THE DAY!!!


Discount Code for A Colorful Life Designs
(Affiliate with no extra cost to you) 

Thanks so much for coming by and taking a look.

Adding my card to these challenges:
Merry Little Christmas Challenge- ANYTHING CHRISTMAS GOES
Daisy Chain Challenge- CHRISTMAS/WINTER
Crazy is Our Fame, Stencils are Our Game- ANYTHING GOES- optional LEAVES

Supplies
Stamps- Tis the Season (PTI); Let it Snow (Visible Image)
Inks- Versafine Clair, DOX
Paper- heavy white (Scribes Nook- Waterloo, Ont.)
Accessories and Tools- stencils (A Colorful Life Designs); Misti (My Sweet Petunia);
Make Art Station (Ranger); glue gem; TE Blending Brushes

Sunday 19 November 2023

Happy Winter Wishes


Welcome
Here's a simple snowflake card I made using the stencil called Fetching Snowflake from 
A Colorful Life Designs.

So, here's what I did to create my card.
  • I was playing with my Gel Plate, rubbed the Villainous Potion Distress ink pad right over the plate and blended out the colour using my brayer.
  • I laid the Fetching Snowflake stencil onto the plate and using a piece of white cardstock, rubbed over the plate with the stencil still in place to get my print.
  • I splattered with my white Posca pen and set aside to dry.
  • While that dried, I die cut the sentiment with some more white cardstock.
  • I glued the dried stenciled panel onto a piece of pale mauve cardstock, then onto a white A2 sized card base.
  • I glued the sentiment to the middle of the card and then added some purple sequins under that.


Here is the stencil I used:

Discount Code for A Colorful Life Designs
(Affiliate with no extra cost to you) 

Thanks so very much for coming by and taking a look.

Adding my card to these challenges:
Allsorts (ANYTHING GOES)
Craft Rocket- WINTERTIME NO CHRISTMAS

Supplies
Stamps- none
Inks- DOX
Paper- heavy white (Scribes Nook- Waterloo, Ont.)
Accessories and Tools- stencil (A Colorful Life Designs); Gel Plate; Speedball Brayer;
sequins (A Colorful Life Designs); Winter Wishes die (SSS)

Saturday 18 November 2023

Prim Snowflake


Welcome
Meet the newly released Prim Snowflake and the new Starry Top stencils from A Colorful Life Designs.
This snowflake stencil is one of the most interesting and these 2 stencils worked so well together.

So, here's what I did to create my card.
  • I cut a piece of white cardstock and placed it onto my Make Art Station.
  • I centered the Prim Snowflake stencil over the cardstock and inked it up with some Mermaid Lagoon Distress Oxide ink.  I added some Uncharted Mariner DOX ink to the middle and edges of the snowflake to add some extra definition.
  • Leaving that stencil in place, I positioned the Starry Top stencil over it and inked that up with some Tumbled Glass DOX ink.  I repeated that step by flipping the stencil over and inking the rest of the panel.
  • I removed both stencils and splattered with my white Posca pen.  I added some white dots to the circles as well.
  • While that dried, I got out a piece of vellum and placed it into my Misti to stamp the sentiment.  I also heat embossed it very carefully with some clear powder as not to warp the vellum.
  • I glued the vellum to the dry card front, attaching it around to the back and glued that onto a piece of navy cardstock.
  • Finally, I glued the finished panel onto an A2 sized card base.

Here are the stencils I used:


Discount Code for A Colorful Life Designs
(Affiliate with no extra cost to you) 

Thanks so much for coming by and taking a look.

Adding my card to these challenges:
Shopping Our Stash- EMBOSS LIKE A BOSS
My Time to Craft- GOT TO BE CHRISTMAS
CRAFT- CHRISTMAS

Supplies
Stamp- Christmas Cheer (TT-retired)
Inks- Versafine Clair; DOX
Paper- heavy white (Scribes Nook, Waterloo, Ont.)
Accessories and Tools- stencils (A Colorful Life Designs); Make Art Station (Ranger);
TE Blending Brushes; white Posca pen

Friday 17 November 2023

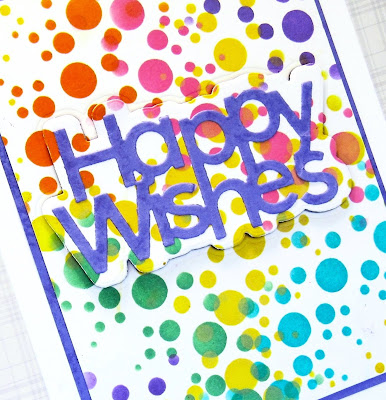
So Happy!


Welcome
Today's card is featuring the new release from A Colorful Life Designs called
I used the stencil in a different way to get the fun and festive look.

So, here's what I did to create this fun card.
  • I placed a piece of white cardstock onto my Make Art Station and instead of centering the Star Ring stencil over my card panel, I just put a corner of the it on.  
  • I started inking with the lightest colour, wiped off the stencil and moved onto the other colours. I continually moved the stencil into different areas of my card front until it was all inked up. Here are the colours I used:  Fossilized Amber, Ripe Persimmon, Picked Raspberry, Cracked Pistachio, Peacock Feathers and Shaded Lilac Distress Oxide inks.
  • Next, I die cut the sentiment from a piece of purple cardstock and then I die cut the shadow for the sentiment right from the stenciled card front.  I glued those 2 together and set aside to dry.
  • I glued the stenciled panel onto another piece of purple cardstock and then onto an A2 card base.
  • I used some foam tape to pop the sentiment back into place over the front.

Here is the stencil I used:

Discount Code for A Colorful Life Designs
(Affiliate with no extra cost to you) 

MARK YOUR CALENDAR....

Thanks so much for coming by and taking a look.

Adding my card to these challenges:
Crafty Gals Corner- DOT/STRIPES
The Crafty Addicts- ANYTHING GOES
Crazy is Our Fame-Stencils are Our Game- NOVEMBER FUN option: LEAVES

Supplies
Stamps- none
Inks- DOX
Paper- heavy white (Scribes Nook- Waterloo, Ont.)
Accessories and Tools- stencil (A Colorful Life Designs); Make Art Station (Ranger); 
Happy Wishes sentiment die (SSS)

Tuesday 14 November 2023

Wispy Floral


Welcome
I had fun playing with this new Wispy Floral stencil from A Colorful Life Designs.
Just a little break from making cards for the holidays.
I paired up this new stencil with an earlier release called Atoms.

So, here's what I did to create my card.
  • I began by getting out my Gel Plate, brayer and some Distress Oxide ink.  
  • I pressed my Tumbled Glass DOX inks pad directly onto my Gel Plate and used my brayer to blend it smooth.
  • I placed a die cut paper ring onto my plate first, then I placed the Atoms stencil onto my plate and gently pressed it down to make contact.  
  • I carefully lifted off the stencil and the paper ring and rubbed some white cardstock over my plate to get the print.  You can see the white ring created by adding the die cut circle ring.
  • Next, I looked through my Marvelous Mask Circles to find the size I wanted and placed that within the circle created on my Gel plate.
  • I laid the Wispy Floral stencil over the circle and inked that up with some Villainous Potion DOX ink. 
  • I removed the stencil but left the circle mask in place and added a bit of ink just along the edges to accentuate the circle shape.
  • I stamped and die cut the sentiment, then glued the stenciled card front onto a piece of purple cardstock, then onto an A2 sized card base.
  • Finally, I added the sentiment with some foam tape.

Here are the stencils and masks I used:


Discount Code for A Colorful Life Designs
(Affiliate with no extra cost to you) 

Thanks so much for coming by and taking a look.

Adding my card to these challenges:
AAA Birthday- BIRTHDAY
Happy Little Stampers- STENCIL ANYTHING GOES
Dream Valley Challenge- OCCASIONS OTHER THEN BIRTHDAY

Supplies
Stamps- Big and Bold Sentiment and die (SSS)
Inks- DOX
Paper- Scribes Nook- Waterloo, Ont.
Accessories and Tools- stencils and masks (A Colorful Life Designs); 
Make Art Station (Ranger); Infinity Circle Dies (HA); TE Blending Brushes;
Gel Plate; brayer

Saturday 11 November 2023

Big Ornament


Good Morning and Welcome.
Today's card features some stencil layering using 2 newly released stencils from A Colorful Life Designs called:

So, here's what I did to create my card.
  • I cut a piece of cardstock that was 4" square and placed it onto my Make Art Station.  
  • I placed the Big Ornament stencil over my white cardstock and inked it up with some Rustic Wilderness Distress Oxide ink.
  • Leaving the stencil in place, I put the Star Ring stencil over the top and inked that up with some Lumberjack Plaid DOX ink.  Layering the 2 stencils made for a unique and interesting background.
  • I removed both stencils and after the ink had a chance to dry, I added some white dots to the middle of the red circles using my Posca pen.
  • I placed the stenciled card front into my Misti and stamped the sentiment.
  • I glued it onto a 4 1/4" square card base.

Here are the stencils I used:


Discount Code for A Colorful Life Designs
(Affiliate with no extra cost to you) 

Thanks so much for coming by and taking a look.

Adding my card to these challenges:
As You Like It- TRADITIONAL or MODERN
(traditional- so memories of past Christmases)
Crazy Catz- ANYTHING GOES-option: Sparkle
Krafty Chicks- CHRISTMAS

Supplies
Stamps- Christmas Cheer (TT- retired)
Inks- Versafine Clair, DOX
Paper- heavy white (Scribes Nook- Waterloo, Ont.)
Accessories and Tools- stencils (A Colorful Life Designs); TE Blending Brushes;
Make Art Station (Ranger); white Posca pen

Tuesday 7 November 2023

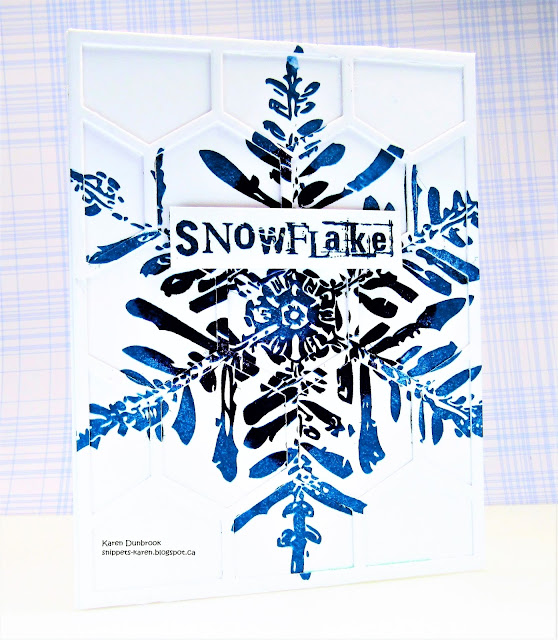
Big Snowflake Wishes


Welcome
Today's card was done using the technique called Cover Plate Eclipse.
It is a fun technique to try and gives a unique look to your cards.
See the other card I made using this technique here.

So, here's what I did to create my card.
  • I placed a piece of white cardstock into my Misti, inked up the snowflake stamp with some Uncharted Mariner Distress Oxide ink, sprayed with some water and stamped.
  • I added some Villainous Potion to the center of my snowflake and stamped again over the first inking.  I set that aside to dry.
  • Taking another piece of white cardstock, I repeated that whole process mentioned above and I was left with 2 panels stamped the very same.
  • Next, I took one of the panels and die cut it with the Hexagons.
  • To give more height to the die cut, I cut it again using some plain white cardstock and glued them together.
  • I glued the die cut panel over the stamped snowflake, matching the two up to create my cover plate eclipse.
  • I glued it onto an A2 sized card base and then added the stamped sentiment with some foam tape.

Thanks so much for coming by and taking a look.

Adding my card to these challenges:
Crafts Galore Encore- ANYTHING GOES
Die Cut Divas- ALL ABOUT THE HOLIDAYS

 Supplies
Stamps- Let is Snow (sentiment- Visible Image); Warm Wishes Snowflake (Colorado Craft)
Inks- DOX
Paper- heavy white (Scribes Nook- Waterloo, Ont.)
Accessories and Tools- Misti (My Sweet Petunia); Simply Hexagons die (Pinkfresh Studio)
foam tape