Showing posts with label collage. Show all posts

Friday, 13 March 2026

Many Wishes


Welcome
I had fun playing with this new stencil from A Colorful Life Designs called
I decided to make a 'collage' style card using the stencil.

Here's what I did to create my card.
  • I looked through some of my discarded paper pieces and found this one I had done as a monoprint. (Monoprint- when I have inked over a stencil, there is always ink left behind on the stencil. Instead of wiping it all off, I will spray with water and press onto another sheet of paper to transfer the design)
  • I placed one the the feathers from the THREE FEATHERS stencil over the left hand side of my cardstock and inked it up with some Cracked Pistachio and some Peacock Feathers Distress Oxide ink.
  • I wanted to add more interest to the background, so I stamped the Script along the right hand side to help balance out the design.
  • Next, I die cut a circle from white cardstock and stamped the sentiment over it using my Misti.
  • I glued my card front onto a piece of white cardstock, then blue and then onto an A2 sized card base.
  • I used some foam tape to pop the sentiment over the background and added 3 black gems to finish my card off.

Here is the stencil I used:


Thanks so much for coming by and taking a look.

Adding my card to these challenges:
Simon Says Wed.- A BIT O'GREEN
Word Power- WORDS AS FOCUS
Simon Says Monday- BIT O'GREEN
Tic Tac Toe- 3 IN A ROW

Supplies
Stamps- Everyday Tags (Avery Elle); Faded Text (Tim Holtz)
Inks- Versafine Clair; DOX
Paper- Solar White
Accessories and Tools- stencil (A Colorful Life Designs); TH Blending Brushes;
Misti (My Sweet Petunia); black gems; foam tape

Sunday, 9 June 2024

Paint Pulling


Good Morning
Here is a fun card I created using some Paint Pulling.
I haven't done this in so long but after watching a Friday Night Live with Vicki Boutin, I wanted to make a card using this technique again.  
You can do this technique using inks diluted with water, but the effect is better using some acrylic paint.

So, here's what I did to create my card.
  • I cut 2 piece of cardstock as I wanted to use one to die cut after inking.
  • I placed a dab of the blue paint on the edge of my card panel and then using an old gift card, I dragged the paint across the paper.
  • I repeated that process with the green until most of the panel was covered with some paint.  I was sure to leave some white space too.  So sorry I don't have a picture of the panels in process.  I got so into it and forgot.
  • When the panels were dry, I stenciled in places using the Messy Dot Grid stencil with some Peacock Feathers and some Twisted Citron Distress Oxide ink.
  • To add even more interest, I stamped the numbers randomly over the panels with some Mermaid Lagoon DOX ink.
  • I used one of the panels to die cut the sentiment and glued it onto the black shadow die.
  • I cut the other panel into strips of random size, then glued those onto another piece of white cardstock.  
  • I glued the finished card front panel onto a piece of black cardstock, then onto a white A2 sized card base.
  • I used some foam tape to add the sentiment over the middle.

Here is the stencil I used:

Discount Code for A Colorful Life Designs
(Affiliate with no extra cost to you) 

Thanks so much for coming by and taking a look.
Here is the link to Vicki's FNL video:

Adding my card to these challenges:
CRAFT- MASCULINE
Simon Says Wed.- MASCULINE

Supplies
Stamps-Numerator (AALL and Create)
Inks- DOX
Paper- heavy white (Scribes Nook: Waterloo, Ont.)
Accessories and Tools- Stencil (A Colorful Life Designs); Paints (Vicki Boutin);
old gift card; die (Concord and 9th)

Wednesday, 22 November 2023

Christmas Collage


Welcome
I hope all is going well in your part of the world.
Today's card is a collage style using stencils and stamps.

So, here's what I did to create my card.
  • I found a blue 'roll off' sheet that I had in my stash.  It was a piece of white cardstock that I rolled excess Tumbled Glass Distress Oxide ink off with my brayer while Gel Plate printing.  
  • I placed the panel onto my Make Art Station and put the Chain Weave stencil over that and inked with some Peacock Feather Distress Oxide ink.  I inked just to the right side of the panel as I wanted to add more stenciling and the snowflake to the left.
  • I removed that stencil and placed the Halftone Circle over to the left side and inked that up with some more Peacock Feathers to create my collage.
  • I got out my Misti to stamp the snowflake with some Uncharted Mariner Distress Oxide ink.  The snowflake set comes with some snowflake dots that I inked with Blueprint Sketch DOX ink and stamped those around the snowflake.
  • I stamped the sentiment into the corner using my Misti again.
  • I glued the card front onto a piece of light blue cardstock, then onto an A2 sized card base.
  • To finish my card off, I added a dark blue gem to the center of the snowflake.

Here are the stencils I used:


.....AND TODAY IS THE DAY!!!


Discount Code for A Colorful Life Designs
(Affiliate with no extra cost to you) 

Thanks so much for coming by and taking a look.

Adding my card to these challenges:
Merry Little Christmas Challenge- ANYTHING CHRISTMAS GOES
Daisy Chain Challenge- CHRISTMAS/WINTER
Crazy is Our Fame, Stencils are Our Game- ANYTHING GOES- optional LEAVES

Supplies
Stamps- Tis the Season (PTI); Let it Snow (Visible Image)
Inks- Versafine Clair, DOX
Paper- heavy white (Scribes Nook- Waterloo, Ont.)
Accessories and Tools- stencils (A Colorful Life Designs); Misti (My Sweet Petunia);
Make Art Station (Ranger); glue gem; TE Blending Brushes

Monday, 5 June 2023

Forever Chasing the Sun


Welcome
Today's card was a fun one, using the new stencil called Waterspout from A Colorful Life Designs and the sentiment from the new Chasing the Sun clear stamp set.
I used it as part of my 'collage' style card.

So, here's what I did to create my card.
  • I laid a piece of white cardstock onto my Make Art Station and then I tore a piece of scrap paper to use as my masks for the top and bottom of my cardstock.
  • I positioned the Waterspout stencil along the middle of the masked area and inked that with some Blueprint Sketch Distress Oxide ink.
  • I turned the stencil upside down and inked the stencil again along the top edge with some Salty Ocean DOX ink.  I think the stencil gave a nice sense of movement to my background.
  • Using some Broken China DOX ink, I inked up the background so the torn edge would become more visible.
  • I did some stamping over the stenciled background to help provide more interest.
  • Next, I removed the masking paper and placed the stenciled panel into my Misti and stamped the image of the biker and stamped the sentiment from the Chasing The Sun stamp set.
  • I glued the finished panel onto a piece of navy cardstock, then onto an A2 sized card base.

Here is the stencil and stamp set I used:


Discount Code for A Colorful Life Designs
(Affiliate with no extra cost to you) 

Thanks so much for coming by and taking a look.

Adding my card to these challenges:
Simon Says Wed.- ANYTHING GOES
2 Sisters on the Blog- MEN'S CARD AND HOBBY
Pearly Sparkles- MAKE IT MASCULINE


Supplies
Stamps- Chasing the Sun (ACLD); Friendship Script (HA); Graffiti Grunge (Kaiser Craft);
Bike Boy (Flonz)
Inks- DOX, Versafine Clair
Paper- heavy white (Scribes Nook, Waterloo, Ont.)
Accessories and Tools- stencil (ACLD); Make Art Station (Ranger); Misti;
scrap paper; TE inking Brushes

Saturday, 24 December 2022

Poinsettia Collage


Welcome
Only one more sleep until the big day!!!
So a fast and easy card today that took no time at all.

So, here's what I did to create my card.
  • I cut a piece of white cardstock and got out my small Lawn Fawn ink cubes.
  • I picked out a few different colours and then press the ink pad directly onto the cardstock creating the little squares of colour.  I tried to vary them as I went down the card front.
  • After the ink had dried, I placed the inked panel into my Misti and stamped the Poinsettia Collage over the background. This stamp included the 'Merry Christmas' sentiment.
  • I glued the inked panel onto a piece of red cardstock, then onto an A2 sized card base.  Super easy and fast card.
  • I added 3 silver gems for more interest.

Thanks so much for coming by and taking a look.

Adding my card to these challenges:
CAS on Friday- CHRISTMAS
Jingle Bells- WRAPPING UP 2022
Winter Wonderland- CHRISTMAS- ANYTHING GOES

Supplies
Stamps- Poinsettia Collage (Stampendous)
Inks- Versafine Clair; Lawn Fawn cubes
Paper- Scribes Nook- Waterloo, Ont.
Accessories and Tools- Misti; silver gems

Wednesday, 10 August 2022

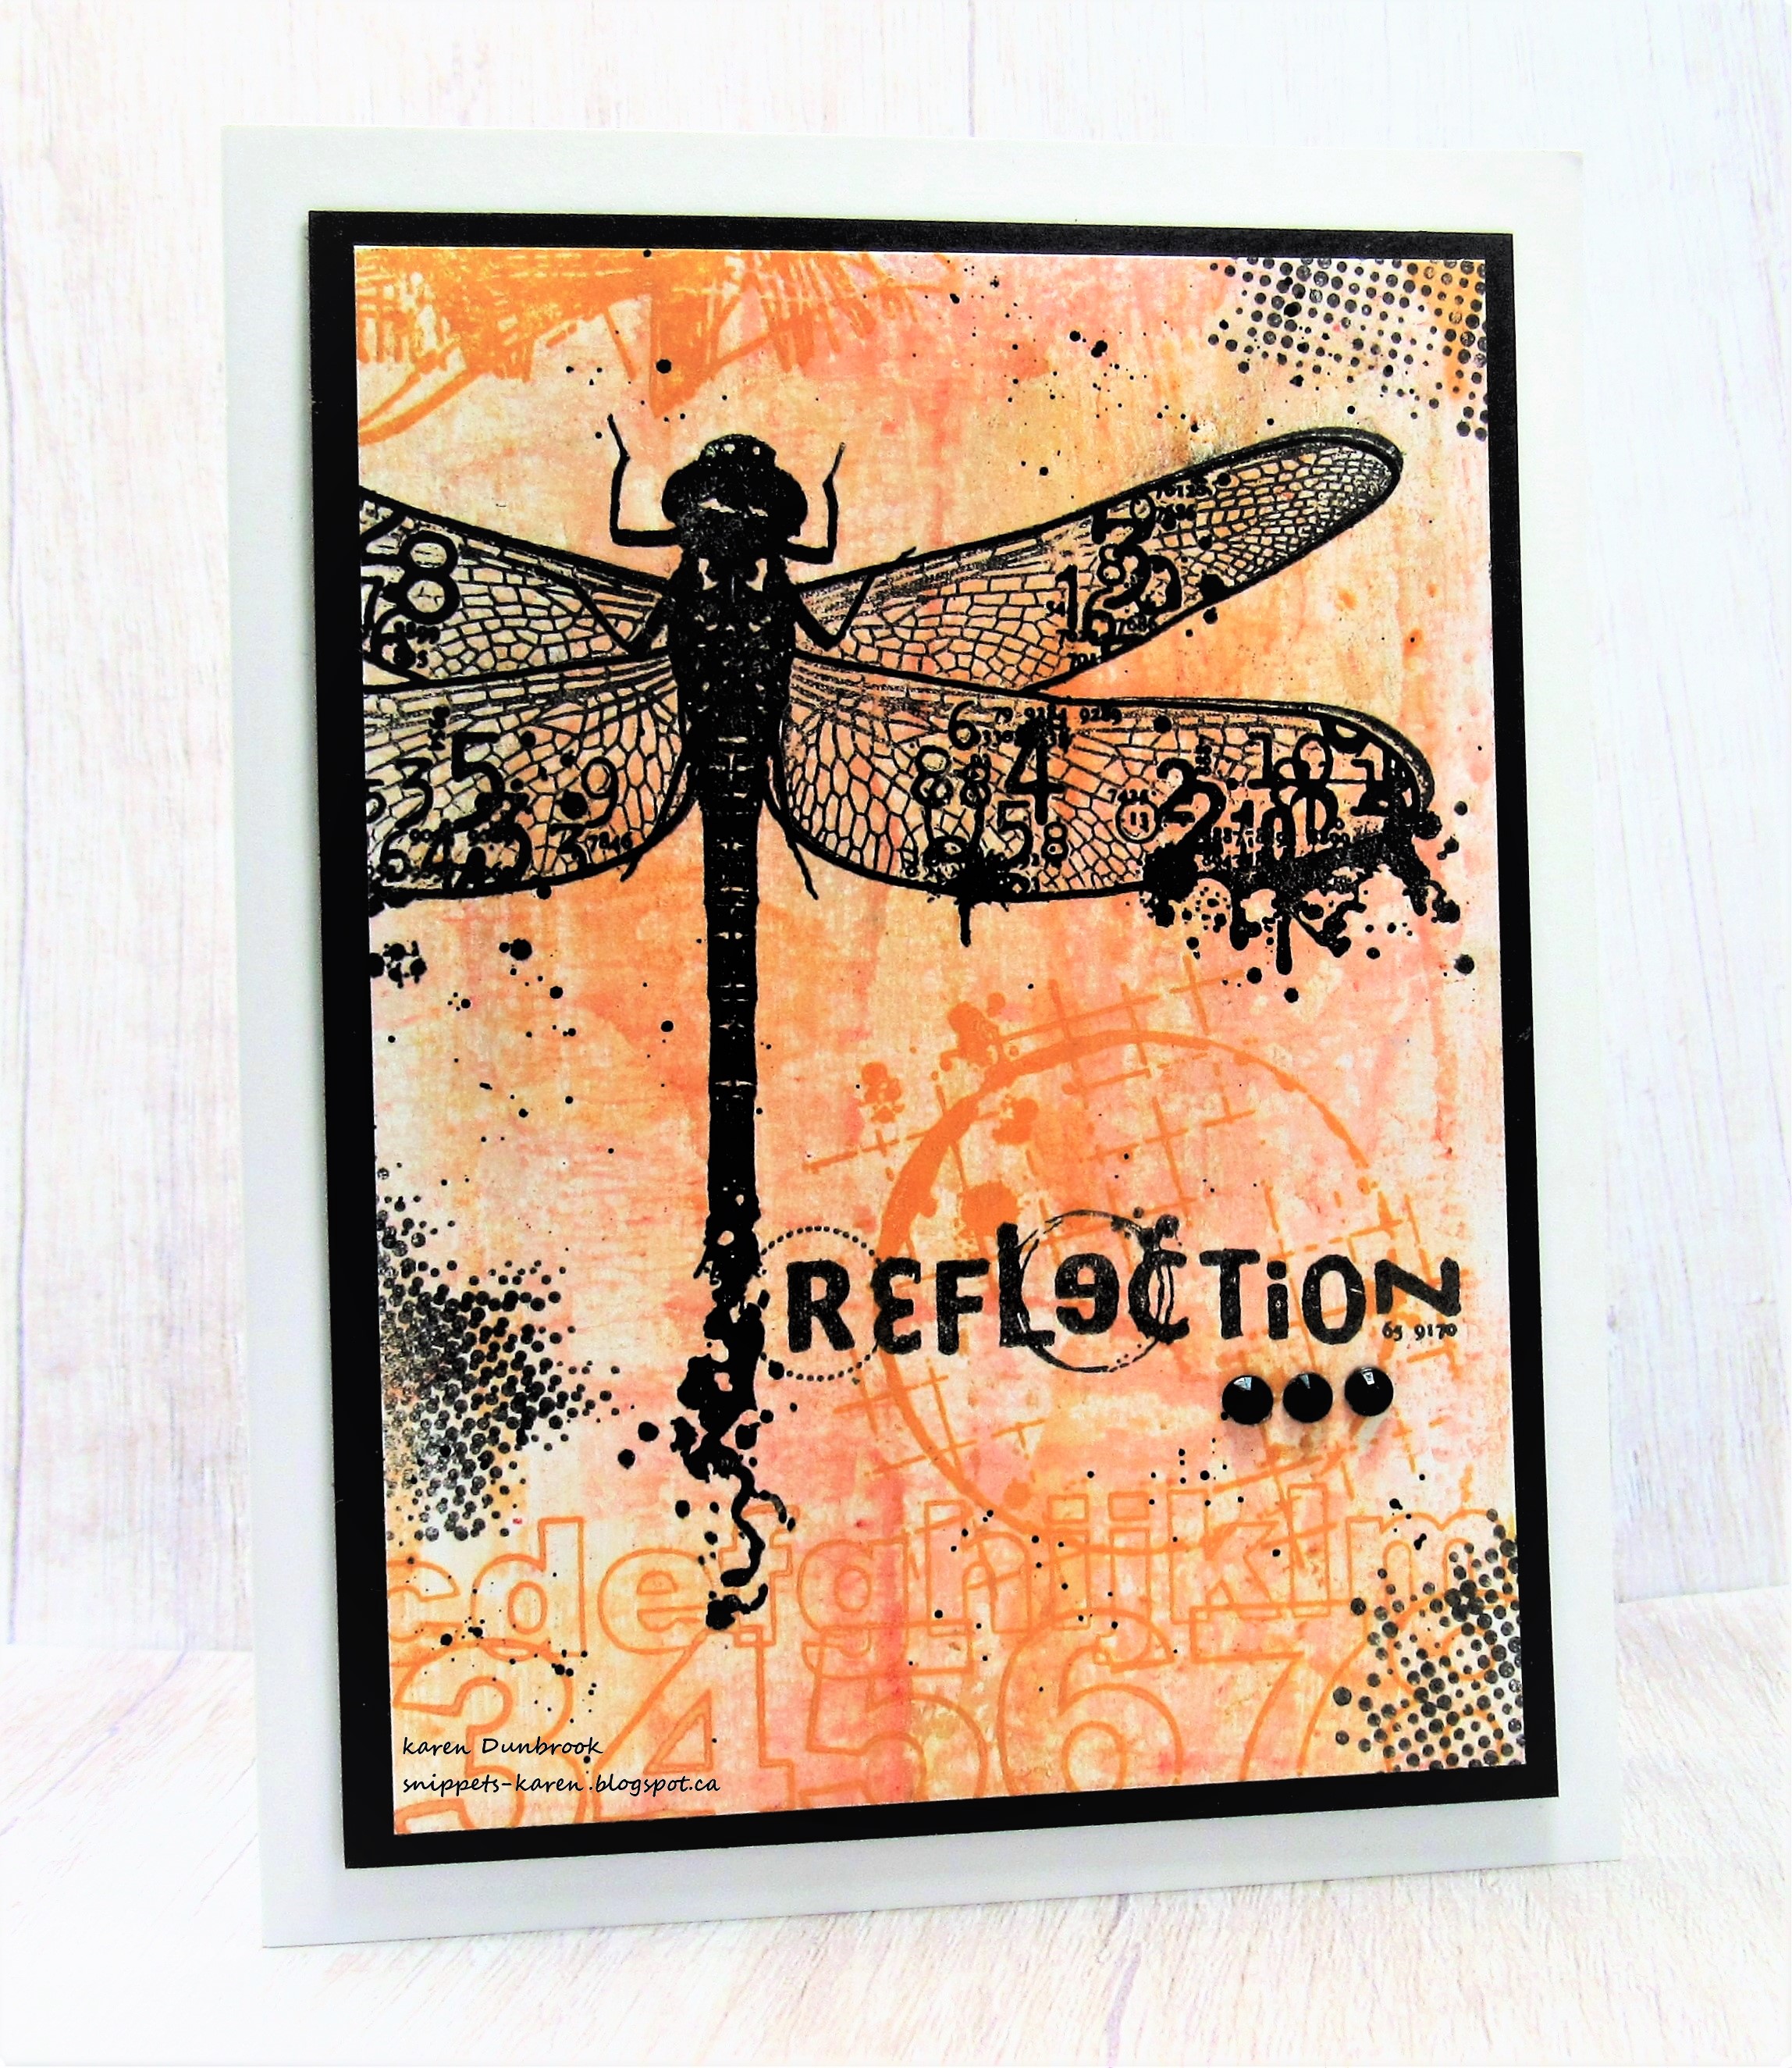
Dragonfly Dreams


Welcome
Today's card features a collage style, using this lovely dragonfly from Visible Image.

So here's what I did to create my card.
  • I cut a white cardstock panel and inked it up with my brayer again.  I rolled my brayer onto some Carved Pumpkin Distress Oxide ink, sprayed with water and rolled onto my paper.
  • I repeated that process using some Dried Marigold DOX ink until I was happy with the coverage of ink.
  • I stamped the dragonfly over to one side with black Versafine ink in my Misti.
  • I stamped the black dots in the corners and side using Grunge Tones and more black ink.
  • I stamped the details and the numbers with some more Carved Pumpkin DOX ink so it blended into the background.
  • I splattered with my black Posca pen.
  • I glued the finished panel onto a piece of black cardstock, then onto a white A2 size card.
  • Finally, I added 3 black gems just under the sentiment.

Thanks so much for coming by and taking a look.

Adding my card to these challenges:
Cardz 4 Guyz- DISTRESS AND GRUNGE 
We Love Stamping- IN MY GARDEN

Supplies
Stamps-Dragonfly Reflections; Grunge Tones (Visible Image); Arty Alphas (Paper Rose)
Inks- Versafine Clair, DOX
Paper- heavy white- Scribes Nook, Waterloo, Ont.
Accessories and Tools- Misti (My Sweet Petunia); Speedball Brayer; black Posca pen; 
black gems

Saturday, 28 May 2022

Collaged Butterfly


Welcome
Meet today's card.
I am loving this new Drippy Butterfly stencil from A Colorful Life Designs.  
This one comes with a stencil and a mask and I used both for my card.

So here's what I did to create my card.
  • I began by cutting a piece of white cardstock 3 3/4" x 5" for my card front.  I laid the Drippy Butterfly stencil over the paper, and inked it up with some  Broken China Distress Oxide inks.  
  • I removed the stencil and placed the mask over the butterfly and lightly inked around the outside edges of my card with some Peacock Feathers DOX ink.
  • Next, leaving the mask in place, I randomly stamped the Friends Script and the Texture around the outer edges with some Blueprint Sketch DOX ink.
  • I place the panel into my Misti and stamped the sentiment with some black ink.
  • I added some white splatters using my white Posca pen.
  • Lastly, I glued it onto a heavy white card base and added 3 black gems under the sentiment.

Here is the stencil I used:

Discount Code for A Colorful Life Designs
(affiliate with not extra cost to you)

Thanks so much for coming by and taking a look.

Adding my card to these challenges:
Simon Says Wed.- ANYTHING GOES
Little Red Wagon- SENTIMENT AS MAIN FOCUS
Try it on Tuesday- BUTTERFLIES
Double D - MONOCHROMATIC


Supplies
Stamps- Texture (Carabelle); Footprints (Inkylicious); Friends Bkg (Hero Arts)
Inks- DOX ink; Versafine Clair
Paper- heavy white (Scribes Nook- Waterloo, Ont.)
Accessories and Tools- Drippy Butterfly stencil (ACLD); Misti (My Sweet Petunia);
black gems, Posca pen

Saturday, 24 April 2021

Made with Love


Good Morning and Welcome to the Weekend!!
Always happy when I get some time to play.

I made this card after watching a Friday night live with Vicki Boutin.  She does them every week and they are so inspiring.  You can find her on FB or on YouTube.  

So here's what I did to create my card.
  • I began by cutting a 4 x 4 inch piece of white cardstock.  I use a heavy weight 110lb that I get from my local store.  I die-cut a circle from more cardstock and positioned it over my panel to use as a mask.
  • I rubbed the pink crayon from the Warm set of Vicki Boutin Art Crayons onto a piece of acetate, diluted it with water and pressed it over the masked circle.  I repeated that process using some Distress inks next (Picked Raspberry and Spiced Marmalade) until the circle was inked.
  • I got out my Simple Grid stencil from ACLD and rubbed some Picked Raspberry over it (seen in the top left and bottom right)
  • I diluted some more of the Art Crayon and stamped using a Graffiti stamp, Script and the Zig Zag by dipping the stamps into the wet ink.  By doing that, it gives more of a watercolour look.
  • I removed the circle mask and let the piece dry, then placed it into my Misti to stamp the thistles and the sentiment using some Versafine black ink.
  • I splattered with my white Posca pen and then doodled around the circle.
  • I added 3 black gems under the sentiment, then glued the panel onto a heavy white card base.


Here are some of the other panels I created as well so more cards to come.


Thanks so much for coming by and taking a look.
Hope you have a wonderful weekend.

Discount Code for A Colorful Life Designs


Supplies
Stamps- Nature Flowers (Art Journey); Everyday Circle Tags (Avery Elle); Zig Zag Stitch (TH);
Graffiti (Kaisercraft)
Inks- Distress (TH); Versafine; Vicki Boutin Art Crayons
Paper- heavy white (Scribes Nook- Waterloo, Ontario)
Accessories and Tools- Grid Stencil (ACLD); Circle Die (HA); Sakura Black marker; Posca pen;
inking tool; acetate sheet; black gems; Misti (My Sweet Petunia)