Tuesday 27 September 2022

Special Delivery


Welcome
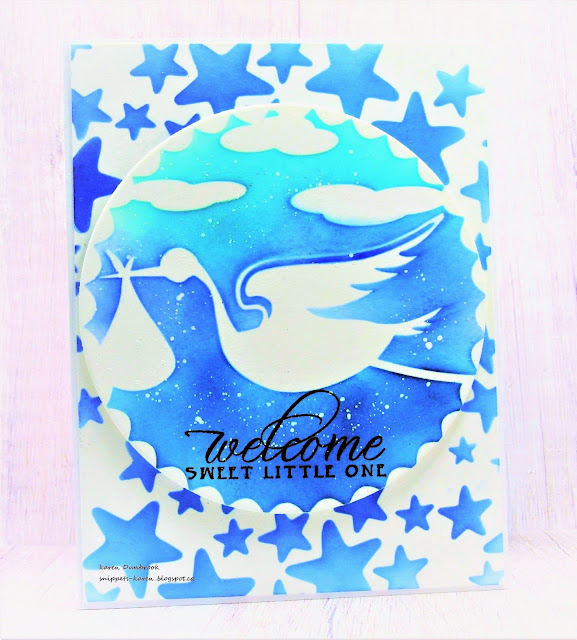
Today's card features 2 of the new releases called Delivery and Dream Stars from A Colorful Life Designs.  They are just perfect for creating some fun baby cards.

So, here's what I did to create my card.
  • I cut a piece of white cardstock and placed the Delivery stencil over my paper.  
  • I inked it up with some Peacock Feathers and some Blueprint Sketch Distress Oxide ink.
  • When I was happy with the inking, I die cut it out using a circle die.
  • I placed the circle into my Misti and stamped the sentiment just under the stork with some black ink. I splattered with my white Posca pen and set aside to dry.
  • Using the Dream Stars stencil, I inked that up onto another piece of white cardstock using the same colours as mentioned above.
  • I glued the stenciled stars panel onto an A2 card base, then popped the stork over that.

Here are the stencils I used:


Discount Code for A Colorful Life Designs
(affiliate with no extra cost to you)

Thanks so much for coming by and taking a look.

Supplies
Stamps- Welcome Little One (IO)
Inks- DOX, Versafine Clair
Paper- Scribes Nook- Waterloo, Ont.
Accessories and Tools- stencils (ACLD); Make Art Station (Ranger); white Posca pen;
TE Blending Brushes; Infinity Circle dies (HA)

Monday 26 September 2022

Happy Halloween


Welcome
Today, I am playing along with a Clean and Simple challenge at Splitcoast Stampers.
The theme is Halloween.

So, here's what I did to create my card.  
  • I cut a piece of white cardstock and placed it onto my Make Art Station.
  • I positioned the Mid Century Shadow stencil over my card panel, then laid the Pumpkin Patch stencil over that.
  • I inked over the pumpkins with some Mustard Seed and some Carved Pumpkin Distress Oxide ink, filling in the first area at top.
  • I moved the pumpkin stencil down and then continued to ink the next 2 areas the same way.
  • I removed the pumpkins and inked the bottom area that I wanted to use for my sentiment.
  • Leaving the Shadow stencil in place, I went back with some Black Soot DOX ink and added that just along the bottom edges of the panels.
  • I removed the stencil and stamped the bats to the side and the sentiment in the bottom section.
  • I glued it onto a piece of orange cardstock, then onto a white A2 size card base.

Here are the stencils I used:


Discount Code for A Colorful Life Designs
(affiliate with no extra cost to you)


Thanks so much for taking a look.

Supplies
Stamps- bats (Craftsmart); sentiment (Studio G)
Inks- Versafine, DOX
Paper- Scribes Nook- Waterloo, Ont.
Accessories and Tools- stencils (ACLD); TE Blending Brushes

Saturday 24 September 2022

Oh Baby


Hello and Welcome
 This month we are celebrating Babies with lots of new and fun stencils.
The one I used for my card today is called Dream Stars from A Colorful Life Designs.

So, here's what I did to create my card.
  • I began with the background.  As I have mentioned in previous posts, I love using 'bleeding tissue paper' to make an easy background.  I bought it on Amazon, reasonably priced and you get a lot.  I cut squares of the tissue, laid them onto a piece of white cardstock, then sprayed with a good amount of water and let dry.
  • It takes a while for the panel to dry so the ink has a chance to transfer to the paper.
Here's what the tissue on the cardstock looks like.

  • When dry, I removed all the piece of tissue. If you still have areas that are not inked and don't want them to be white, repeat the process with new pieces of tissue.
  • I placed the dry panel onto my Make Art Station and rubbed over it with my anti-static bag, then laid the Dream Stars stencil over that.  
  • Using some pressure, I pressed my Versamark pad over the stencil, trying to get into all the open areas.  
  • I sprinkled white embossing powder over the stars and heat embossed.  
  • Some of the stars needed a bit of a touch-up, so I did that with a Versamark pen, added more white eb powder and heated again.
  • I splattered with my white Posca pen and set aside to dry.
  • I die cut the sentiment from some orange cardstock and the outline in some white, then glued those together.
  • I glued the finished panel onto another piece of orange cardstock, then onto an A2 card base.
  • I pop dot mounted the sentiment into the middle of the panel.

Here is the stencil I used:

Discount Code for A Colorful Life Designs
(affiliate with no extra cost to you)

Thanks so much for coming by and taking a look.

Supplies
Stamps- none
Inks- Versamark ink and pen
Paper- 110lb (Scribes Nook, Waterloo, Ont.)
Accessories and Tools- stencil (ACLD); Lawn Fawn white EB powder; white Posca pen;
bleeding tissue paper (Amazon); Oh Baby die (TE)