Tuesday 28 May 2024

Try It On Tuesdays

Welcome
Today, I have the pleasure of being the guest designer at the 


The theme is a fun one:
EMBOSS IT

So, here's what I did to create my card.
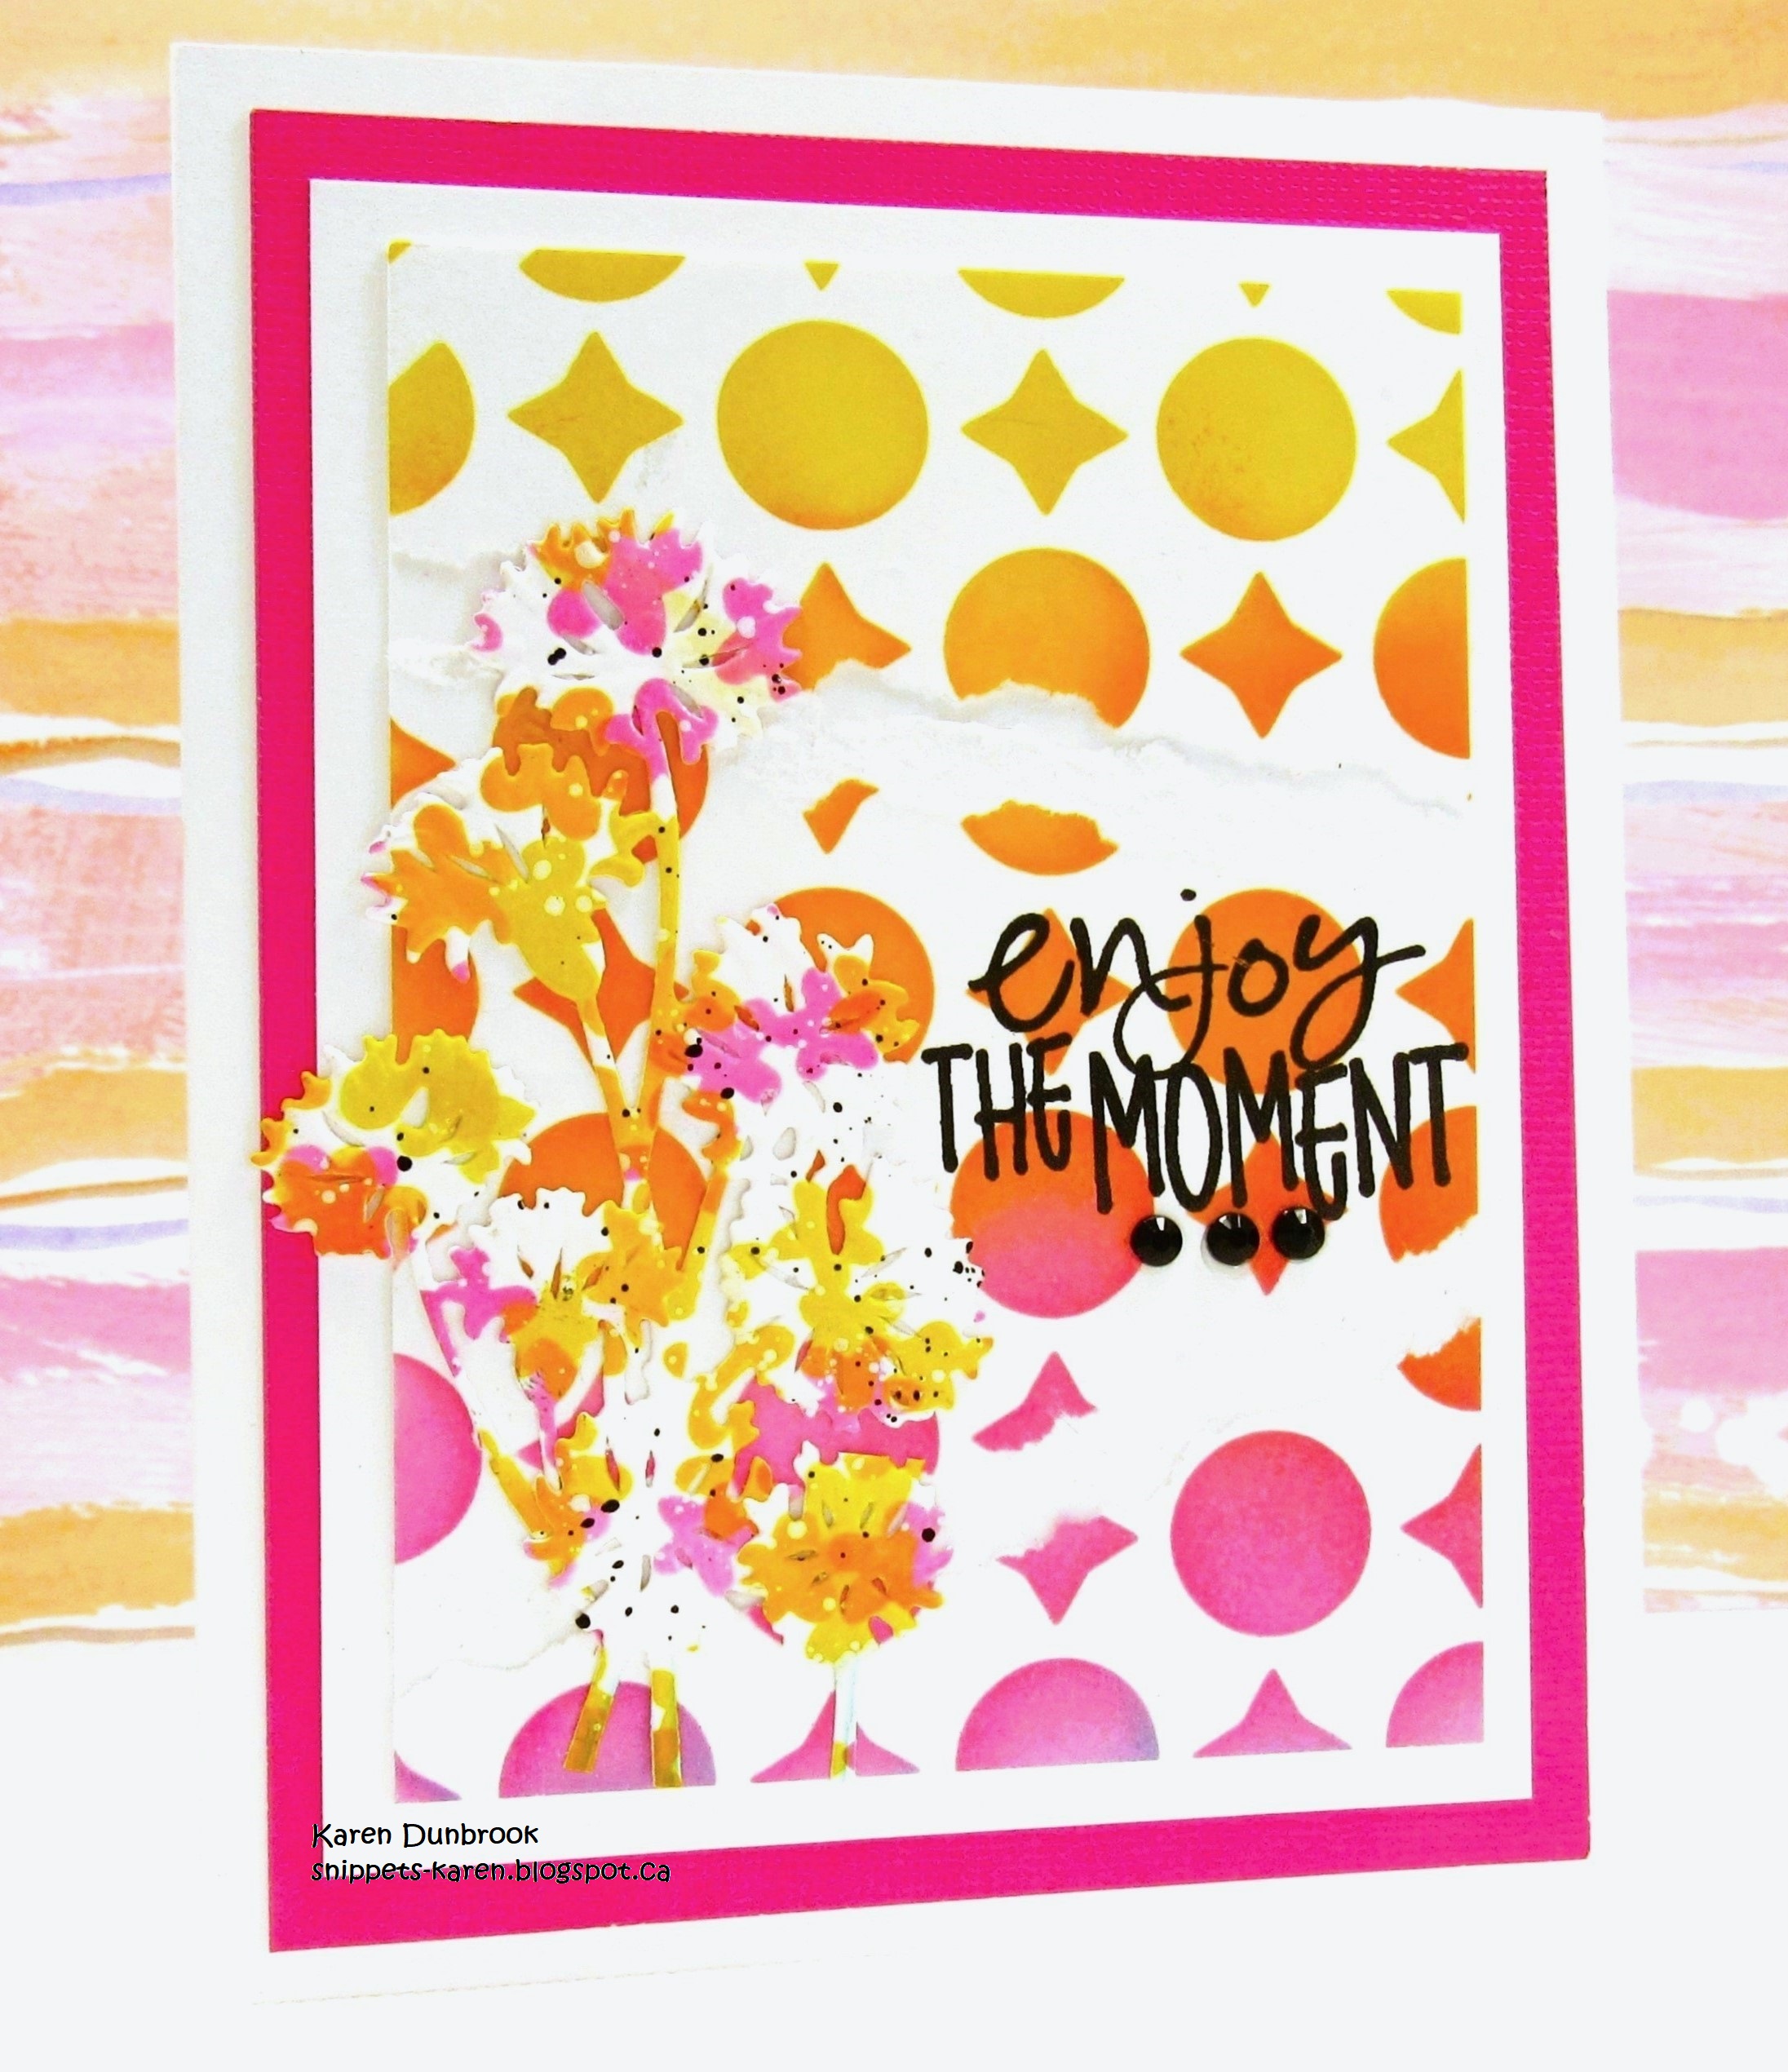
  • I cut a piece of white cardstock and beginning at the top of the paper, I blended these Distress Oxide colours together: Fossilized Amber/ Ripe Persimmon/ Picked Raspberry/ Cracked Pistachio/ Peacock Feathers.
  • Next, I embossed the panel with a 3D Burlap folder.  Using a sanding block, I gently sanded over the embossing to add a bit more interest and reveal a bit of the white cardstock.
  • I laid the Dot Circle  Dot Circle stencil (one of my favs) over the embossed panel and inked with the same colours as mentioned above.
  • I die cut out the little paint brushes and glued them together.
  • I stamped the sentiment in my Misti and then die cut it out.
  • I glued the embossed panel onto a piece of white, then pink cardstock and finally onto an A2 sized card base.
  • I glued the little paint brushes onto the card front and used some foam tape to add the sentiment.

Here is the stencil I used:

Thanks so much for coming by and taking a look.

Discount Code for A Colorful Life Designs
(Affiliate with no extra cost to you) 

Supplies
Stamps- With All My Art (TE)
Inks- DOX; Versafine Clair
Paper- heavy white (Scribes Nook- Waterloo, Ont.)
Accessories and Tools- stencil (A Colorful Life Designs); 3D Burlap EB Folder (Honey Bee);
Paint the Town dies (TE); foam tape; sanding block

Sunday 26 May 2024

Rockin' Out


Good Morning

Today's card is more on the masculine side featuring the newly released for May stencil from 
A Colorful Life Designs called:

So, here's what I did to create my card.
  • I placed a piece of white cardstock onto my Make Art Station and put the Right Angles stencil over that. I inked with some Black Soot Distress Oxide ink.
  • I lifted the stencil off and then repositioned it and then inked again creating this fun pattern.
  • I splattered with my black Posca pen and set aside to dry.
  • While that dried, I die cut the guitar and the Burlap Texture die with some red cardstock.
  • I stamped the sentiment with some black and then glued it onto a piece of red cardstock.
  • Next, I glued the stenciled panel onto a piece of red cardstock and then onto an A2 sized card base.
  • I glued the Burlap die cut onto the panel, then added the guitar over that.  
  • Lastly, I used some foam tape to add the sentiment across the bottom.

Here is the stencil I used:

Discount Code for A Colorful Life Designs
(Affiliate with no extra cost to you) 

Thanks so very much for coming by and taking a look.

Adding my card to these challenges:
Dragonfly Dreams- USE A STENCIL
SAS4Kids- CARD FOR DAD/SPECIAL GUYS
Just Us Girls- ANYTHING GOES STENCIL WEEK

Supplies
Stamps- Rock On (High Hopes)
Inks- DOX, Versafine Clair
Paper- heavy white (Scribes Nook- Waterloo, Ont.)
Accessories and Tools- stencil (A Colorful Life Designs); Large Guitar die (Paper Rose);
Burlap Texture (Altenew); foam tape; black Posca pen

Saturday 25 May 2024

Sweet New Baby


Welcome
Meet today's card.
It features 3 stencils in total, 2 are new and the other is an older one and all from A Colorful Life Designs.
So meet the new stencils called 

So, here' what I did to create my card.
  • I began by inking up my Gel Plate with some Worn Lipstick and some Spiced Marmalade Distress Oxide ink.
  • I placed the Puzzle Pieces stencil onto the plate and rubbed a piece of white cardstock over the plate to lift the print.
  • Next, I placed the Dotted Lines stencil over the gel plate print and inked that up with some more Worn Lipstick DOX ink.
  • I removed that stencil and replaced it with the Blazing Stars stencil and inked that one with some Picked Raspberry DOX ink.  I splattered over that stencil with my white Posca pen so just the stars would have the splatters.
  • After the panel was dry, I added the sentiment along the bottom in my Misti.
  • I glued the finished card front onto a piece of white, then pink cardstock and then onto an A2 sized card base.

Here are the 3 stencils I used:


Discount Code for A Colorful Life Designs
(Affiliate with no extra cost to you) 

Thanks so much for taking a look.

Adding my card to these challenges:
Just Us Girls- ANYTHING GOES WITH STENCILS

Supplies
Stamps- Welcome Sweet Little One (Impression Obsession)
Inks- DOX, Verafine Clair
Paper- heavy white (Scribes Nook- Waterloo, Ont.)
Accessories and Tools- stencils (A Colorful Life Designs); white Posca pen;
Gel Plate; Speedball Brayer; TE Blending Brushes

Monday 20 May 2024

Meow


Welcome
Meet the newly released stencil from A Colorful Life Designs called
Lots of cats and dogs in this new release, perfect for the pet owners 

So, here's what I did to create my card.
  • I cut a piece of white cardstock and placed the Two Cat Meow stencil over that and inked up with some black Versaclair black ink.
  • I cleaned the stencil off and then masked off one of the cat faces on the stencil.  I used that to stencil the rest of the cat faces all over my panel.  The colours I used were Cracked Pistachio, Peacock Feathers and some Shaded Lilac Distress Oxide ink.
  • I glued the stenciled card front onto a piece of purple cardstock, then onto an A2 sized card base.
  • Lastly, I added the sentiment along the bottom with some foam tape.

Here is the stencil I used:

Discount Code for A Colorful Life Designs
(Affiliate with no extra cost to you) 

Thanks so much for coming by and taking a look.

Supplies
Stamps- Simple Strips (TE)
Inks- DOX, Versafine Clair
Paper- heavy white (Scribes Nook- Waterloo, Ont.)
Accessories and Tools- stencil (A Colorful Life Designs); TE Blending Brushes;
sentiment strip die (TE); foam tape

Saturday 18 May 2024

Gate Wide Open


Good Morning
Today's card is a fun one.
It features 2 new stencils from A Colorful Life Designs called

So, here's what I did to create my card.
  • I placed a piece of white cardstock onto my Make Art Station and then put the Gate Wide Open stencil over that.  
  • I inked the dog with some Rusty Hinge Distress Oxide ink and a bit of the Black Soot and splattered the dog with my white Posca pen.
  • This stencil comes with a mask for the dog, so I first removed the stencil and placed the mask over the dog before adding the next stencil I wanted for the background.
  • I placed the Classic Circus stencil over top of the dog and then inked with some Cracked Pistachio, Broken China and some Shaded Lilac DOX ink.
  • I removed that stencil and placed the Gate Wide Open stencil back in place to add the sentiment with some Black Soot DOX ink.
  • I added a white dot to the middle of the circles on the card front with my white Posca pen.
  • I glued the dried panel onto a piece of blue cardstock, then onto an A2 sized card base.

Here are the stencils I used:


Discount Code for A Colorful Life Designs
(Affiliate with no extra cost to you) 

Thanks so much for coming by and taking a look.

Adding my card to these challenges:
Time Out- ALPHABET MAGNET DAY
CRAFT- ANYTHING GOES
My Time to Craft- SUPER CUTE

Supplies
Stamps- none
Inks- DOX
Paper- heavy white (Scribes Nook- Waterloo, Ont.)
Accessories and Tools- stencils (A Colorful Life Designs); Make Art Station (Ranger);
white Posca pen; TE Blending Brushes

Wednesday 15 May 2024

Paper Piercing with Stencils

Good Morning
A Colorful Life Designs has just released some great new stencils for May and when I saw this one, I knew right away what I wanted to do to create with it.

Meet the new stencil called:

So, here's what I did to create my card.
  • I cut a piece of black cardstock and placed the Airy Swirls over my paper.
  • Next, instead of inking up the stencil, I got out my paper piercing tool and I poked holes through the stencil onto my cardstock.  Just another way to get more mileage using your stencils.
  • I removed the stencil and glued the black cardstock onto a white A2 card base.
  • I die cut the sentiment in black and the word shadow in white and glued them together.
  • I added the sentiment to the card front with some foam tape and then added 3 silver gems.

Here is the stencil I used:
*THIS STENCIL IS ON SALE FOR ONE WEEK ONLY FROM $6.99 down to $4.00*
(you can also use my code for even more of a discount)

Discount Code for A Colorful Life Designs
(Affiliate with no extra cost to you) 

Thanks so much for coming by and taking a look.

Adding my card to these challenges:
Simon Says Wed.- USE DIE CUTS
(option: Girly)
Daisy Chain- BOYS/MEN


Supplies
Stamps- none
Inks- none
Paper- black and heavy white (Scribes Nook- Waterloo, Ont.)
Accessories and Tools- stencil (A Colorful Life Designs); piercing tool; 
Just Saying dies (Concord and 9th); silver gems

Monday 13 May 2024

Two Card Designs, One Stencil

Good Morning.
I've got 2 cards to show you today.
They both use the same stencil and same colours, but the background design looks totally different.

So, meet the newly released stencil from A Colorful Life Designs called 

So, here's what I did to create my cards.
  • I placed the Chunky Chevrons stencil over a piece of white cardstock and inked it up with some Picked Raspberry and some Ripe Persimmon Distress Oxide ink.
  • I wiped the stencil off, flipped it upside down and inked again with the same colours in the same areas.  It made a fun, patterned background.
  • I placed the stenciled panel into my Misti and stamped the flowers and the sentiment.
  • I splattered over the flowers with my black Posca pen.
  • I glued the finished piece onto some white cardstock, then orange and then onto an A2 sized card base.


So now onto CARD #2

  • I cut another piece of white cardstock and placed the Chunky Chevrons stencil onto the paper and inked with some Picked Raspberry and some Ripe Persimmon Distress Oxide ink.
  • I lifted the stencil off but to get a different look then the card above, I flipped the stencil upside down and then tried to match up the chevrons instead of off setting them and inked with the same colours again.
  • I placed the panel into my Misti and stamped the flowers to one side and added the sentiment to the side.  
  • I used my black Posca pen to splatter just around the flowers.
  • I glued the dried piece onto some pink cardstock and then onto an A2 sized card base.

Here is the stencil I used for both cards:

Discount Code for A Colorful Life Designs
(Affiliate with no extra cost to you) 

Thanks so much for coming by and taking a look.

Little Red Wagon- CREATE YOUR OWN BACKGROUND
Crafts Galore Encore- ANYTHING GOES
Sparkles- APRIL SHOWERS BRING MAY FLOWERS
Dragonfly Dreams- USE A STENCIL

Supplies
Stamps- CARD #1- Star Burst (Lavinia), Just Be Happy (Visible Image)
CARD #2- Noteworthy (STAMPlorations); Insightful Meadow (Unity)
Inks- Verafine Clair, DOX
Paper-heavy white (Scribes Nook- Waterloo, Ont.)
Accessories and Tools- stencil (A Colorful Life Designs); Misti (My Sweet Petunia); 
black Posca pen

Sunday 12 May 2024

Oh Boy, It's Your Birthday!

Welcome
I really enjoy making masculine cards and when I saw this newly released stencil from A Colorful Life Designs, I knew what I wanted to do.  Love how it turned out!
So meet the new for May stencil called 

So, here's what I did to create my card.
  • I cut a piece of white cardstock and placed the Right Angles stencil over that.  I inked the whole panel with some Salty Ocean Distress Oxide ink.
  • I removed the stencil, cleaned it off and repositioned it again.  This time I inked with some Versafine Clair Nocturne ink.
  • Next, I stamped the running shoes with more of the black, then die cut them out.  
  • I stamped the sentiment with some more of the Salty Ocean DOX ink and die cut that out too.
  • I glued the stenciled panel onto a piece of black cardstock, then onto and A2 sized card base.
  • To help bring attention to my sentiment, I cut a strip of black cardstock and added the sentiment over that with some foam tape.
  • Finally, I used some more foam tape to add the running shoes under the sentiment.

Here is the stencil I used:

Discount Code for A Colorful Life Designs
(Affiliate with no extra cost to you) 

Thanks so much for coming by and taking a look.

Adding my card to these challenges:
Little Red Wagon- CREATE YOUR OWN BKG
Simon Says Wed.- USE DIE CUTS
Fab 'n' Funky- FOR A CHILD, BABY or TEEN

Supplies
Stamps- Sock Hop (Catherine Pooler); Big and Bold Sentiment and die (SSS)
Inks- DOX, Versafine Clair
Paper- heavy white (Scribes Nook- Waterloo, Ont.)
Accessories and Tools- stencil (A Colorful Life Designs); Misti (My Sweet Petunia)

Monday 6 May 2024

Enjoy Your Moments


Good Morning
Spring is in the air so I decided to use this new stencil from A Colorful Life Designs to create a fun background and add some spring-like flowers.
The new stencil is called:

So, here's what I did to create my card.
  • I placed the Classic Circus stencil over a piece of white cardstock and beginning at the top and moving my way down, I inked with some Fossilized Amber, Ripe Persimmon and some Picked Raspberry Distress Oxide inks.
  • To create a bit of a different look to the background, I tore the stenciled cardstock into 3 pieces and glued them onto another piece of white cardstock.
  • I searched through my scrap box for a piece of inked cardstock that had the colours of my background in it.  (I keep a box of all the background I don't use or don't quite work out for just this purpose)  I found this toss off and die cut the flowers from it and splattered them with my black Posca pen to help them stand out a bit more against the background.
  • I glued the flowers over to the side of my stenciled panel and then stamped the sentiment with some black ink beside it.
  • I glued the stenciled panel onto a piece of pink cardstock, then onto an A2 sized card base and added 3 black gems under the sentiment.


Here is the stencil I used:

Discount Code for A Colorful Life Designs
(Affiliate with no extra cost to you) 

Thanks so much for coming by and taking a look.

Adding my card to these challenges:
Simon Says Wed.- FEMININE
Craft Rocket- FLOWERS

Supplies
Stamps- Enjoy the Moment (Daisy Bucket- no longer in business)
Inks- Versafine Clair; DOX
Paper- heavy white (Scribes Nook- Waterloo, Ont.)
Accessories and Tools- stencil (A Colorful Life Designs); black Posca pen;
Misti (My Sweet Petunia); TE Blending Brushes;
Dandelion Posies die (Creative Expressions)

Wednesday 1 May 2024

I Appreciate You


Good Morning
I'm excited for a new month which means 21 fun new releases from A Colorful Life Designs.
So here's one of the new stencils called

So, here's what I did to create my card.
  • I placed the Classic Circus stencil over a piece of white cardstock then masked the top part off on an angle with some low tack tape and inked with some Faded Jeans Distress Oxide ink.  I repeated that step along the bottom edge as well.
  • Leaving the stencil in place, I moved my low tack tape to mask off the center area and then inked with some Peacock Feathers DOX ink.
  • Next, I used my ScorPal to add the perforated lines between the different ink colours.
  • I splattered the whole panel and set aside to dry.
  • I die cut the thanks from some paper I inked with more of the Faded Jeans DOX ink and then die cut the flowers from some white cardstock.
  • When the panel was dry, I glued it onto a piece of white cardstock, then onto a piece of navy and then onto and A2 sized card front.
  • I glued the sentiment along the perforated line and then added the flowers beside that.

Here is the stencil I used:

Lots of New Bling Too!

Discount Code for A Colorful Life Designs
(Affiliate with no extra cost to you) 

Thanks so much for coming by and taking a look.

Simon Says Wed.- ANYTHING GOES
OPTION- SPRING/FLOWERS
Allsorts- STENCIL

Supplies
Stamps- none
Inks- DOX
Paper- heavy white (Scribes Nook- Waterloo, Ont.)
Accessories and Tools- stencil (A Colorful Life Designs); TE Blending Brushes;
Thanks die (SSS); Fresh Daisies die (SSS); white Posca pen