Showing posts with label embossing folder. Show all posts

Sunday, 29 March 2026

Spotlight Debossing


Welcome
It's my turn to host the TLC over at Splitcoast Stampers this week.
The technique we will be trying out I'm calling:

So, here's what I did to create my card.
  • I began by looking through my coloured cardstock until I found 2 complimentary colours.
  • Using a rectangle die, I cut from both pieces.
  • I took out this flower Embossing Folder and placed the blue sheet down first and fitted the small green die cut inside that and ran it through my machine inside the folder. BE SURE AND USE THE DEBOSS SIDE OF YOUR FOLDER.
  • I glued the pieces onto a base, matching up the embossed pattern, debossed side up.
  • Holding my black ink pad flat against the surface, I covered the whole card with black ink and set that aside to dry.
  • I die cut the sympathy sentiment in black and glued that onto the white word shadow.
  • I glued the card front panel onto a piece of green cardstock and then onto a white A2 sized card base.
  • Lastly, I used some foam tape to add the sentiment across the front of my card and added a black gem to dot the 'i'.

Thanks a lot for coming by and taking a look.

Adding my card to these challenges:
Simon Says Wed.- ANYTHING GOES
Can You Handle the Pressure- ANYTHING GOES/option; Kids
Allsorts- SPRINGTIME or ANYTHING GOES

Supplies
Stamps- none
Inks- Versafine Clair
Papers- random
Accessories and Tools- Floral Field 
Eb folder (SSS); Infinity Rectangle dies (Hero Arts);
With Sympathy die (SSS)

Tuesday, 28 May 2024

Try It On Tuesdays

Welcome
Today, I have the pleasure of being the guest designer at the 


The theme is a fun one:
EMBOSS IT

So, here's what I did to create my card.
  • I cut a piece of white cardstock and beginning at the top of the paper, I blended these Distress Oxide colours together: Fossilized Amber/ Ripe Persimmon/ Picked Raspberry/ Cracked Pistachio/ Peacock Feathers.
  • Next, I embossed the panel with a 3D Burlap folder.  Using a sanding block, I gently sanded over the embossing to add a bit more interest and reveal a bit of the white cardstock.
  • I laid the Dot Circle  Dot Circle stencil (one of my favs) over the embossed panel and inked with the same colours as mentioned above.
  • I die cut out the little paint brushes and glued them together.
  • I stamped the sentiment in my Misti and then die cut it out.
  • I glued the embossed panel onto a piece of white, then pink cardstock and finally onto an A2 sized card base.
  • I glued the little paint brushes onto the card front and used some foam tape to add the sentiment.

Here is the stencil I used:

Thanks so much for coming by and taking a look.

Discount Code for A Colorful Life Designs
(Affiliate with no extra cost to you) 

Supplies
Stamps- With All My Art (TE)
Inks- DOX; Versafine Clair
Paper- heavy white (Scribes Nook- Waterloo, Ont.)
Accessories and Tools- stencil (A Colorful Life Designs); 3D Burlap EB Folder (Honey Bee);
Paint the Town dies (TE); foam tape; sanding block

Friday, 18 November 2022

Sanded Snowflake


Welcome
Today's card was truly a fast one to make using a piece of cardstock that I rolled my brayer off onto while Gel Plate printing.  I find it's so great to have them on hand and I always keep some scrap paper nearby when I've got my plate and brayer out.

So, here's what I did to create my card.
  • I began by pulling this inked background out of my stash.  I had rolled my brayer off onto it while Gel Plate printing.
  • I placed it into this Snowflake Embossing Folder and ran it through my machine.  
  • Next, I took out my sanding tool and sanded off the raised areas to reveal more of the design.
  • I did some second generation stamping around the edges of the panel by inking up my stamp with some Blueprint Sketch Distress Oxide ink, stamping off onto a scrap paper and then stamping on the card panel.
  • I splattered with my white Posca pen to give a more snowy look.
  • I glued that onto a white A2 size card base.
  • I used some foam tape to add the sentiment strip across the middle of the snowflake.
  • Lastly, I added some silver gems to add interest.


Thanks so much for coming by and taking a look.

Adding my card to these challenges:
Can You Handle the Pressure?-  Anything Goes Embossing With A Twist of Wreaths
Creative Knockouts- ANYTHING GOES
As You Like It- NON-TRADITIONAL COLORS
(love the blues, so calm and soothing)

Supplies
Stamps- Friendship (Hero Arts)
Inks- DOX
Paper- Scribes Nook- Waterloo, Ont.
Accessories and Tools- Snowflake EB folder (Stampin Up); sanding block; 
white Posca pen; Christmas Sentiment strips (SSS); foam tape; silver gems

Monday, 18 July 2022

Sympathy


Good Morning
Taking a break from stenciling to use the new to my Foxgloves Embossing folder I picked up from Scrapbook.com.
I so wish I could grow these in my garden, they are so elegant and beautiful.
I used a simple inking technique that can be used with any EB folder and it is a great way to get more mileage from tools you already have on hand.

So here's what I did to create my card.
  • I got out this Foxglove EB folder and inked it up with some Dusty Concord and some Wilted Violet Distress Oxide inks.
  • Next, I gave it a small spray of water and then I placed a piece of white cardstock into the folder and ran it through my Spellbinders Platinum machine.
  • I took the inked panel out of the folder and splattered it with my white Posca pen.
  • While that dried, I stamped the sentiment, clear heat embossed it and then die cut it out.
  • I glued the embossed panel onto a heavy white A2 card base.
  • Lastly, I pop dotted the sentiment along the bottom of the flowers.


Thanks so much for coming by and taking a look.

Adding my card to these challenges:
Simon Says Wed.- MAKE YOUR OWN BKG

Supplies
Stamps- Simple Strips (TE)
Inks- Versafine Clair, Distress Oxides
Paper- heavy white (Scribes Nook- Waterloo, Ont.)
Accessories and Tools- Foxglove eb folder (Lisa Horton); white Posca pen; clear eb powder

Tuesday, 4 January 2022

A New Year


Hello and Welcome
I hope your first few days of the New Year have been happy ones.
I had a few days off so was glad to have some time to play with some new Christmas goodies.
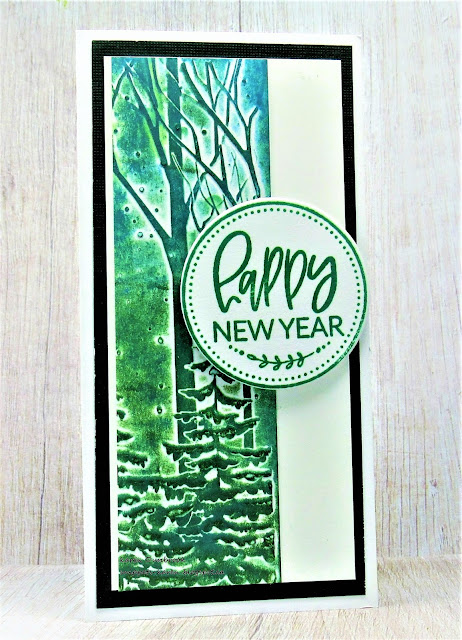
I was inspired by a video I watched and decided to try and make my first 'mini' slimline card.
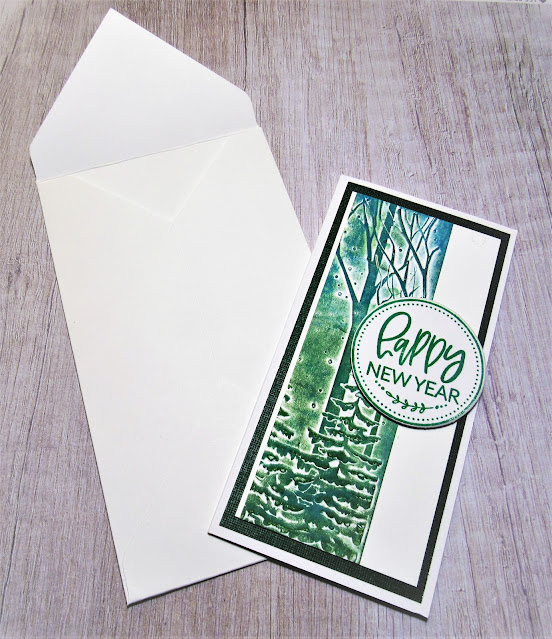
Super easy to make but may be difficult to find the right size envelope so I will add how I made one at the end.
A standard Slimline card is size is 8 1/2 x 3 1/2 whereas a Mini Slimline is 6" x 3".

So here's what I did to create my card.
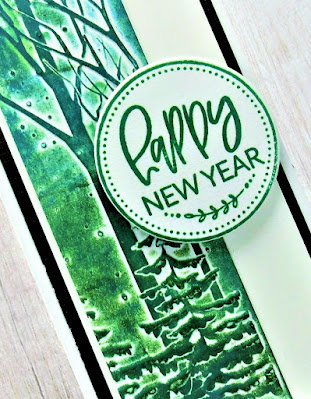
  • I began by embossing a piece of heavy white cardstock using my new Snowy Forest eb folder.  I ran it through my machine to get a good impression.
  • I wanted to add colour so I got out my brayer and rolled some Lucky Clover Distress Oxide ink along the bottom where the trees are.  I cleaned off my brayer and then added some Rustic Wilderness DOX ink over the middle area, overlapping the colours a bit.
  • Finally at the top, I brayered on some Salty Ocean DOX ink to give the sky a hint of blue.
  • While the ink dried, I cut my card base.  For my mini slimline the white cardstock was cut 6 x 6" and scored at 3"and folded in half.
  • I then took the embossed panel and cut it in half so I could make 2 slimline cards (another one coming soon) using the one embossed/inked piece I had made.
  • I glued it to one side of a piece of white cardstock, then onto a dark green that looks black here and finally, onto the white card base.
  • I stamped the sentiment and circle from a new Avery Elle set I got for Christmas using some more Rustic Wilderness ink in my Misti, then die cut out the circle and pop dotted it off to the side.


ENVELOPE:
  • The envelope to mail this card is very simple.  I used my Envelope Punch Board to create it.
  • I cut my lightweight white cardstock to 8 1/4 x 8 1/4".  (I used the lightweight cs as it is easier to fold and not as stiff as the heavy.)
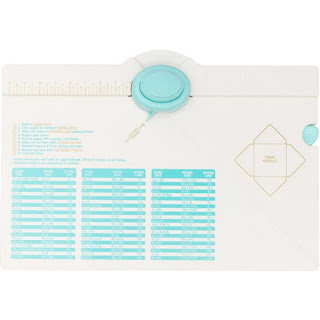
  • I placed it into my Envelope Punch Board and punched the first mark at 3 1/8" and scored along the marked line.  I rotated my cardstock and followed the instructions, continuing around until my envelope was made.  It is so simple to do using this Punch Board.  You can make any size envelope. All the measurements are included on the front of the board.


Here is a picture of the Envelope Punch Board:
Thanks so much for coming by and taking a look.

Adding my card to these challenges:
Simon Says Wed.- TIME TO PARTY
CAS on Friday- HAPPY NEW YEAR
Shopping Our Stash- BEGINS WITH 'S'
(slimline)

Supplies
Stamps- Merry Circle Tags (Avery Elle)
Inks- Distress Oxides (see above)
Paper- cardstock (Scribes Nook- Waterloo, Ont.)
Accessories and Tools- Snowy Forest eb folder (Memory Box); Misti (My Sweet Petunia); 
Speedball Brayer; Envelope Punch Board (We R Memory Keepers); 
Infinity Circle dies (Hero Arts); foam tape

Saturday, 2 October 2021

Oh Christmas Tree


Hello and Welcome
Time is just going by so fast.  
With sweater weather arriving so quickly here where I live, it reminds me that I need to get going on making some more holiday cards.  
So into my stash I went and this is what I came up with.

Here's what I did to create my card.
  • As I went through my stash of inky backgrounds, I found all the practice sheets that I had done on my Gel Plate with acrylic paint while taking a class from Vicki Boutin.  They certainly weren't my favourite so I decided to change that.  I found this one that had blue and green paint on it.  Kind of streaky and not great.  I scratched my head and wondered what to do.  I just picked up a new embossing folder by Spellbinders called Forevergreen and thought I would give it a try.  
  • I placed the painted piece inside the Embossing folder and ran it through my machine a few times to get a good impression.  TIP: Lightly spray your paper with water before embossing to get a better impression.
  • Next, using a small sanding block, I gently rubbed over the raised area to remove some of the blue and green paint. Now to figure out how I would make the details more noticable.
  • I squeezed out a small amount of white acrylic paint onto my non-stick craft mat and using my brayer, I rolled some white paint gently over the top of the sanded areas.  I loved the results.
  • I splattered with more of the white paint that was left on my mat and set aside to dry.
  • I die cut the sentiment from Simon Says from some white cardstock twice and glued them together for stability.
  • When the panel was dry, I glued it onto a piece of green cardstock, then onto a white card base.
  • I glued the sentiment onto the panel, then added some green gems.


I was happy with the results of my card using the embossing folder and this otherwise 'throw away' piece of painted cardstock.
I hope this inspires you to look through your stash and use an otherwise rejected piece.
To see some of my other cards using this technique, go HERE and HERE.

Thanks so much for coming by and taking a look.

Supplies
Stamps- none
Inks- none, Basics Acrylic paint
Paper- white cardstock (Scribes Nook- Waterloo, Ont.)
Accessories and Tools- Forevergreen EB folder (Spellbinders); Speedball Brayer; 
Merry Christmas die (SSS); Spellbinder Platinum die cutting machine; green gems; sanding block