Sunday 28 April 2024

Blackout Embossed Daisy


Welcome
This week, I'm hosting the TLC Challenge (Technique Lovers) over at Splitcoast Stampers.

The technique we will be playing with today is called:
It will give you stunning results as you will see.  The trick it to use the Debossed side of the cardstock.

So, here's what I did to create my card.
  • I took a piece of white cardstock and embossed it using the Spoon Daisy Embossing Folder from Altenew.
  • I turned my cardstock to the DEBOSSED side and using my blending brushes, I added colour to the flower by randomly rubbing the ink over the embossing.  At this point, you don't have to be precise with your inking because it will be getting covered up with the black ink.  The Distress Oxide colours I used were:  Fossilized Amber, Picked Raspberry and some Peacock Feathers.
  • After I was happy with the inking, I took my Versafine Clair Noir black ink pad, held it flat onto the panel and rubbed until the black ink covered all the card panel.
  • I splattered with my white Posca pen and then set aside to dry.
  • While that dried, I stamped the sentiment with some Versamark ink and then white heat embossed it on the black cardstock.
  • I glued the dried panel onto a piece of yellow cardstock, then a piece of blue and then finally onto an A2 sized card base.  
  • Finally, I added the sentiment across the bottom using some foam tape.

I hope you give it a try.  
Thanks so much for coming by and taking a look.

Adding my card to these challenges:
Simon Says Wed.- ANYTHING GOES
Stamping Sensations- MOOD BOARD/ ANYTHING GOES
Can You Handle the Pressure?- ANYTHING GOES WITH A TWIST OF FEMININE


Supplies
Stamps- Simple Strips (TE)
Inks- Versafine Clair; Versamark; DOX
Paper- heavy white (Scribes Nook- Waterloo, Ont.)
Accessories and Tools- Daisy EB folder (Altenew); TE Blending Brushes; 
white Posca pen; foam tape; white embossing powder

Saturday 27 April 2024

Party Time

Good Morning
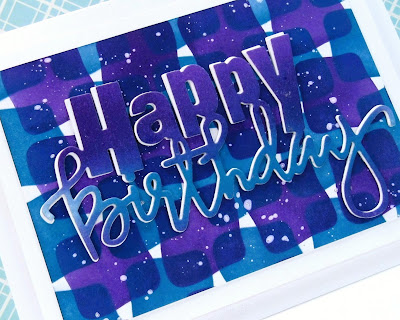
I had fun making this birthday card using 2 newly released stencils from A Colorful Life Designs called

So, here's what I did to create my card.
  • I placed a piece of white cardstock onto my Make Art Station and then put the Rocks stencil over that.  
  • I began at the top of my cardstock and inked with some Cracked Pistachio Distress Oxide.  I moved on down my cardstock inking with some Villainous Potion and then some Peacock Feathers along the bottom.
  • Leaving that stencil in place, I put the Four Squares stencil over it and inked again using the same colours to match the areas in the background.  It added lots of interest and details to the design.
  • Using the eraser on the end of a pencil, I added the dots between the stenciled squares.
  • I splattered with my white Posca pen and then set aside to dry.
  • I die cut the sentiment from white paper 3 times and inked one of them with the same colours I had used on the background.  I glued the 2 white ones together and then glued the inked one on the top, offsetting it a bit so it would show up better against the background.
  • I took a piece of purple cardstock and die cut the edge of it, then glued that onto an A2 sized card base.  I added the stenciled panel over that.  
  • Lastly, I glued the sentiment right over the middle of the panel.

Here are the stencils I used:


Discount Code for A Colorful Life Designs
(Affiliate with no extra cost to you) 

Thanks so much for coming by and taking a look.

Adding my card to these challenges:
Simon Says Wed.- ANYTHING GOES
Cut it Up- STARTS WITH A 'B'

Supplies
Stamps- none
Inks- DOX
Paper- heavy white (Scribes Nook- Waterloo, Ont.)
Accessories and Tools- stencils (A Colorful Life Designs); blending brushes;
Make Art Station (Ranger); Big birthday die (Amazon); white Posca pen; 
Diagonal Stitch Rectangle (Taylored Expressions)

Sunday 21 April 2024

Hello Spring

Welcome
Today's card features 2 new stencil releases this month from A Colorful Life Designs called
I combined them with some fun colours and patterns.

So, here's what I did to create my card.
  • I began by placing a piece of white cardstock onto my Make Art Station and then put the Intersections stencil over just the top half of my cardstock panel.  
  • Next, I inked it up with a few different Distress Oxide inks.  These are the colours I used:  Fossilized Amber, Ripe Persimmon and Picked Raspberry.
  • I lifted the stencil off and repositioned it across the bottom part of my cardstock and inked again with the same colours as mentioned above.
  • I took another piece of white cardstock and inked a portion of the Rotating Rings stencil.  Again, I used the same colours as mentioned above.  I used a circle die and cut that out.
  • I die cut the sentiment from some more white cardstock 3 times and inked the top one to match the background.
  • I glued the stenciled card front onto a piece of pink and then onto an A2 card base.
  • I used some foam tape to add the circle over the middle of my card front and glued the sentiment onto that.

Here are the stencils I used:


Discount Code for A Colorful Life Designs
(Affiliate with no extra cost to you) 

Thanks so much for the visit!

Adding my card to these challenges:
Simon Says Wed.- STENCIL IT
Simon Says Mon.- MAKE YOUR OWN BKG

Supplies
Stamps- NONE
Inks- DOX
Paper- heavy white (Scribes Nook- Waterloo, Ont.)
Accessories and Tools- stencils (A Colorful Life Designs); blending Brushes;
Make Art Station (Ranger); Circle die (Hero Arts); Hello Spring die (Amazon)

Saturday 20 April 2024

The Coming of Spring


Welcome
Today's card features a new for April stencil from A Colorful Life Designs called

So, here's what I did to create my card.
  • I placed the Square to Circle stencil onto a piece of white cardstock, then inked it up with some Ripe Persimmon Distress Oxide ink.
  • I removed the stencil, wiped it clean and then placed it back onto the cardstock, shifting it down and inked with some Picked Raspberry DOX ink.
  • I placed the stenciled panel into my Misti and stamped the large circle into the left hand corner with some Picked Raspberry DOX ink.  I added the Grid stamp inside of the circle with the same colour.
  • I stamped the flowers inside the circle, then stamped the sentiment into the top corner.
  • I glued the finished card front onto a piece of white cardstock, then used some foam tape to add it over a white card base.

Here is the stencil I used:

Discount Code for A Colorful Life Designs
(Affiliate with no extra cost to you) 

Thanks so much for coming by!

Adding my card to these challenges:
Simon Says Wed.- STENCIL IT
Simon Says Monday- MAKE YOUR OWN BKG
Just Add Ink- CHOOSE 2 (Leaves, Flowers, Pot)


Supplies
Stamps- Circle Collage (Stampers Anonymous); Off the Grid (SU); 
Beautiful You (STAMPlorations); To Everything (IO)
Inks- DOX; Versafine Clair
Paper- heavy white- Scribes Nook- Waterloo, Ont.
Accessories and Tools- stencil (A Colorful Life Designs); Misti; 
Make Art Station (Ranger)

Friday 19 April 2024

Rainbow Birthday


Good Morning
Today's card has a bit of a rainbow look to it.
I used the new stencil from A Colorful Life Designs called

So, here's what I did to create my card.
  • I placed the Rotating Rings stencil over a piece of white cardstock on my Make Art Station.
  • Starting at the top and moving my way down, I inked it up with some Fossilized Amber, Ripe Persimmon, Picked Raspberry and then some Peacock Feathers Distress Oxide inks.
  • While that dried, I stamped and die cut the sentiment.
  • I glued the stenciled card front onto a piece of white cardstock, then onto a piece of blue and then onto an A2 sized card base.
  • Lastly, I used some foam tape to pop the sentiment over the panel and finally, I added some bling around the sentiment.

Here is the stencil I used:

Discount Code for A Colorful Life Designs
(Affiliate with no extra cost to you) 

Thanks a lot for coming by and taking a look.

Adding my card to these challenges:
Simon Says Wed.- STENCIL IT
Simon Says Monday- MAKE YOUR OWN BKG

Supplies
Stamps- Big and Bold Sentiment and die (SSS)
Inks- DOX
Paper- heavy white (Scribes Nook- Waterloo, Ont.)
Accessories and Tools- stencil and bling (A Colorful Life Designs); blending brushes;
foam tape

Tuesday 16 April 2024

So Much Thanks

Welcome
Today's card featured the new stencil from A Colorful Life Designs called
This stencil is a fun, unique one to work with and is a larger size for those that work on a bigger scale.

So, here's what I did to create my card.
  • I began by putting the Rotating Rings stencil over a piece of white cardstock and inked it with some Villainous Potion Distress Oxide ink.
  • I removed the stencil, wiped it off, then repositioned it and inked with some Peacock Feathers DOX ink.
  • Next, I cut a circle from the stenciled card panel and glued it onto a purple die cut circle that was just a bit bigger.
  • I die cut the sentiment from some purple paper and splattered the letters with my white Posca pen.
  • I glued the card front onto a piece of purple cardstock, then onto a white A2 sized card base.
  • I used some foam tape to put the circle back into position over the front panel, then glued the sentiment letter over it.

Here is the stencil I used:

Discount Code for A Colorful Life Designs
(Affiliate with no extra cost to you) 

Thanks so much for coming by and taking a look.

Adding my card to these challenges:
Simon Says Monday- MAKE YOUR OWN BKG
Crafts Galore Encore- ANYTHING GOES

Supplies
Stamps- NONE
Inks- DOX
Paper- heavy white (Scribes Nook- Waterloo, Ont.)
Accessories and Tools- stencil (A Colorful Life Designs); white Posca pen;
Infinity Circle die (Hero Arts); sentiment die (Concord and 9th)

Saturday 13 April 2024

Hooray!

Welcome
Today I've got a fun card that features the new for April stencil from A Colorful Life Designs called
It sure is a good one to use.

So, here's what I did to create my card.
  • I put the Puzzle Pieces stencil over my white cardstock and then inked it up with some Villainous Potion Distress Oxide ink.
  • I lifted the stencil off, cleaned it and repositioned it to the open white areas, then inked again but this time with some Uncharted Mariner DOX ink.
  • Next, I splattered with my white Posca pen and set aside to dry.
  • I die cut the HOORAY sentiment 4x's from some white cardstock, then inked one up with the same colours as the background.  I die cut the sentiment shadow with a piece of vellum and glued them all together.
  • I glued the stenciled panel onto a piece of white cardstock, then a piece of purple and finally, onto an A2 sized card base.
  • I glued the sentiment across the front to finish off my card using some foam tape.

Here is the stencil I used:

Discount Code for A Colorful Life Designs
(Affiliate with no extra cost to you) 

Thanks so much for coming by and taking a look.

Adding my card to these challenges:
Addicted to Stamps and More- DIE CUT &/or STENCIL
Word Power- SENTIMENT IS FOCUS

Supplies
Stamps- none
Inks- DOX
Paper- heavy white (Scribes Nook- Waterloo, Ont.)
Accessories and Tools- stencil (A Colorful Life Designs); blending Brushes;
HOORAY die (Taylored Expressions); white Posca pen

Friday 12 April 2024

Masculine Birthday


Good Morning
Meet the new for April stencil from A Colorful Life Designs called
This is a simple stencil but it is perfect for layering with other stencils or I just used it to make a fun pattern.  

So, here's what I did to create my card.
  • I put a piece of white cardstock onto my Make Art Station and placed the Rocks stencil over that.  I inked it up with some Uncharted Mariner Distress Oxide ink.
  • I lifted the stencil off, cleaned it and then repositioned it over my cardstock.  This time, I inked with some Villainous Potion DOX ink.  
  • I removed the stencil, splattered with my white Posca pen and set aside to dry.
  • Next, I inked up a piece of white cardstock using the same DOX inks as mentioned above and die cut the sentiment.  I also die cut the sentiment again with some white cardstock, glued them together being sure to offset them so the sentiment would show up against the background.
  • I glued the stenciled card front onto a piece of white cardstock, then used some foam tape to pop it up onto an A2 sized card base.
  • I glued the sentiment into the center to finish off my card.

Here is the stencil I used:

Thanks so much for coming by and taking a look.

Adding my card to these challenges:
Addicted to Stamps and More- DIE CUT &/ OR STENCIL

Supplies
Stamps- none
Inks- DOX
Paper- heavy white (Scribes Nook- Waterloo, Ont.)
Accessories and Tools- stencil (A Colorful Life Designs); Make Art Station (Ranger);
blending brushes; white Posca pen; die (Amazon)

Thursday 11 April 2024

Big Hello!

HELLO!
Today's card is a fun one that I did by combining 2 newly released stencil from A Colorful Life Designs called

So, here's what I did to create my card.
  • I put the Rocks stencil over the Four Squares stencil on a piece of white cardstock.
  • I inked it up with some Fossilized Amber Distress Oxide right into the middle of the panel.  Next, I inked with some Ripe Persimmon DOX ink on either side and finally, added some Picked Raspberry DOX ink along the outer edges.  What a fun pattern it created!
  • I removed the stencils and die cut the HELLO right from the middle of my stenciled card front.
  • I wanted to do an eclipse technique using the letters, so I die cut them again 3x's with white cardstock and glued them all together, adding the stenciled ones on the top.
  • I glued the stenciled panel onto a piece of orange cardstock, then onto a piece of red and then onto an A2 sized card base.
  • I glued the HELLO letters back into place on the card front.
  • The last step was to add some bling around the sentiment.

Here are the stencils I used:


Discount Code for A Colorful Life Designs
(Affiliate with no extra cost to you) 

Thanks so much for coming by and taking a look.

Adding my card to these challenges:
Addicted to Stamps and More- DIE CUT &/or STENCIL

Supplies
Stamps- none
Inks- DOX
Paper- heavy white (Scribes Nook- Waterloo, Ont.)
Accessories and Tools- stencil and Bling (A Colorful Life Designs); Blending Brushes; 
die (Concord and 9th)

Sunday 7 April 2024

Birthday Fun


Good Morning
Today, I decided to make a monochromatic card using the new for April stencil from A Colorful Life Designs called

So, here's what I did to create my card.
  • I placed a piece of white cardstock onto my Make Art Station and placed the Four Squares stencil over that.  
  • Starting at the center of the stencil, I inked it up with some Villainous Potion Distress Oxide ink.
  • Next, I inked the outer edges using some Wilted Violet DOX ink.  To add some interest, I went back into the middle area and inked with some Uncharted Mariner DOX ink that gave a bit of contrast.
  • Using the same colours as mentioned above, I inked up a scrap of white cardstock and then used that to die cut the sentiment.
  • I die cut an oval from white cardstock, then glued the sentiment over that.
  • To assemble my card, I glued the stenciled panel onto a piece of pale mauve cardstock, then onto an A2 sized card base.
  • I used some foam tape to add the sentiment over the middle of the panel.
  • Finally, I added some bling around the sentiment.

Here is the stencil I used:

AND DON'T FORGET THE BLING:


Discount Code for A Colorful Life Designs
(Affiliate with no extra cost to you) 

Thanks so much for coming by and taking a look.

Adding my card to these challenges:
Simon Says Wed.- HAPPY BIRTHDAY
Dragonfly Dreams- USE A DIE

Supplies
Stamps- NONE
Inks- DOX
Paper- heavy white (Scribes Nook- Waterloo, Ont.)
Accessories and Tools- stencil and bling (A Colorful Life Designs); Make Art Station (Ranger);
Oval die (Concord and 9th); sentiment die (SSS)

Saturday 6 April 2024

Celebrating With You


Welcome
I am loving this new stencil from A Colorful Life Designs called 
I turned the stencil on the diagonal to create a fun new pattern.

So, here's what I did to create my card.
  • I placed a piece of white cardstock onto my Make Art Station, then put the Four Squares stencil over my card panel on the diagonal.
  • I inked it up with some Ripe Persimmon and some Picked Raspberry Distress Oxide ink.
  • I lifted the stencil off, cleaned it and then flipped it over and inked again using the same colours.
  • I placed the stenciled card panel into my Misti and stamped the flower stem along the side.
  • I rubbed some of the same colours mentioned above, onto a scrap piece of white cardstock and sprayed with water to blend the colours together.  I then stamped the flower head onto that inked scrap and fussy cut it out.
  • I stamped the sentiment over to the side and used some foam tape to pop the flower head into place over the stem.
  • I used my black Posca pen to splatter just over the flower area.
  • I glued the finished card front onto a piece of white, then pink cardstock and finally onto an A2 sized card base.

Here is the stencil I used:

Discount Code for A Colorful Life Designs
(Affiliate with no extra cost to you) 

Thanks a lot for coming by and taking a look.

Adding my card to these challenges:
Simon Says Wed.- HAPPY BIRTHDAY
Seize the Birthday- SPRING FLORAL
As You Like It- CUTE or FLORAL
(to me florals add such elegance and are easy to use on any background)

Supplies
Stamps- Creative Chaos (Visible Image); Celebrate (IO)
Inks- DOX, Versafine Clair
Paper- heavy white (Scribes Nook- Waterloo, Ont.)
Accessories and Tools- stencil (A Colorful Life Designs); Make Art Station (Ranger); 
blending brushes; black Posca pen

Friday 5 April 2024

Four Squares

Welcome
Here's another new for April stencil from A Colorful Life Designs called
I decided to use it to make a monochromatic card.

So, here's what I did to create my card.
  • I placed a piece of white cardstock onto my Make Art Station and put the Four Squares stencil over that, centering it onto the cardstock.
  • Next, I inked it up using Peacock Feathers, Tumbled Glass, Blueprint Sketch and some Salty Ocean Distress Oxide inks. 
  • I removed the stencil and splattered with my white Posca pen, then set aside to dry.
  • I inked up a scrap piece of white cardstock using the same colours as mentioned above, then die cut the sentiment.  I die cut the sentiment shadow from a piece of vellum and glued the two together.
  • I glued the stenciled card front onto a piece of blue cardstock, then onto an A2 sized card base.  
  • I glued the sentiment into the center and added a dark blue gem for the dot on the 'j'.

Here is the stencil I used:

Discount Code for A Colorful Life Designs
(Affiliate with no extra cost to you) 

Thanks so much for coming by and taking a look.

Adding my card to these challenges:
Word Power- SENTIMENT IS FOCAL POINT
Crafty Gals- ANYTHING GOES

Supplies
Stamps- none
Inks- DOX
Paper- vellum, heavy white (Scribes Nook- Waterloo, Ont.)
Accessories and Tools- stencil (A Colorful Life Designs); Make Art Station (Ranger);
TE blending brushes; white Posca pen; die (Amazon)