Showing posts with label Grunge. Show all posts

Saturday, 26 April 2025

Scalloped Harlequin

Welcome
I had fun playing with this newly released stencil from A Colorful Life Designs called;

So, here's what I did to create my card.
  • I placed the Scalloped Harlequin stencil over a piece of white cardstock and inked it up with some Ripe Persimmon Distress Oxide ink along the middle and then some Picked Raspberry DOX ink along the edges.
  • I cleaned the stencil off, shifted the position and then inked again with some Fossilized Amber DOX ink.
  • I removed the stencil and stamped the Grunge stamp over the whole panel with some more of the Ripe Persimmon DOX ink.
  • I splattered the panel with my white Posca pen and set aside to dry.
  • While that dried, I inked another piece of white cardstock with the same colours as used above and stamped it too with the same Grunge stamp.  I used that to die cut the sentiment.
  • I wanted a 'stacked' sentiment so I die cut the Hello 4 x's with some white cardstock and glued them all together, added the inked one to the very top.
  • I glued the stenciled card front panel onto a piece of white cardstock, then pink and then onto a white 4 1/4" square card base.
  • Finally, I glued the sentiment over the middle of the card base and added some gems to finish off my card.

Here is the stencil I used:

My Discount Code for Your Entire Order from A Colorful Life Designs:
Thanks a lot for coming by and taking a look.

Adding my card to these challenges:
Simon Says Wed.- MAKE IT GIRLY
Cardz 4 Galz- ART DECO
Just Us Girls- STENCIL WEEK/ANYTHING GOES

Supplies
Stamps- Grunge (Kaisercraft)
Inks- DOX
Paper- heavy white
Accessories and Tools- stencil (A Colorful Life Designs); TE Blending Brushes;
white Posca pen; Hello die (Amazon)

Wednesday, 31 August 2022

Mix It Up Birthday


Welcome
Meet today's card featuring this fun Cow Hide stencil from A Colorful Life Designs.
I wanted to try and give it a different look.

So here's what I did to create my card.
  • Like I mentioned above, I wanted to give the Cow Hide stencil a more unique look, plus I didn't have a cow stamp.  I cut a piece of white cardstock and placed it onto my Make Art Station.
  • Next, I positioned the Marvelous Masks Rectangle also from A Colorful Life Designs into the corner.  I wanted to use it for simplicity instead of having to mask.  
  • I laid the stencil over the mask and inked it up with some Picked Raspberry Distress Oxide ink.
  • I moved the rectangle mask (I did end up having to do a bit of masking using low tack tape) and repeated the process, again inking with some Mustard Seed and then some Carved Pumpkin.
  • When the card front panel was all inked, I added some details by stamping over the areas with the  same colour as I had used to ink it up.
  • I stamped the sentiment with some black ink and clear heat embossed it.
  • I carefully splattered with my black Posca pen just around the sentiment.
  • I glued it onto a piece of black cardstock, then onto an A2 card base.
  • To finish off my card, I added 3 black gems.

Here is the stencil and mask I used:
Cow Hide


Discount Code for A Colorful Life Designs
(affiliate with no extra cost to you)

Thanks so much for coming by and taking a look.

Adding my card to these challenges:
Simon Says Wed.- ANYTHING GOES
Simon Says Monday- MAKE YOUR OWN BKG

Supplies
Stamps- Grunge Tones (Visible Image); Scripted Bold Sentiments (Pinkfresh Studios)
Inks- DOX, Versafine Clair
Paper- Scribes Nook- Waterloo, Ont.
Accessories and Tools- stencils and masks (ACLD); Make Art Station (Ranger); 
TE Blending Brushes; gems (Dollar Tree), Lawn Fawn clear embossing powder

Wednesday, 10 August 2022

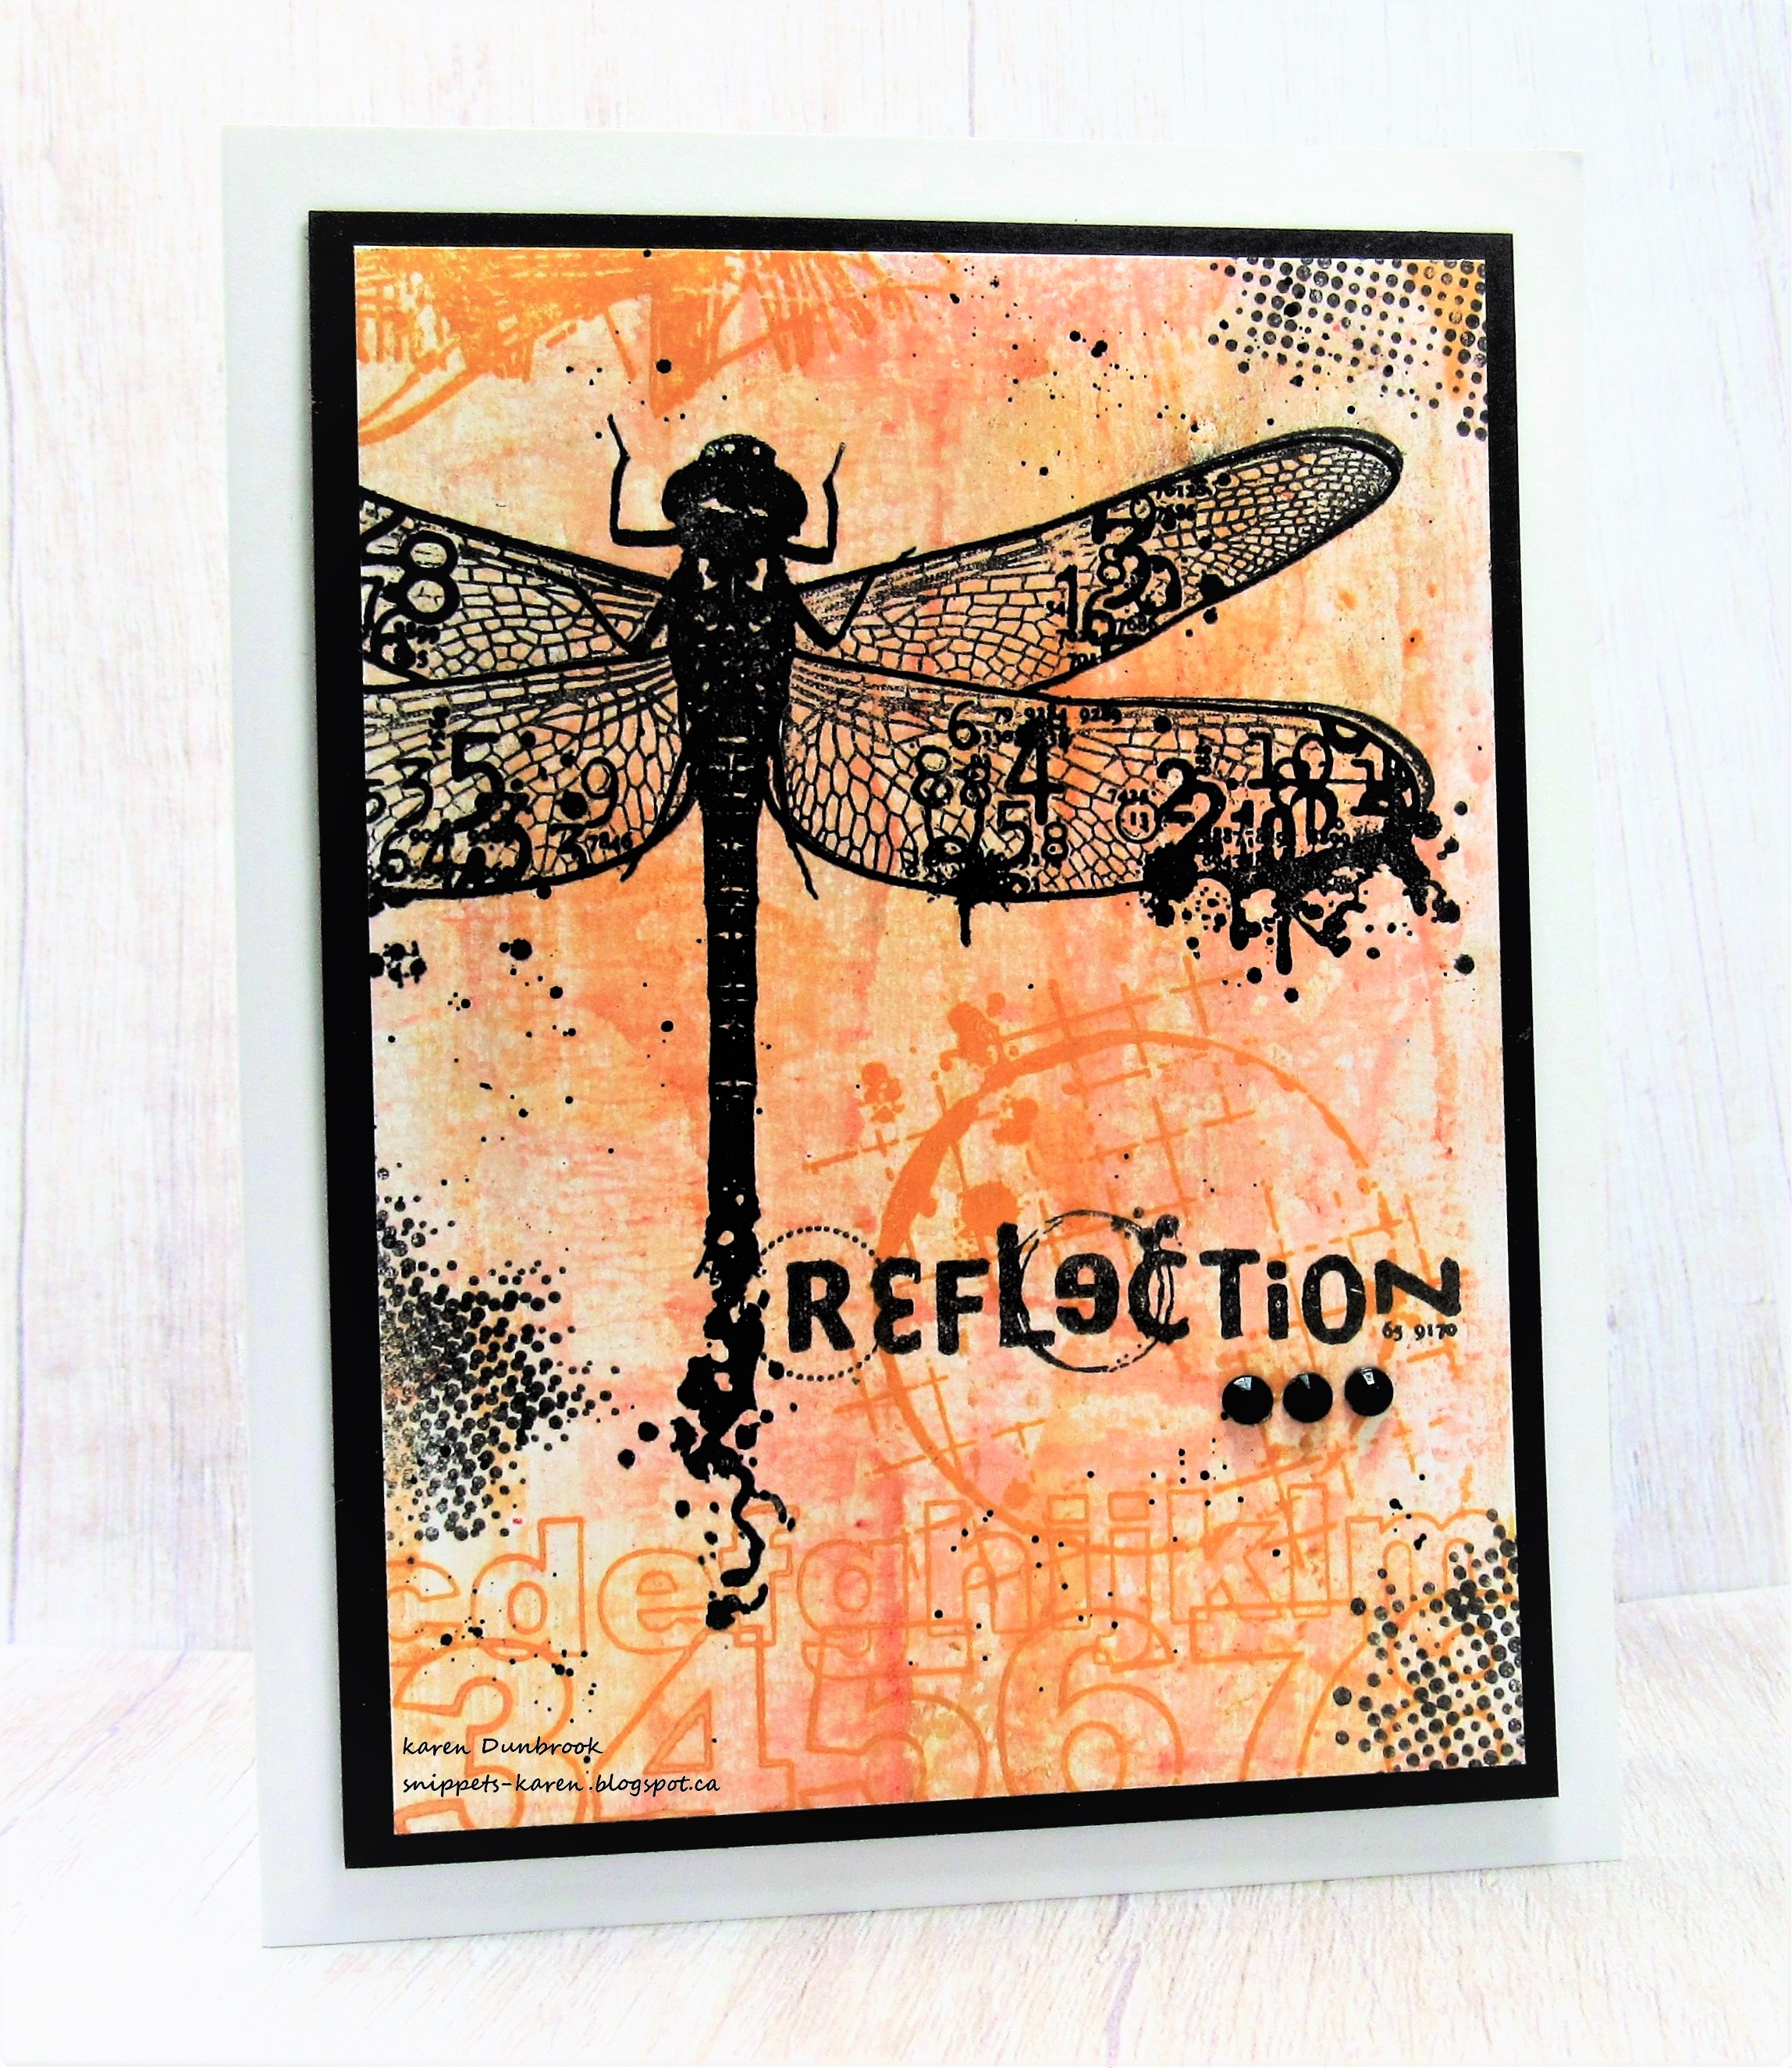
Dragonfly Dreams


Welcome
Today's card features a collage style, using this lovely dragonfly from Visible Image.

So here's what I did to create my card.
  • I cut a white cardstock panel and inked it up with my brayer again.  I rolled my brayer onto some Carved Pumpkin Distress Oxide ink, sprayed with water and rolled onto my paper.
  • I repeated that process using some Dried Marigold DOX ink until I was happy with the coverage of ink.
  • I stamped the dragonfly over to one side with black Versafine ink in my Misti.
  • I stamped the black dots in the corners and side using Grunge Tones and more black ink.
  • I stamped the details and the numbers with some more Carved Pumpkin DOX ink so it blended into the background.
  • I splattered with my black Posca pen.
  • I glued the finished panel onto a piece of black cardstock, then onto a white A2 size card.
  • Finally, I added 3 black gems just under the sentiment.

Thanks so much for coming by and taking a look.

Adding my card to these challenges:
Cardz 4 Guyz- DISTRESS AND GRUNGE 
We Love Stamping- IN MY GARDEN

Supplies
Stamps-Dragonfly Reflections; Grunge Tones (Visible Image); Arty Alphas (Paper Rose)
Inks- Versafine Clair, DOX
Paper- heavy white- Scribes Nook, Waterloo, Ont.
Accessories and Tools- Misti (My Sweet Petunia); Speedball Brayer; black Posca pen; 
black gems

Friday, 8 March 2019

#1

Meet today's card.
A masculine card with a simple CAS design.

I needed a card for my husband's birthday.  He is a huge music fan and loves attending concerts.  This image from IO works so perfectly for a masculine card and for anyone who loves concert going.
So onto my card.

I began by pulling out my Rectangle Mask from A Colorful Life Designs.  These masks have pretty much found a permanent spot on my desk and are so great for creating cards with a border. It sure saves time and I don't have to fuss around with my Post it Tape.
I placed the mask over my white card front and started sponging on some DOX inks being sure to keep the colour just to the left side.  I used a small sponge dabber to apply the ink and chose colours that complimented each other.  When I was happy with the coverage, I added some details using the Grunge Dots stencil and more DOX inks.
Next, I place the piece inside my Misti and add more details by stamping some Graffiti along the left edge.  I stamped the image by inking with black Memento then clear heat embossed to help make it pop against the colourful background.
I added the sentiment, removed the mask and mounted it onto some orange cardstock then onto a plain white card.  


Thanks so much for coming by and taking a look.

Discount Code for A Colorful Life Designs

Adding my card to these challenges:
Simon Says Wed.- CREATE A SCENE
CAS on Fridays- EMBOSSED (Heat)
Time Out- UNIQUE


Supplies
Stamps- Rock Silhouette (Impression Obsession); Graffiti (Kaisercraft); 
Happy Birthday (Studio G)
Inks- Tuxedo Black Memento; Distress Oxides- Spice Marmalade, Carved Pumpkin, Fossilized Amber (TH)
Paper- heavy white (Scribes Nook); orange cs
Accessories and Tools- Misti (My Sweet Petunia); Rectangle Mask (A Colorful Life);
Grunge Dots (A Colorful Life); sponge dabber


Saturday, 22 July 2017

Flower Collage

Happy Saturday and time to play.
Meet today's card.  Just a fun combination of stencilling and stamping.

I like the look of a nice crisp, white border so I began by masking off my card front with painter's tape.  I laid down the lattice mini stencil and using some Peeled Paint Distress Oxide ink, I covered my card front.  I removed that stencil then laid down the flower mini stencil from the same set over that and using some Broken China Distress Oxide ink, I stencilled again.  
(I did a TLC Challenge a few weeks ago over at Splitcoast stampers about stencilling over a stencil.
You can check out my other card here.)
Next, I inked up the Clover Silhouette inside my Misti with black ink then clear heat embossed it to help make it pop.  I did the same thing with the sentiment.
To help further define my card front, I stamped some mixed media element on the edges and inked around the edges with Distress ink.
I removed the painter's tape and mounted my piece onto a blue cardstock front.


Thanks so very much for coming by and taking a look!


Adding my card to these challenges:

STAMPlorations- ANYTHING GOES

Addicted to Stamps and More- ANYTHING GOES 

Craft Stamper Magazine- ANYTHING STAMPED GOES

Mod Squad- LAYERED FLORALS

International Art and Soul- ELEMENTS OF NATURE


Supplies
Stamps- Clover Silhouette (Magenta); Enjoy the Moment (Daisy Bucket); 
Mixed Media Elements (STAMPlorations)
Inks- Tuxedo Black Memento; Peeled Paint and Broken China Distress Oxides (TH)
Paper- heavy white cs (local store)
Accessories and Tools- MISTI; painter's tape; applicator tool (TH); 
Tim Holtz Mini Stencils Set 4; clear eb powder; heat tool

Friday, 9 May 2014

Most Distressing


Messy sewing, loose ends....all would be most distressing to anyone who likes to sew!  Today, the challenge at Splitcoast is to add distressing to our card.  Now I could have just roughed up the edges and added ink but instead I did lots of messy sewing around the edge of my frame.  
So here's how my card came together.  I had a piece of left-over paper from inking one of my embossing folders.  I cut an oval in the center then added the stamped flowers behind the frame.  The flowers are coloured with Memento markers, sprayed with water then stamped for a watercolour look.  Added some splatters too for interest.  The whole piece was mounted onto my card front with pop dots.  
I wanted the sentiment to reflect the feel of the card so hence, this sentiment.

Also adding my card to these challenge:


Little Red Wagon- SEEING SPOTS


Simon Says- SPRING FLOWERS


Thanks so much for coming by and taking a look.

Supplies:  stamps- Unity, Rubbernecker/ Distress ink/ eb folder/ Memento markers/ Memento ink/ pop dots

Tuesday, 8 April 2014

Enjoy

 I love CAS and I guess I love 'grunge' too.  I think I really like the free flow of the grunge looking cards.  This card just came together in a jiffy.  
I am playing along with the CAS Challenge at Splitcoast; use dry embossing on your card.  For anyone who doesn't know what dry embossing is, you place your cardstock into an embossing folder and run it through a die-cutting machine like a Cuttlebug or Big Shot.  Embossing can also be done with a scoring  tool.  I am having problems with my camera so it may be hard to see but I added random embossing down the side.  It looks like little bubbles.  I did that by placing my cardstock in a Cuttlebug embossing folder and hitting it with a rubber mallet instead of running it through my machine.  By doing that, it gives a much more subtle, random impression I wanted.  I inked my stamps with Distress Ink and sprayed with water before stamping.  

I am adding my card to these challenges:


Less is More- COLOUR WEEK 166

Little Red Wagon- MASCULINE


Simon Says- BIRTHDAY

Thanks so much for coming by and taking a look.

Supplies:  stamps- Impression Obsession, Studio G, Inkadinkadoo, Mama Elephant/ Distress inks-Peeled Paint, Salty Ocean/ Cuttlebug Eb/ Rubber Mallet/ bl. Memento ink/ bl pearls