Showing posts with label Simon Says. Show all posts

Saturday, 16 September 2023

Artichoke Rose


Welcome
Today's card is featuring 2 new stencils for September called

So, here's what I did to create my card. 
  • I cut a piece of white cardstock and place it onto my Make Art Station. 
  • I positioned the Artichoke Rose stencil over my cardstock and inked it up.  I started at the center of the flower with some Cracked Pistachio, then moved outwards with some Worn Lipstick, Shaded Lilac and finally some Villainous Potion Distress Oxide ink along the outer edges.
  • I splattered with my white Posca pen and set aside to dry.
  • I cut another piece of white cardstock, placed it onto my Make Art Station and inked up the top portion using the Lined Leaves stencil with some Worn Lipstick DOX ink.
  • Next, I fussy cut out the Rose and glued it over the stenciled background.
  • I glued the finished panel onto a piece of purple cardstock, then onto an A2 sized card base.
  • I stamped and die cut the sentiment and used some foam tape and placed it at the top of the flower.

Here are the stencils I used:


Discount Code for A Colorful Life Designs
(Affiliate with no extra cost to you) 

Thanks so much for coming by and taking a look.

Adding my card to these challenges:
Addicted to Stamping- ANY OCCASION
The Crafty Addicts- ANYTHING GOES
Tic Tac Toe- SEE BOARD (stencil, free, foliage)

Supplies
Stamps- Big and Bold Sentiments (SSS)
Inks- DOX
Paper- heavy white (Scribes Nook)
Accessories and Tools- stencil (A Colorful Life Designs); TE Blending Brushes;
Make Art Station (Ranger); white Posca pen

Saturday, 12 August 2023

Bold Birthday


Good Morning
Here's another card I made using some of the patterned paper I have in my stash.
I used the Blowout stencil from A Colorful Life Designs.

So, here's what I did to create my card.
  • I began by looking through my stash of patterned papers until I found this fun striped one.
  • I cut a piece for my card front, set it onto my Make Art Station and positioned the Blowout stencil over that.
  • I inked up the stencil with some Lumberjack Plaid Distress Oxide ink, then splattered with my white Posca pen.  The red worked very well with the stripes.
  • While that dried, I stamped out the sentiment with some more DOX ink and then die cut it out.
  • I glued the finished panel onto a piece of red cardstock, then onto a whiter A2 sized card base.
  • I used some foam tape to pop the sentiment up and put 3 red gems around it.

Here is the stencil I used:

Many thanks for stopping by and taking a look.

Adding my card to these challenges:
Simon Says Mon.- HAPPY BIRTHDAY
My Time to Craft- STENCILING
The Male Room- DOTS and/or STRIPES

Supplies
Stamp- Big and Bold Sentiments (SSS)
Ink- DOX
Paper- patterned??  heavy white (Scribes Nook- Waterloo, Ont.)
Accessories and Tools- stencil (A Colorful Life Designs); Make Art Station (Ranger); 
red gems (Dollar Store); white Posca pen
Friday, 19 May 2023

Wanted to say Hello


Good Morning
Today's card was a fun one using a new stencil for May called Orbits and combined with an older stencil called Dotted Wreath.  
It made for a Clean and Simple card.

So, here's what I did to create my card.
  • I placed a piece of white cardstock onto my Make Art Station and positioned one part of the Orbits stencil over my paper, centering it.  I inked it up with some Uncharted Mariners Distress Oxide ink.
  • I moved the stencil and added one of the smaller rings and inked that up with some Peacock Feathers Distress Oxide ink right into the center part.
  • Next, I removed the Orbits stencil and I placed the Dotted Wreath stencil over the background and inked that up with some more Peacock Feathers DOX ink.
  • I die cut the "Hello' from some blue cardstock and the shadow of the die from white and glued them together, then popped that into the center of the circles.
  • I glued the panel onto a piece of matching blue cardstock, then onto an A2 sized card base.

Here are the stencils I used:


Discount Code for A Colorful Life Designs
(Affiliate with no extra cost to you) 

Thanks so much for coming by and taking a look.

Adding my card to these challenges:
Crafty Addicts- ANYTHING GOES
Addicted to CAS- MONOCHROME
Challenge Up Your Life= CLEAN AND SIMPLE

Supplies
Stamp- none
Ink- DOX
Paper- Scribes Nook- Waterloo, Ont.
Accessories and Tools- stencils (ACLD); Make Art Station (Ranger); 
TE Blending Brushes; Hello die (SSS); foam tape

Saturday, 3 December 2022

Snowy Greetings


Welcome
I picked up this fun Snowflake Cluster stencil from Simon Says and wanted to get a chance to play with it.

So, here's what I did to create my card.
  • I began by placing a piece of white cardstock onto my Make Art Station and then positioned the Snowflake stencil over that.
  • Next, I sprayed my panel with some water, then sprinkled on some Brushos.  (Brushos are highly concentrated crystals of colour that are activated by water.) 
  • I used a baby wipe to dab over the stencil to help spread the colour of the Brushos, covering the panel, then removed the stencil and let the piece dry.
  • I die cut the sentiment next.  The script with some white and the outline with a dark purple to match the card front and glued them together.
  • When the snowflakes were dry, I splattered with my white Posca pen to add a more snowy effect.
  • I glued it onto a piece of pale purple cardstock, then onto an A2 card base.
  • I popped the sentiment over the background and added 3 silver gems.

Thanks so much for coming by and taking a look.

Adding my card to these challenges:
Simon Says Wed.- ANYTHING GOES
Beyond the Blue- WINTER HOLIDAY
Allsorts- IT'S BEGINNING TO LOOK A LOT LIKE CHRISTMAS

Supplies
Stamps- none
Inks- Brushos
Paper- heavy white (Scribes Nook)
Accessories and Tools- Snowflake Clusters (SSS); Snowy Greetings die (SSS); 
Brushos; baby wipes; silver gems; white Posca pen; Make Art Station (Ranger)

Thursday, 8 September 2022

Christmas Time


Welcome
Today, I am playing with a new stencil called Chunks from A Colorful Life Designs.
A very interesting stencil that I had such fun playing with.

So here's what I did to create my card.
  • I began by placing a piece of white cardstock onto my Waffle Flower Stencil Mat, then positioned the Chunks stencil over that and inked it up with some Broken China Distress Oxide ink.
  • I rotated the stencil one turn, then inked again with some Peacock Feather DOX ink.
  • I rotated the stencil 2 more times inking with some Faded Jeans and then finally some Uncharted Mariner DOX ink.
  • I removed the stencil and revealed the background....so fun. (sorry, I should have taken a picture of it)
  • Next, I placed the panel into my Misti and rubbed it with an anti-static bag.  
  • I stamped the Snowflake Outline with some Versamark ink, then white heat embossed it.
  • I splattered with my white Posca pen and set it aside to dry.

  • I die cut the 'Merry Christmas' from a piece of white cardstock, then from a piece of navy and glued them together.
  • I glued the finished panel to an A2 size card front, then glued the sentiment into the center.
  • I finished it off by adding 3 silver gems.

Here is the stencil I used:

Discount Code for A Colorful Life Designs
(affiliate with no extra cost to you)

Adding my card to these challenges:
Simon Says Wed.- STAMP IT


Thanks so much for coming by and taking a look.

Supplies
Stamps- Snowflake Outline (SSS)
Inks- Versamark, DOX
Paper- white (Scribes Nook, Waterloo, Ont)
Accessories and Tools- Chunks stencil (ACLD); Stencil Mat (Waffle Flower);
TE Blending Brushes; white Posca pen; Merry Christmas die (SSS); 
silver gems (Dollar Tree), white eb powder

Monday, 21 March 2022

Paper Weaving


Welcome
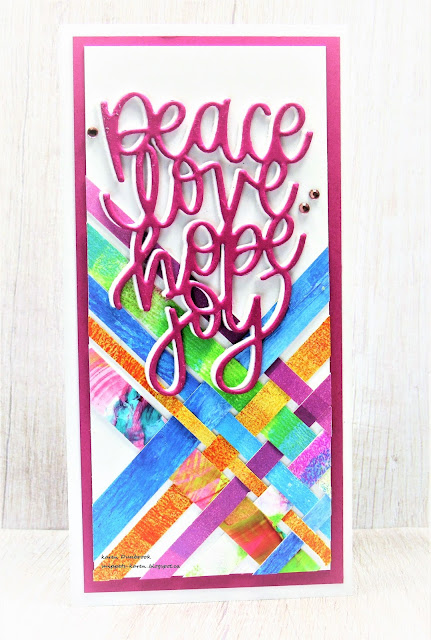
Meet today's card.
Another one for the series of cards I am doing and calling 
USE YOUR SCRAPS

So here's what I did to create my simple card.
  • I decided on making a slimline card.  This is a fun size to create, a bit smaller then a regular sized slimline.  A standard Slimline card is size is 8 1/2 x 3 1/2 whereas a Mini Slimline is 6" x 3". To see how I made another mini slimline and an envelope to fit it, see THIS POST.
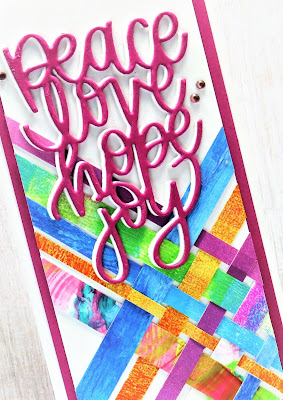
  • I began by cutting a piece of cardstock for my front panel which was a bit smaller then the finished card base.  I got out all my paper scraps and started to weave them together across my card front panel. 
  • When I was happy with the look, I glued the pieces down to secure them.
  • Next, I die cut the sentiment from some matching pink cardstock and then some heavy white.  I glued them together, offsetting them a bit so the white would peek out from behind the pink.
  • I glued the woven panel onto a piece of pink cardstock that matched the die cut sentiment, then glued that onto my card base.
  • I glued the sentiment over the background and finally I added 3 silver gems to add interest and finish off my card.


Thanks so much for coming by and taking a look.

Adding my card to these challenges:
Simon Says Wed.- FAVOURITE THING
(being able to use my paper scraps in new ways is one of my fav. things)
Simon Says Mon.- BRIGHT AND CHEERFUL


Supplies
Stamps- none
Inks- various DOX inks, acrylic paints
Paper- heavy white (Scribes Nook- Waterloo, Ont.)
Accessories and Tools- Peace die (Simon Says); paper scraps; silver gems (Dollar Store)

Wednesday, 9 February 2022

Icy Snowflakes


Good Morning
This card started as a 'fail' but I tried to rescue it and was very pleased with the final results.
Icy cold is what we have had here where I live, so this card was a perfect one to speak to the winter weather all around me.

So here's what I did to create my card.
  • As I mentions above, this card started as a 'fail'.  Why do I say that?  I had cut a white piece of cardstock and tried to use this new snowflake die I got for Christmas to cut it out.  WELL, the cardstock I was cutting was too thick and the die make an impression instead of cutting.  I looked at it and thought....hmmmmm.  Time to rescue it.
  • I took the panel and rubbed some Peacock Feathers and Salty Ocean Distress Oxide ink all over the front of the panel.  I loved how the snowflake stood out and stayed white....SAVE!
  • I cut the panel down to fit a 4 1/4 x 4 1/4 inch size card when finished. 
  • To add interest, I first splattered with a good amount of water to lift some of the ink, then splattered with my white Posca pen to add a more snowy look to my card.
  • While that dried, I die cut the sentiment 3 times and glued them together.  
  • When the inked panel was dry, I glued it onto a white card base, then added the sentiment and a few little blue gems.
 

Thanks so much for coming by and taking a look.

Adding my card to these challenges:
Simon Says Wed.- WITH LOVE
The Four Seasons- ANYTHING GOES WINTER
Papercraft Challenges- WINTER WONDERLAND


Supplies
Stamps- none
Inks- DOX 
Paper- heavy white (Scribes Nook, Waterloo, Ont.)
Accessories and Tools- Snowflake die (Amazon); TE inking brushes; blue gems;
Peace die (SSS)

Tuesday, 8 February 2022

Many Thanks


Hello and Welcome
Meet today's card.
Again, I am using a previously painted Gel Plate print.

So here's what I did to create my card.
  • I looked through my Gel Plate prints and roll off sheets that I keep in a folder just for this reason.  This one wasn't pretty, so I decided to try and make it into something.
  • I placed the piece into this lovely embossing folder called Scandinavian Christmas that I got as a gift and ran it through my machine.
  • Using a sanding block, I sanded off the raised areas to reveal the design. Be sure to sand carefully over the cardstock as too much pressure may tear the paper.
  • I brushed away the residue left from the sanding and glued the panel onto a heavy white card base.
  • I splattered the panel using my white Posca pen to add a snowy effect.
  • I stamped the sentiment and cut it out, then used some foam tape to mount it into the middle of my card front.
  • I added 3 green gems under the sentiment.


Thanks so very much for coming by and taking a look.

Adding my card to these challenges:
CRAFT- WINTER
Crafty Gals Corner- SNOW MUCH FUN
Crafts Galore Encore- ANYTHING GOES

Supplies
Stamps- Thank you (Studio G)
Inks- DOX, acrylic paint
Paper- white (Scribes Nook- Waterloo, Ont.)
Accessories and Tools- Scandinavian Christmas eb folder(SSS); sanding block; 
foam tape; green gems; painted cardstock

Saturday, 29 January 2022

Heavy Heart


Welcome
Happy Saturday.
Hoping to get in some crafting time today.
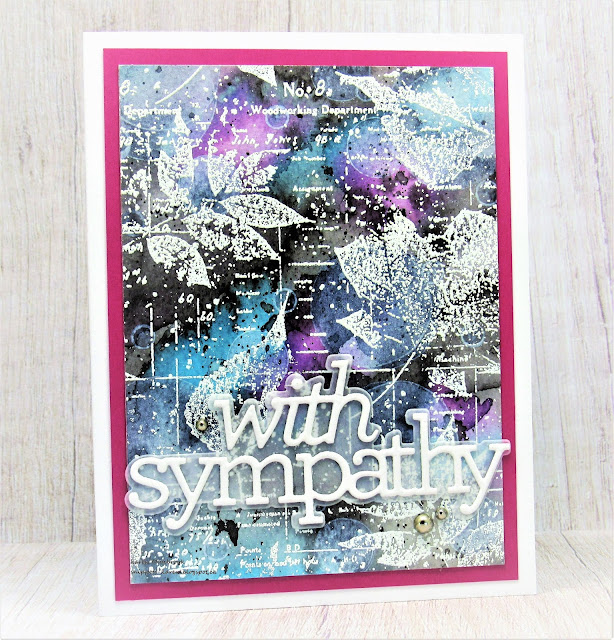
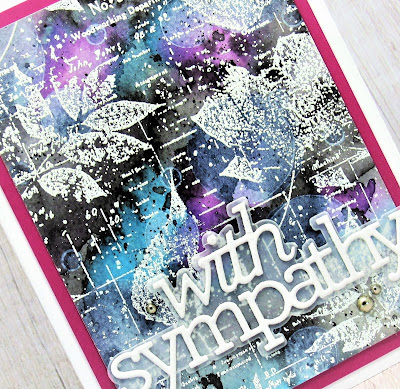
Meet today's card.  I'm trying to add to my stash of sympathy cards and this is what I came up with.

So here's what I did to create my card.
  • I began by cutting a piece of white cardstock 3 3/4 x 5".  I like that size as there is room to mat it before adding it onto a card base.
  • I got out a variety of Distress Oxide inks and using my Blending Brushes, just started blending away.  Colours used:  Black Soot, Picked Raspberry, Peacock Feathers, Blueprint Sketch, Weathered Wood
  • When I was happy with the inking, I spritzed water over the whole panel lifting some of the ink and blending other areas and then set it aside to dry.
  • I placed the dry panel into my Misti, rubbed with my Anti-static bag and stamped with this beautiful Leaf Ledger stamp using some Versamark ink and white heat embossed.
  • I splattered with my white Posca pen.
  • I glued the panel onto a piece of cardstock, then onto a white card base.
  • I die cut the new-to-me sentiment with white cardstock, then cut the outline with a piece of vellum and glued them together, then onto my card front.  
  • I added some silver gems that are most difficult to see in the photo.


Thanks again so much for coming by and taking a look.

Adding my card to these challenges:
Simon Says Wed.- ANYTHING GOES
Stamps & Fun= Creativity
A Place to Start- ANYTHING GOES

Supplies
Stamps- Leaf Ledger (Impression Obsession)
Inks- Versamark; Distress Oxide
Paper- Vellum; white cs- (Scribes Nook- Waterloo, Ont.)
Accessories and Tools- Lawn Fawn white eb powder; heat tool; Misti; 
white Posca pen; TE Blending Brushes; Sympathy die (SSS); Anti Static bag

Monday, 17 January 2022

Sending Some Happy


Good Morning
Hope you had a good weekend.  I appreciated having some time to create.
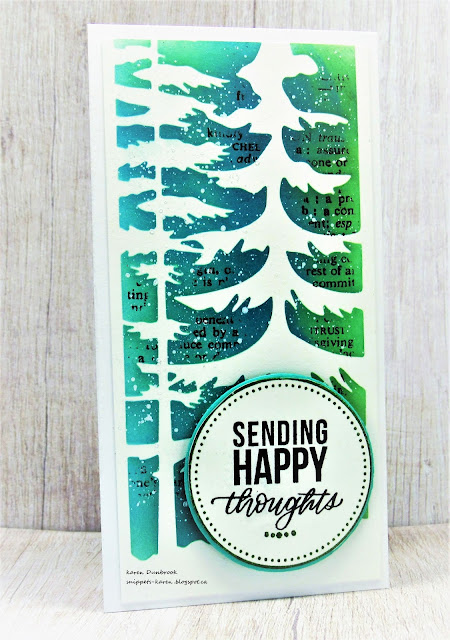
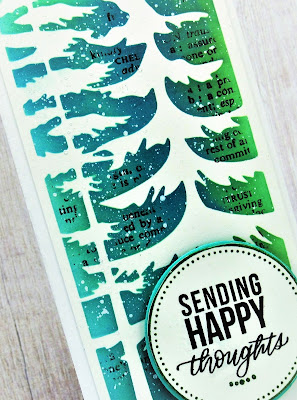
I pulled out this great stencil from ACLD called Pine Tree Right.  There are a series of tree stencils similar to this one and all create such great backgrounds.  They especially work well for creating slimline cards.
My card today is a Mini Slimline...a bit smaller then the regular size.  
A standard Slimline card is size is 8 1/2 x 3 1/2 whereas a Mini Slimline is 6" x 3".
To see how I made another mini slimline and an envelope to fit it, see this card:

So here's what I did to create my card.
  • I placed a piece of white cardstock onto my Waffle Flower Stencil Mat and positioned the Pine Trees stencil over that.  I began to ink it up with some Lucky Clover Distress Oxide inks just along the right side of the stencil and towards the middle.
  • Next, I filled in the rest of the areas with some Rustic Wilderness DOX ink.  
  • To add more interest and shading to the trees, I rubbed on some Broken China DOX ink just along the left hand sides of the trees.
  • Leaving the stencil in place, I stamped over it with the Friends background script stamp to add interest.  
  • I splattered the whole panel with my white Posca pen.
  • While that dried, I stamped the sentiment from the Hexagon Crafty Hugs set with some Versafine Clair ink and then stamped the circle from an Avery Elle set with more of the Rustic Wilderness ink around the sentiment.
  • I die cut it with a circle and glued it onto a piece of blue/green cardstock to match the background.
  • I glued the stenciled trees onto a white slimline base (6" x 3") and pop dotted the sentiment at the bottom.


Here is the stencil I used:


Discount Code for A Colorful Life Designs
(affiliate with no extra cost to you)


Thanks so much for coming by and taking a look.

Adding my card to these challenges:
Simon Says Wed.- FUN WITH STENCILS
Stamping Sensations- ANYTHING GOES WITH OPTION OF A DIE
Alphabet Challenge- 'U' IS FOR UNEQUAL (BIG AND SMALL)


Supplies
Stamps- Crafty Hugs (SSS); Merry Circle Tags (Avery Elle); Friends Bkg (HA)
Inks- Distress Oxides (mentioned above); Versafine Clair
Paper- Scribes Nook; Waterloo, Ont.
Accessories and Tools- Stencil Mat (Waffle Flower); TE Blending Brushes; 
Misti (My Sweet Petunia); Posca pen; Infinity Circle Dies (HA)

Friday, 3 December 2021

Plaid for Christmas


Welcome
If you read my blog posts, once I start making holiday cards, I can't stop.  
Listening to Christmas carols on the radio, crafting....my happy place.
So meet today's card.

So here's what I did to create my card.
  • I began by stamping the Plaid in my Misti using some Peeled Paint Distress Oxide ink.  Over the top of that, I stamped the Outline Snowflakes to add more interest.  I think it made it so fun.
  • In my stash, I found this side fold card base...I do a few at a time to have on hand, (instructions found here) so I cut the plaid panel to fit on the card base as per the instructions and glued it down
  • I die cut the snowflake and glued it into the center, then pop dot mounted the sentiment over the snowflake.
  • To finish my card off, I added tiny green gems to all the snowflake points.

Thanks so much for coming by and taking a look.

Adding my card to these challenges:
Little Red Wagon- LET IT SNOW
Simon Says Wed.- HAPPY HOLIDAYS/ MERRY CHRISTMAS
Winter Wonderland- CHRISTMAS ANYTHING GOES


Supplies
Stamps- Outline Snowflake (SSS); Plaid (Concord and 9th)
Inks- Versafine Clair; Distress Oxide
Paper- heavy white (Scribes Nook- Waterloo, Ont.)
Accessories and Tools- Christmas sentiment strips (SSS); snowflake die (SSS); 
green gems (Dollar Store); Misti