Showing posts with label double stenciling. Show all posts

Wednesday, 6 December 2023

Christmas Holidays


Good Morning
Today's card is interesting as I combined 2 stencils from A Colorful Life Designs called

So, here's what I did to create my card.
  • I cut a piece of white cardstock and placed it onto my Make Art Station.  I inked up the Fluttering Snow stencil with some Tumbled Glass Distress Oxide ink.  
  • Leaving that stencil in place, I put the outline mask of the Fetching Snowflakes stencil right over the Fluttering Snow stencil and inked that up with some Salty Ocean DOX ink.
  • I removed the stencils and splattered with my white Posca pen and set aside to dry.
  • When it was dry, I place it into my Misti to stamp the sentiment.
  • I die cut the little snowflake and glued that over the middle of the large middle snowflake.
  • To finish my card off, I added 3 blue gems.

Here are the stencils I used:


Discount Code for A Colorful Life Designs
(Affiliate with no extra cost to you) 

Thanks so much for coming by and taking a look.

Adding my card to these challenges:
Simon Says Wed.- ANYTHING GOES
Shopping Our Stash- WHATEVER THE WEATHER

Supplies
Stamps- Christmas Cheer (TT- retired)
Inks- Versafine Clair, DOX
Paper- heavy white (Scribes Nook- Waterloo, Ont.)
Accessories and Tools- stencils (A Colorful Life Designs); Make Art Station (Ranger);
white Posca pen; TE Blending Brushes; Snowflake die ?

Saturday, 1 January 2022

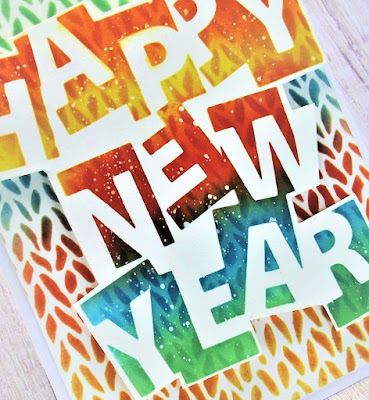
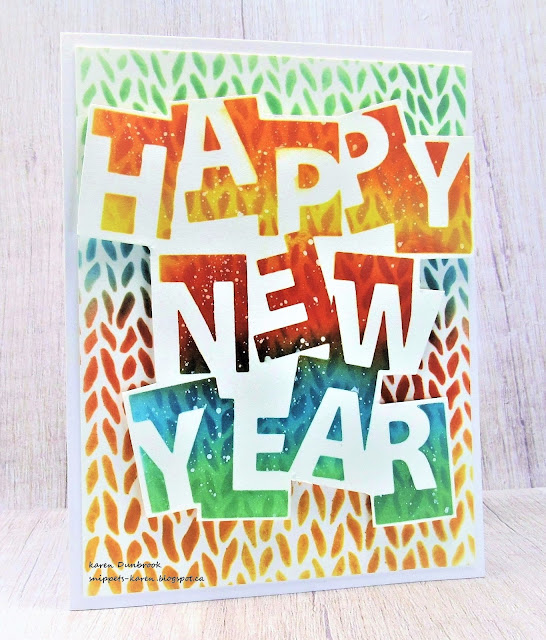
Happy New Year 2022


HAPPY NEW YEAR!!

Good Morning.
Time to celebrate a New Year with new beginnings and hopefully good health and happiness!

Here's a simple card I made using stencils from ACLD.

So here's what I did to create my card.
  • I began by getting out my Stencil Mat from Waffle Flower....a fairly new to me tool that I am loving to stencil on.  It is a silicone mat that holds your paper and stencil nicely in place.
  • I positioned the Happy New Year stencil over my white cardstock.  Starting at the top, I applied Distress Oxide inks in this order:  Mustard Seed, Carved Pumpkin, Crackling Campfire, Barn Door, Peacock Feathers Salty Ocean and Cracked Pistachio.  
  • To add more interest, I left that stencil in place and positioned the Cozy Knit stencil right over the top of it, doing a stencil on stencil technique.  I inked from top to bottom again.
  • I splattered with my white Posca pen and set aside to dry.
  • I cut another white panel and using the Cozy Knit stencil again, I used the same colours of Distress Oxide inks and stenciled up the whole panel but this time I reversed the colours.  I glued that onto a heavy white card base.
  • I fussy cut the Happy New Year out, then pop dot mounted it onto my stenciled card panel.


Discount Code for A Colorful Life Designs
(affiliate with not extra cost to you)

Wishing you everything wonderful this New Year.
Thanks so much for all the times you have visited and for all the most kind and generous comments.
You have all blessed my life in so many ways.

Adding my card to these challenges:
Simon Says Wed.- IT'S TIME TO PARTY


Supplies
Stamps- none
Inks- Distress Oxides (all mentioned above)
Paper- heavy white (Scribes Nook- Waterloo, Ont.)
Accessories and Tools- Happy New Year stencil (ACLD); Cozy Knit Stencil (ACLD); 
Stencil Mat (Waffle Flower); TE Blending Brushes; Posca pen

Wednesday, 9 August 2017

Jumping for Joy

Good Morning.
Simple, happy card today using a technique I showed a few weeks ago that I called 
Basically, it is stenciling over a stencil.

I began by masking my card front using Painter's Tape then using some Peeled Paint Distress ink and stenciled the TCW Chicken Wire as the bkg.  I then took some drywall tape and stenciled over that using Peacock Feather.
Using my Misti, I stamped this wonderful image then this fun sentiment.
I clear heat embossed both to help make the black pop.
Lastly, I splattered some diluted Distress ink to look like rain and rubbed more ink along the card edges.


Thanks so much for coming by and taking a look.


Adding my card to these challenges:
Simon Says Wed.- SPLATTER IT
Shopping Our Stash- SPICE UP YOUR LIFE
(Sporty Spice-she jumps around so much on stage)
Addicted to Stamps and More- CAS
Use Your Stuff- INSPIRED BY A QUOTE
Just Us Girls- SHOWERS

Supplies
Stamps- Fruit Loop (Verses);  Rain Dance (Technique Junkies)
Ink- Peacock Feathers, Peeled Paint Distress (TH); Tuxedo Black Memento
Paper- heavy weight (local Store)
Accessories and Tools- Misti; drywall tape; cl embossing powder; heat tool; paintbrush; 
sponge applicator


Saturday, 22 July 2017

Flower Collage

Happy Saturday and time to play.
Meet today's card.  Just a fun combination of stencilling and stamping.

I like the look of a nice crisp, white border so I began by masking off my card front with painter's tape.  I laid down the lattice mini stencil and using some Peeled Paint Distress Oxide ink, I covered my card front.  I removed that stencil then laid down the flower mini stencil from the same set over that and using some Broken China Distress Oxide ink, I stencilled again.  
(I did a TLC Challenge a few weeks ago over at Splitcoast stampers about stencilling over a stencil.
You can check out my other card here.)
Next, I inked up the Clover Silhouette inside my Misti with black ink then clear heat embossed it to help make it pop.  I did the same thing with the sentiment.
To help further define my card front, I stamped some mixed media element on the edges and inked around the edges with Distress ink.
I removed the painter's tape and mounted my piece onto a blue cardstock front.


Thanks so very much for coming by and taking a look!


Adding my card to these challenges:

STAMPlorations- ANYTHING GOES

Addicted to Stamps and More- ANYTHING GOES 

Craft Stamper Magazine- ANYTHING STAMPED GOES

Mod Squad- LAYERED FLORALS

International Art and Soul- ELEMENTS OF NATURE


Supplies
Stamps- Clover Silhouette (Magenta); Enjoy the Moment (Daisy Bucket); 
Mixed Media Elements (STAMPlorations)
Inks- Tuxedo Black Memento; Peeled Paint and Broken China Distress Oxides (TH)
Paper- heavy white cs (local store)
Accessories and Tools- MISTI; painter's tape; applicator tool (TH); 
Tim Holtz Mini Stencils Set 4; clear eb powder; heat tool

Monday, 26 June 2017

Do a Double Take

Good Morning.
Today, I have the pleasure of hosting and TLC Challenge at Splitcoast.
I am calling my challenge:
Do a Double Take
 The challenge is to use 2 different stencils on top of each other for your card.

I came up with this challenge after playing with my stencils and my Distress Oxides to see how well they would layer over one another.  I was very pleased with the outcome.

So onto my card.
I began by inking the back of the Mini Harlequin Circles stencil using Peeled paint, sprayed with water and pressed onto my paper to create a monoprint.
For those of you that are unfamiliar with monoprinting, it is another way to use your stencils. Ink is applied directly from the pad to the back of the stencil, sprayed with water and applied to paper.

When that was dry, I laid the Mini Circle Grid onto my paper and this time, I stenciled it using an applicator tool as you would with any stencil.  
I stamped some Graffiti down the left side using more of the Broken China then sponged the edges with that colour too to help tie it all together.
I stamped the flourish just off the edge of my card front leaving enough room to stamp the sentiment.
You can easily stamp over the Oxides which is another reason I just love using them.


I hope you get a chance to try this technique out.  It is a great way to get more mileage using your stencils in a different way!
Thanks for the visit...very appreciated.

Adding my card to these challenges:

Addicted to Stamps and More- MAKE YOUR MARK
Craft Stamper- ANYTHING STAMPED GOES
Mixed Media World- ANYTHING GOES
Love to Create- ANYTHING CREATIVE/MIXED MEDIA GOES
Simon Says Mon.- STENCIL IT

Supplies
Stamps- Art Soul (Hampton Arts); Flourish (Technique Tues. sorry, discontinued); 
Graffiti (Kaisercraft)
Inks- Tuxedo Black Memento; Peeled Paint, Broken China Distress Oxides (TH)
Paper- Heavy weight white (local store)
Accessories and Tools- Misti; stencils..Mini Harlequin Circle, Mini Circle Grid (TCW); mister (TH);
sponge applicator (TH)