Showing posts with label Technique. Show all posts

Saturday, 3 April 2021

Typography Birthday


Welcome
Yes....you guess it!!  
Another inked background from my stash became a card today.
This one had some faint stenciling done with embossing powders and my Distress Oxide inks.  
You can see some hints of the stenciling in the background done with a resist technique.
I will do my upmost best to remember what the heck I did since I didn't write on the back of this one!!  I need to get better at doing that.

So here's what I did to create my card.
  • Background- Like I said, I will try my best to remember what I did with the layers.  I inked the panel with Broken China and Shaded Lilac Distress Oxide inks.  I laid on the Floral Stencil from Tim Holtz over the inking and pressed on some Versamark ink and then clear heat embossed it to create a resist.  I inked over that with some Dusty Concord DOX ink and rubbed away the ink over the embossing to reveal the flowers.  I splattered with water to lift some of the ink too. I added some stamping with some Salty Ocean DOX ink along the edges with the Reverse Squares from AALL and Create.  At that point, I didn't know what I wanted to do with it, so threw it into the basket where it sat until today.  
  • I just recently picked up this embossing folder called Typewriter by TH and if you saw my post from Monday HERE, I decided to emboss and then sand off the top layer of the colour to reveal the letters....love the look!!
  • I die cut a circle that I wanted to use for the sentiment and stamped on the sentiment with some Versafine Clair Noir ink using my Misti.  I clear heat embossed that as well to help make it pop.
  • I die cut the flowers called Dandelion Posies from some white cardstock and set aside.
  • I glued the inked background onto a piece of white cardstock, then onto a heavy white card base, then glued on the flowers and pop dotted the circle greeting over onto the other side. 


Thanks so much for coming by and taking a look.

Adding my card to these challenges:
Simon Says Wed.- ANYTHING GOES


Supplies
Stamp- Everyday Circle Tags (Avery Elle); Reverse Squares (AALL and Create)
Inks- Versafine Clair; DOX inks; Versamark
Paper- heavy white (Scribes Nook- Waterloo, Ontario)
Accessories and Tools- Typewriter eb folder (TH); Floral stencil (TH); Wow clear eb powder;
heat tool, Misti (My Sweet Petunia); Dandelion Posies (Creative Expressions); 
sandpaper, pop dots, circle die (Spellbinders)

Monday, 6 July 2020

Rainbow of Colour


Hello and Welcome
Meet today's card.
I really like the look it has with a rainbow of many colours.  

Here's what I did to create my card.
I began with a piece of heavy white cardstock.  I added small dots of Acrylic paint all over the panel, randomly as you can see below:


Next, using a small piece of cardboard, I pulled each dot of paint downwards just a bit.  I continued doing that until all the dots were blended together as you can see below:

You can use whatever you have on hand to drag the paint, I just used a piece of cardboard so I had less clean up. 

I set the piece aside to dry completely which took a bit of time.
I added the die cut sentiment and the square gems when the paint was totally dry.
I mounted it onto a piece of matching blue cardstock, then onto a heavy white card base.


Thanks so much for coming by and taking a look.

Adding my card to these challenges:
Simon Says Wed.- BRIGHT AND CHEERFUL
The Male Room- DIE CUTS
Southern Girls- ANYTHING GOES


Supplies
Stamps- none
Inks- none
Paper- heavy white (Scribes Nook)
Accessories and Tools- Celebrate die (MFT); Vicki Boutin Acrylic Paint; square gems; 
piece of cardboard

Sunday, 24 February 2019

Feather- Photo Paper and Baby Wipes


Hello and Welcome.
Trying out something new today using my Distress Oxide inks.

A friend of mine gave me a stack of HP photo paper that she couldn't use.  I wanted to try and use it for my card and after watching a few videos on YouTube I was off to try this fun and simple technique.

So like I said, I began with a piece of photo paper.  I inked up a sheet of acetate with my Distress Oxide inks, sprayed with water and pressed onto the paper.  You are left with a chalky looking inking.  I let that dry for a moment, then placed the piece inside my Misti.  These feathers are one of my favs from Technique Junkies so I inked it up with more DOX and stamped it over the bkg.  
Now for the magic part......I took a baby wipe and wiped over the surface of the whole card.  Amazing, it just all wiped away the chalky look and revealed wonderfully bright colour. 
So simple yet effective.
I then stamped the sentiment and done.


Thanks so much for coming by and taking a look.

Adding my card to these challenges:
Seize the Birthday- ANYTHING GOES
The Male Room- ANYTHING GOES
Use Your Stuff- MAGIC (wipe and see the magic happen)

Supplies
Stamp- Peacock Feathers (Technique Junkies); Birthday Letter It (Ranger)
Inks- Peacock Feathers, Salty Ocean, Faded Jeans, Seedless Preserves DOX (TH);
Black Archival (Ranger)
Paper- Photo HP; heavy white for base (Scribes Nook)
Accessories and Tools- Misti (My Sweet Petunia); baby wipes; acetate sheet; Mister (TH)


Monday, 27 August 2018

Sunrise


Hello and Welcome.
Here is a very simple card using this great stamp from Technique Junkies.
I just spent a few day at the beach so this card makes me smile with the good memories I have.

Here's how I created my card.

I began by masking my white card front with some Post-It Tape.
I then placed the paper inside my Misti, stamped the image and clear heat embossed it so it would resist the ink I was about to put over it and still shine through.
Next, I took a piece of clear acetate, rubbed some Distress Oxide inks onto it, sprayed with water and pressed the ink over my image. 
I have a pictorial about how to do it here:
When the ink was dry, I removed the tape and simply mounted it over a piece of blue cardstock to match the blue background.
I think this would make a great card for a guy.


Thanks so much for coming by and taking a look.

Supplies
Stamp- Old Pier (Technique Junkies)
Inks- DOX- Salty Ocean, Peacock Feathers, Faded Jeans (TH), Memento black
Paper- heavy white (Scribes Nook)
Accessories and Tools- Misti= clear eb powder= heat tool= acetate sheet= Mister (TH)


Saturday, 2 December 2017

Acetate Inking- CAS Watercolour Challenge


Hello and Welcome.
Time for more fun at the 

Our theme this month is 'Anything Goes'

 http://caswatercolour.blogspot.com/2017/12/cas-watercolour-december-challenge.html


This month we welcome out guest Hideko from Papercraft Boutique.
Please check out all the great inspirations the Design Team has created.

 I had the most frustrating time trying to photograph this card so I apologize for the poor quality.

So onto my card.  
As most of you already know, I love to play with my inks and create watercoloured backgrounds that are quick and simple.  I have found that by using a piece of acetate, I can do this quite efficiently as I can bend it and manipulate the inks and place them where I want them to go.
I added ink over ink then when they were all dry, I edged the inked area using my ScorBug and my ScorPal and added the 'Let is Snow' and the snowflake die.  Lastly, I added a silver Nuvo drop to the center of the snowflake.

I created a few of these backgrounds and I took pictures of my process so you could see how I did it.
Hope you enjoy it.


Acetate Inking

Step #1
I got out my piece of acetate and my Distress Oxide inks.
Rub ink onto the acetate sheet.


Step #2
Spray with water, then you can bend the sheet and place the ink wherever you want it to go.


Step #3
Dry each colour layer (I used my heat tool) and then add additional colours you want for your piece.


Finished backgrounds and ready to make a card.


Thanks so much for coming by and taking a look.


Adding my card to these challenges:
 Simon Says- ANYTHING GOES 
Craftyhazelnut's Christmas- QUICK AND EASY
CAS on Friday- CHRISTMAS
Shopping Our Stash- SNOW MUCH FUN


Supplies
Stamps- none
Inks- Picked Raspberry, Iced Spruce DOX (TH)
Paper- heavy white (local store)
Accessories and Tools- acetate sheet; Stitched Snowflake die (Lawn Fawn); Let is Snow die (STAMPlorations); 
Scorbug; ScorPal; Mister (TH); Cuttlebug; Nuvo silver drops

Wednesday, 16 August 2017

Just a Bit More Salt- The CAS Watercolour Challenge

Hello
It's time for another card for the 


It's been such a fun month playing with salt and trying to see the results we can achieve using it.
There are some really great links on the main blog for you to try and some wonderful cards to inspire.

So for my card, I began with a piece of the heavy white cardstock I usually use.
I sprayed it with water, then dropped drips of Distress re-inkers onto the wet paper.  I sprayed again to help blend the colours then sprinkled on some Sea Salt and left it to dry.
Love how the salt absorbs the ink and leaves behind a beautiful patterned piece of card.

To keep it simple, I die cut a frame and mounted the inked piece behind that.  I die cut the flowers and added them over the piece.
I scored diagonal lines on my card front to add more interest and pop dotted the framed salted piece over that.


 Thanks so much for coming by and taking a look.
I hope you will play along with us.


Adding my card to these challenges:

Simple Create Too- FLOWERS 
Crafty Creations- ANYTHING GOES 
The Crafty Addicts- ANYTHING GOES/ GIRLY OPTION
Paperminutes- ANYTHING GOES

  
Supplies
Stamps- none
Inks- Distress Re-inkers: Salty Ocean, Cracked Pistachio, Peeled Paint,
 Peacock Feathers (TH)
Paper- heavy white (local store)
Accessories and Tools- Wonky Stitched frame (Avery Elle); ScorPal, 
Hollyhocks die- Impression Obsession; Cuttlebug; foam dots

Tuesday, 8 August 2017

Beach Life

Good Morning.
As I mentioned in a previous post, I am playing along with some of the challenges at Splitcoast.
This was a long weekend here for us, so I had time to play.
I made 2 cards using the same stamps but totally different techniques which I will do my best to explain.

The card above was really an experiment to see what would happen if I used hot glue on my cardstock.  I had read about a technique using it with heat embossing so thought I would give it a whirl.
I began with heavy weight cardstock and squeezed a line of hot glue onto my paper.  While it was still hot, I used a credit card to pull the glue downwards and really didn't know what to expect.  Before it cooled, I sprinkled on some white embossing powder and melted that with my heat gun.  After it cooled, it reminded me of water and a wave so I inked up the background with Distress Oxide ink and then using my Misti, stamped the birds and the sentiment.
Fun to try something new.


The second card is more straight forward.

For this card, I watercolored the background using Distress inks, then using my Misti, I stamped the same birds as above.  
For the card front, I used a piece of drywall tape to stencil using Peeled Paint and Mowed Lawn Distress inks.  I thought the green was a nice compliment to the colours in the scene.  I stamped the sentiment from Mama Elephant using black Memento ink and mounted the scene over the bkg using foam dots.


Well there you have it.  Two different cards using the same stamps.
 Thanks so much for the visit!


Adding my card to these challenges:

Use Your Stuff- QUOTE
(quote on my card)
 A Bit More Time to Craft- ANYTHING GOES
Create and Inspire- ANYTHING GOES
NordSalten Hobby Club- BLUE
Stempelgarten- SUMMERTIME

Supplies
Card #1
Stamps- Flying Crane, Standing Crane (Frog's Whiskers); 
Everyday Beauty (Impression Obsession)
Ink- DOX- Salty Ocean; Memento black
Paper- heavy weight (local store)
Accessories and Tools- Misti; hot glue; credit card; white eb powder; heat tool; sponging tool

Card #2
Stamps- Flying Crane, Standing Crane (Frog's Whiskers); Everyday Greetings (Mama Elephant)
Ink- Distress ink- Salty Ocean, Peeled Paint,Seedless Perserves
Paper- heavy weight (local store)
Accessories and Tools- Misti; drywall tape; foam dots; paintbrush

Sunday, 6 August 2017

Marbled Magic- Tutorial

Meet today's card. 
I called it Marbled Magic.  I love making marbled paper and I want to show you how super easy it is to create!
This card used a lovely recycled heart from a greeting card I received.

I took step-by step pictures to give you a better idea of what to do. 
I hope they help you see how it's done.
 So here we go.


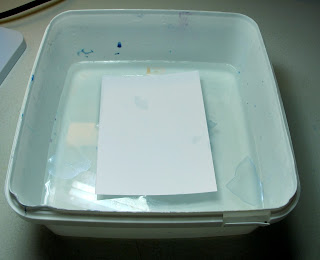
Step One
Fill a container that is larger then the size of you cardstock piece and with approx. 2 inches of water.  I use an old container for this as you may get some staining.


Step 2
Randomly drop some nail polish over the surface of the water.  I try and spread them across the surface of the water.


Step 3
Next, take a small skewer and swirl the nail polish around in the water a bit.  It may stick a bit to the stick but if you lift it out quickly it shouldn't be a problem.
Now lay your piece of cardstock onto the surface of the water.
I used a heavy weight cardstock for mine.


Step 4
Lift it quickly out of the water and set aside to dry completely.
Your marbled paper is ready to use.


Well there you go and by the way, here is the nail polish I used which I bought at the Dollar Store.
*EDITED TO INCLUDE:  I recently tried using the Gel Nail Polish with not as nice results
so I suggest sticking with the regular kind.*


I hope you enjoyed this tutorial and that you will give it a try.


Adding my card to these challenges:

 Love to Create- ANYTHING CREATIVE/MIXED MEDIA
Dare 2B Artzy- PASTEL COLOURS
Glitter 'N' Sparkle- MONOCHROMATIC
Pile It On- RECYCLE


Supplies
Stamps- None
Ink-None
Paper- heavy weight white (local store)
Accessories and Tools- container for water, skewer, nail polish, recycled heart

Wednesday, 5 July 2017

Simple Sympathy

Hello and Welcome!
Today, I am restocking my stash of sympathy cards.
I like to have them on hand so I can sent them out as soon as possible if needed.
I like a simple, clean design for this kind of a card.

Very simple card but can be a bit messy...truth be told, I don't mind getting a bit messy!
The technique I used on my card is called

So, I sprayed some inexpensive shaving cream into a shallow dish and dropped on some Distress re-inkers over the top.  I pulled the colour into the shaving cream with the wooden end of a paintbrush, then picked up the shaving cream with a credit card and spread it over the top of my stencil. I lifted the stencil carefully, then removed the excess shaving cream with the clean edge of the credit card to reveal a lovely bkg.
When it was all dry, I stamped the sentiment and then splattered with some watered down ink.


Thanks so very much for coming by and taking a look.


Adding my card to these challenges:

Addicted to Stamps and More- CAS
Mixed Media World- ANYTHING GOES
Love to Create- MIXED MEDIA
Brown Sugar- ANYTHING GOES


Supplies
Stamps-Deepest Sympathy (MFT)
Ink- Tuxedo Black Memento; Cracked Pistachio, Peacock Feathers; 
Salty Ocean Distress re-inkers (TH)
Paper- heavy white cardstock (local store)
Accessories and Tools- Misti; shaving cream; credit card; black gems; stencil- frond (Stencil Girl)

Saturday, 1 July 2017

Happy Birthday- Repeated Pattern


Playing with inks always makes for a fun time.
I wanted to try and create my own background paper and this is what I came up with.

I began by choosing a flower stamp that I thought would look alright as a repeated pattern.
The stamp I chose is called Happy Harmony from Stampin Up that I have had for years.
This technique is called 'Smack Down' and is really fun to do.
You can see this technique done on this card I made a few wks ago. 

I began with a piece of heavy white cardstock and inked my stamp with Fired Brick Distress ink and stamped.  I stamped again right beside my first impression then again without re-inking, each time the stamped impression getting lighter and looking like you were stamping off.
I repeated that whole process all over my card front changing colours to Carved Pumpkin then Fossilized Amber Distress inks, filling in my card front but leaving some white space showing through.
Next, I ran the piece through my Cuttlebug using the Penny Black Birthday die.
I cut it again 2 more times just using heavy white cardstock and glued all three layers together.  When that was dry, I glued them into the cut away area on my card front to create an embedded sentiment.
The last step was to add some red gems around the die cut to help bring attention to it.


Thanks so much for coming by and taking a look.

Adding my card to these challenges:

Seize the Birthday- ANYTHING GOES
Simon Says Wed.- ANYTHING GOES
CAS on Sunday- FLOWERS
A Gem of a Challenge- SUMMER COLOURS
Fussy and Fancy- PUNCHES AND DIES


Supplies
Stamp- Happy Harmony (SU)
Inks- Fired Brick, Carved Pumpkin, Fossilized Amber Distress (TH)
Paper- heavy white cs (local store)
Accessories and Tools- Cuttlebug; Birthday die (Penny Black); red gems

Monday, 26 June 2017

Do a Double Take

Good Morning.
Today, I have the pleasure of hosting and TLC Challenge at Splitcoast.
I am calling my challenge:
Do a Double Take
 The challenge is to use 2 different stencils on top of each other for your card.

I came up with this challenge after playing with my stencils and my Distress Oxides to see how well they would layer over one another.  I was very pleased with the outcome.

So onto my card.
I began by inking the back of the Mini Harlequin Circles stencil using Peeled paint, sprayed with water and pressed onto my paper to create a monoprint.
For those of you that are unfamiliar with monoprinting, it is another way to use your stencils. Ink is applied directly from the pad to the back of the stencil, sprayed with water and applied to paper.

When that was dry, I laid the Mini Circle Grid onto my paper and this time, I stenciled it using an applicator tool as you would with any stencil.  
I stamped some Graffiti down the left side using more of the Broken China then sponged the edges with that colour too to help tie it all together.
I stamped the flourish just off the edge of my card front leaving enough room to stamp the sentiment.
You can easily stamp over the Oxides which is another reason I just love using them.


I hope you get a chance to try this technique out.  It is a great way to get more mileage using your stencils in a different way!
Thanks for the visit...very appreciated.

Adding my card to these challenges:

Addicted to Stamps and More- MAKE YOUR MARK
Craft Stamper- ANYTHING STAMPED GOES
Mixed Media World- ANYTHING GOES
Love to Create- ANYTHING CREATIVE/MIXED MEDIA GOES
Simon Says Mon.- STENCIL IT

Supplies
Stamps- Art Soul (Hampton Arts); Flourish (Technique Tues. sorry, discontinued); 
Graffiti (Kaisercraft)
Inks- Tuxedo Black Memento; Peeled Paint, Broken China Distress Oxides (TH)
Paper- Heavy weight white (local store)
Accessories and Tools- Misti; stencils..Mini Harlequin Circle, Mini Circle Grid (TCW); mister (TH);
sponge applicator (TH)