Showing posts with label quilt. Show all posts

Saturday, 24 January 2026

Patchworks

Hello
Today's card reminded me of a cozy patchwork quilt, so good for this cold winter we are having.

I had a bunch of pieces left over from doing the Bargello technique a few weeks ago, so I decided to use them and make another card.

So, here's what I did.
  • I began by looking through my scrap papers that I never use and found 4 that I thought would work together.
  • I cut them into 3/4" strips and glued the strips onto a piece of white cardstock side by side of each other being sure they were all touching. 
  • I let the piece dry, then cut the strips in the opposite direction, again 3/4" wide so each strip had the patterns on them. (hope that makes sense)
  • I glued them, one at a time onto another piece of white cardstock, offsetting the pieces like putting together a quilt pattern. There are many different ways you can create a pattern by just moving the strips into different positions.
  • While the glue dried, I die cut the black frame and then glued that over the patchwork.
  • I glued the finished card front onto a piece of patterned paper and then onto a 4 1/4" white square card base.
  • I die cut the sentiment with some black and added it over the middle to finish my card off.

Thanks so much for coming by and taking a look.

Adding my card to these challenges:
Time Out- FAV CARD MAKING TECHNIQUE
Crafty Catz- ANYTHING GOES
Craft Rocket- SOMETHING NEW (frame die I got for Christmas)

Supplies
Stamps- none
Inks- none
Papers- miscellaneous dp's scraps found in my stash
Accessories and Tools- frame die (Amazon); Hello die (Amazon)

Sunday, 28 December 2025

Congrats~ Bargello Technique


Welcome
It's my turn to host the TLC Challenge (Technique Lovers) at Splitcoast Stampers.
My challenge is to make a card using the 

Everyone has been so busy with their Christmas festivities so I thought this Technique was a very simple, achievable one to try.  So many possibilities with it as well and a good chance to use up some of those scrap pieces of designer paper you may have in your stash.

So here's what I did to create my card.
  • I began by looking through my scrap papers that I never use and found 4 that I thought would work together.
  • I cut them into 3/4" strips and glued the strips onto a piece of white cardstock side by side of each other being sure they were all touching. 
  • I let the piece dry, then cut the strips in the opposite direction, again 3/4" wide so each strip had the patterns on them. (hope that makes sense)
  • I glued them, one at a time onto another piece of white cardstock, offsetting the pieces like putting together a quilt pattern. There are many different ways you can create a pattern by just moving the strips into different positions.
  • When I was happy with the pattern, I glued the piece onto some white cardstock and then black and then onto an A2 sized card base.
  • I die cut the sentiment with some black cardstock 4 times and glued them together, creating a stacked sentiment.  I cut the word shadow from a piece of white and glued them together.
  • To finish my card off, I used some foam tape to pop the sentiment over the middle of my card.

Thanks a lot for coming to take a look.

Adding my card to these challenges:
Simon Says Wed.- ADD A SENTIMENT
Cut it Up- ANYTHING GOES
The Creative Crafters- ANYTHING GOES

Supplies
Stamps- none
Inks- none
Papers- various dp's (unknown)
Accessories and Tools- Congrats die (TE)

Thursday, 2 November 2023

Christmas Star


Good Morning.
Todays card features a new stencil from A Colorful Life Designs called
The finished panel reminds me of a cozy quilt.

So, here's what I did to create my card.
  • I placed a piece of white cardstock onto my Make Art Station and positioned the Starry Top stencil over my paper.  I inked it up with some Rustic Wilderness Distress Oxide ink over the whole panel, then lifted it to wipe off the ink.
  • I turned the stencil upside down and repositioned it to fill in the white areas and to match up the pattern, then inked it up again with some Lumberjack Plaid DOX ink.
  • I removed the stencil and splattered with my white Posca pen.
  • While that dried, I stamped the sentiment using the same above mentioned ink, clear heat embossed it  and die cut it out.  
  • I die cut another circle from some green cardstock and glued the sentiment onto that.
  • The card front was dry so I glued it onto a piece of red cardstock, then onto an A2 sized card base.
  • I used some foam tape to pop up the sentiment circle into the center of the panel.

Here is the new stencil:

Discount Code for A Colorful Life Designs
(Affiliate with no extra cost to you) 

Thanks so much for coming by and taking a look.

Adding my card to these challenges:
Simon Says Wed.- EMBOSS IT
Use Your Stuff- ANYTHING GOES

Supplies
Stamps- Merry Circle Tags (Avery Elle)
Inks- DOX
Paper- heavy white (Scribes Nook- Waterloo, Ont.)
Accessories and Tools- stencil (A Colorful Life Designs); white Posca pen;
Make Art Station (Ranger); Infinity Circle dies (Hero Arts); clear eb powder

Tuesday, 13 December 2022

Scandinavian Quilt


Welcome
Today's card is featuring one of my favourite new stencils called Scandinavian Quilt from A Colorful Life Designs.

So, here's what I did to create my card.
  • I cut a piece of white cardstock, put it onto my Make Art Station and placed the Scandinavian Quilt stencil over that.
  • I used some tape to mask off the middle area as I wanted a 2 tone colour card.  
  • I inked up the middle with some Broken China Distress Oxide ink, added some shading with some Uncharted Mariner.
  • I removed the tape I had used to mask and positioned it along the area I had just inked.  I inked up the top and bottom area with some Uncharted Mariner Distress Oxide.
  • Next, to add a bit of interest, I scored some lines top and bottom using my ScorPal and then splattered with my white Posca pen.
  • I glued the finished panel onto an A2 card base and used some foam tape to add the pre-printed sentiment. 

Here is the stencil I used:
Scandinavian Quilt


Discount Code for A Colorful Life Designs
(Affiliate with no extra cost to you) 

Thanks so much for coming by and taking a look.

Adding my card to these challenges:
Use Your Stuff- ANYTHING GOES
A Place to Start- HAPPY HOLIDAYS

Supplies
Stamps- none
Inks- DOX
Paper- Scribes Nook- Waterloo, Ont.
Accessories and Tools- Stencil (ACLD); TE Blending Brushes; white Posca pen;
ScorPal; Pre-printed Christmas sentiment strips (SSS)

Sunday, 11 December 2022

Christmas Quilt


Welcome
Just making a few extra cards to have on hand just in case I need one.
This one is made totally from some scraps in my stash that I kept when Gel Plate printing.

So, here's what I did to create my card.
  • I began by looking through my stash to find 2 complementary inky pieces.  The two I found had similar colours so I got them out.
  • I used the large one for the base.  It was a roll off sheet.  By that I mean it was the a piece of cardstock that I rolled my brayer off onto to remove some of the excess paint from my Gel Plate.
  • Next, I die cut the quilted pattern with some white and backed it with another scrap. I glued those together and then onto a piece of black cardstock.
  • I glued the large piece onto an A2 card base, then popped the die cut piece over that.
  • I added a pre-printed sentiment and 2 purple gems to finish it off.

Thanks so much for coming by and taking a look.

Adding my card to these challenges:
Allsorts- LET IS SNOW
Winter Wonderland- ANYTHING CHRISTMAS GOES
As You Like It- ANYTHING CHRISTMAS GOES


Supplies
Stamps- none
Inks- Basics Acrylic paint
Paper- Scribes Nook- Waterloo, Ont.
Accessories and Tools- Snowflake Quilt die (Amazon); Speedball Brayer; 
Pre-printed Sentiments (SSS); purple gems

Sunday, 6 March 2022

Seeing Green- Use Your Scraps


Welcome
Two more cards today as I continue my series called 
Use Your Scraps

It's been fun trying to think of all the fun ways to use my scraps.  
Both of these cards use a lot of pieces I had leftover while Gel Plate printing.  
Some used acrylic paint on my Gel Plate and some were just inked or roll off sheets while printing.

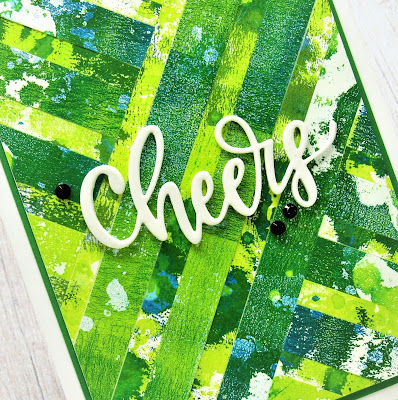
So here's what I did to create card # 1
  • I began by cutting a white cardstock panel and pulled out scraps that were similar in colour.  (I even remembered to take picture of the larger scrap pieces before I cut them down.)

  • I cut all my strips into 1/4 and 1/2 " pieces and laid them all out together.  Like I mentioned above, some were also scraps of inked paper from larger pieces I cut down to use as card front.
  • First, I glued the horizontal pieces down the front from the top right hand side of the white cardstock panel down to the bottom left hand corner.
  • When I was happy with that arrangement, I glued the smaller pieces going in the opposite diagonal direction.  
  • While that dried, I die cut the 'Cheers' from some white cardstock 3x's and glued them all together.
  • When the patchwork panel was dry, I glued it onto a piece of green cardstock, then onto a heavy white card base.
  • I glued the sentiment over the middle and added 3 black gems.


Ok...now for card #2 using the same colours and leftover scraps.


  • This time I cut a white cardstock panel and then cut it into 4 equal parts.  
  • I glued more of the scraps I had left onto the white panels, again going in a diagonal direction.
  • I used some foam tape to pop the panels up over the white cardstock base.
  • I stamped the sentiment in my Misti, clear heat embossed it, then mounted it over the background.

Well thanks so much for coming by and taking a look.
I hope you feel inspired to use your scraps.

Adding my card to these challenges:
Simon Says Wed.- ADD A DIE CUT


Supplies
Stamps- Words and Ideas (Impression Obsession)
Inks- Distress Oxides, Acrylic paint
Paper- heavy white (Scribes Nook- Waterloo, Ont.)
Accessories and Tools- Gel Plate, brayer, scraps from previous projects,
Lawn Fawn cl eb powder, Cheers die (MFT), black gems, foam tape

Sunday, 27 February 2022

Paper Quilts- Use Your Scraps


 Welcome
I've been doing a series of cards over the last few weeks, showing how to use those scraps you know we all have hanging around in our craft space.  
I keep all mine in a container as I often have strips leftover when cutting down a Gel Plate print to make them card size.  I'm on a mission to use those scraps and hopefully, create some nice looking cards using them.
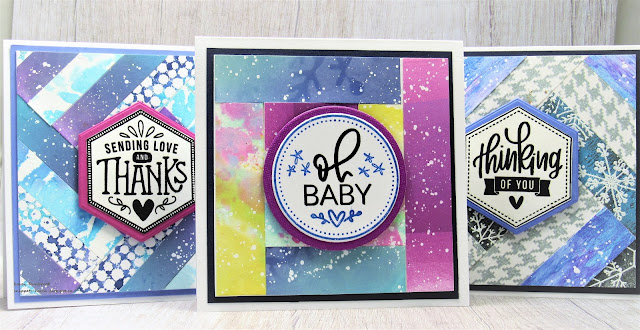
I used the strips to make 3 cards today, all made with scraps and inspired by quilt designs...I love quilts.
To see other cards I have done with scraps, just look above in the tutorials section.
All the paper strips were cut at 1/4 inch wide.
All the cards are 4 1/4 x 4 1/4 inches in size so they fit easily into a standard size envelope.

USE YOUR SCRAPS


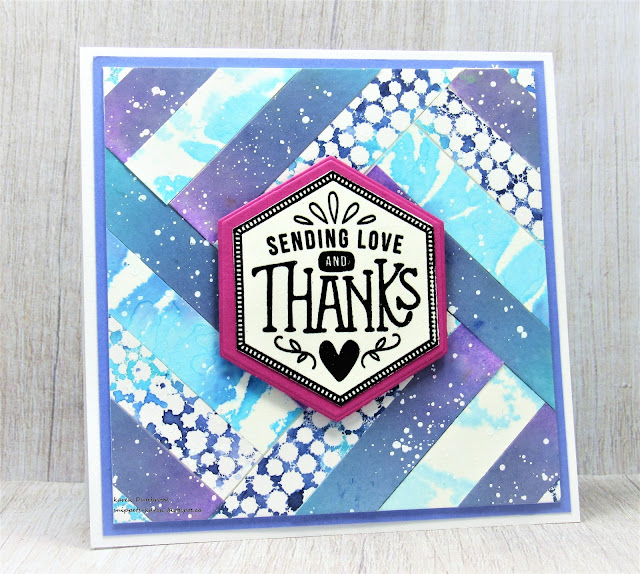
Card #1
For this card I used a variety of scraps including some inked Distress Oxide inked pieces, some stenciled pieces and some stamped.  
The pieces are cut at 1/4 inch wide and glued in this 'quilt style' format starting with a square piece of cardstock that you can't see, (it's under the sentiment) right in the middle of the card front panel. 
I splattered it with my white Posca pen after all the pieces were glued into place.
 I stamped the Sending Love and Thanks in my Misti onto a piece of white cardstock and die cut it using the Hero Arts Hexagon Infinity dies.
I pop dot mounted it over the finished quilt style background.


Card #2
This one was again a combination of some stamped strips and some inked ones, glued together in the same way as Card # 1. This one has a much more wintery feel to it with the snowflakes and the colours of the strips.
I stamped the sentiment onto some white cardstock and again, cut that out using the Hexagon Infinity dies then was pop dot mounted over the background.


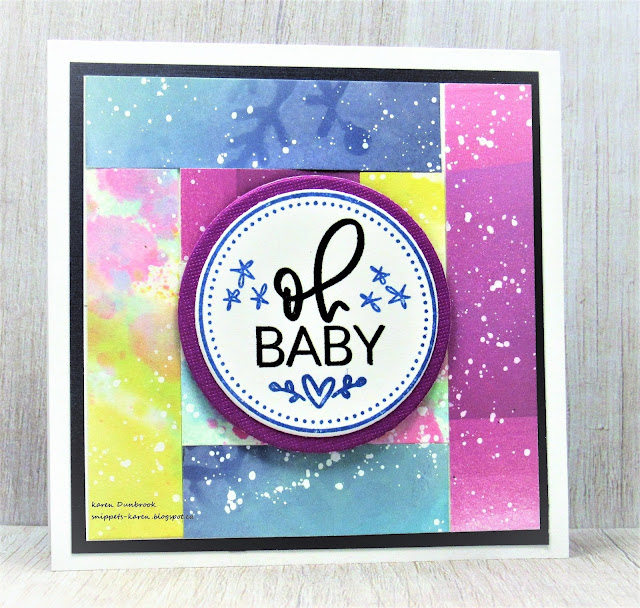
Card #3
This pattern was a bit different then the first two.  The strips are laid straight instead of on the diagonal.
I splattered using my white Posca pen on this one too.
I made this one into a baby card by stamping the sentiment and then used a circle die to cut it out and pop dotted it over the background.  

Well I hope you enjoy these simply done 'quilt' style cards all done using scraps.

Thanks so much for coming by and taking a look.

Adding my cards to these challenges:
Simon Says Wed.- ANYTHING GOES
Crafter's Cafe- MYO BACKGROUND


Supplies
Stamps- Hexagon Greetings (SSS); Everyday Circle Tags (Avery Elle)
Inks- Versafine Clair, DOX
Paper- heavy white- Scribes Nook, Waterloo, Ont.
Accessories and Tools- Misti (My Sweet Petunia); white Posca pen; Infinity Circle dies (Hero Arts);
Infinity Hexagon dies (HA); foam tape

Thursday, 10 February 2022

Paper Scraps- Use Your Scraps


Good Morning
I've decided to do a series of cardmaking over the next few weeks, showing how to use those paper scraps you know we all have hanging around in our craft space. 
I keep all mine in a container as I often have strips leftover when cutting down a Gel Plate print to make it card size.  I'm on a mission to use those scraps and hopefully, create some nice looking cards using them.
To see all the cards I will include in this series go to the tutorials bar above and find
USE YOUR SCRAPS

So here's what I did to create my card.
  • I began by cutting 4 squares that were 2 1/4 x 2 1/4" from white cardstock to use as the base for gluing all the strips onto.
  • I got out my container with all the paper strips that I save.  Like I mentioned above, they are stenciled, stamped, gel plate printed or just just plain inked pieces that I got when cutting down larger panels to make my card fronts.
  • I cut the strips down; some are 1/2" and some are 1/4" wide.  I randomly glued them onto the 4 white cardstock squares that I had cut from above.
  • I splattered the panels with my white Posca pen.
  • While they dried, I stamped the sentiment and die cut it out.  I cut a slightly larger circle from some bliue cardstock and glued them together.
  • I cut my card base- finished card size is 5"x 5".  
  • I glued the 4 squares together onto another piece of white cardstock and then glued that onto my card base.
  • I pop dot mounted the sentiment into the center of my card.

Thanks so much for coming by and taking a look.

Supplies
Stamps- Everyday Circle Tags (Avery Elle)
Inks- Versafine Clair; (many Distress Oxide inks; acrylic paint etc used on strips)
Paper- white (Scribes Nook- Waterloo, Ont.)
Accessories and Tools- Infinity Circle dies) HA; pop dots; white Posca pen

Monday, 15 November 2021

Patchwork Christmas


Good Morning
The weekends seem to fly by and at this time of the year, there is less time to create.
That being said, I really wanted to try a technique featured over at Splitcoast Stampers called
Super simple to do and a great way to use up some of you paper scraps.
I chose some holiday themed paper in red and green for my card.

So here's what I did to create my card.
  • I began by looking through my dp's until I found some papers that I liked.  
  • Following the tutorial on SCS, I cut my paper into 1" squares and then glued my papers onto a piece of white cardstock that was 3 x 3.
  • I cut them as per the instructions and glued them onto another piece of cardstock.
  • Using a postage die, I cut a piece of white cardstock and glued that onto a card panel that was 4 1/4 x 4 1/4 square.  
  • I glued a piece of red cardstock over that, then pop dotted the patches onto the red.
  • I die cut the 'Merry' from some white and some red, glued them together off setting them a bit and then glued them over the patches.
  • I stamped the sentiment strip and pop dotted that over the die cut.


Adding my card to these challenges:
Sweet Stampin- USE RED
Crafty Calendar- ANYTHING GOES
Dragonfly Dreams- CHRISTMAS/ WINTER
Christmas Kickstart- CHRISTMAS SNIPPETS


Thanks so much for coming by and taking a look.

Supplies
Stamps- Taylored Expressions-Simple Strips Christmas
Inks- Versafine Clair
Paper- heavy white cardstock (Scribes Nook-Waterloo, Ont.); dp from my stash
Accessories and Tools- Merry die (The Stamp Market);  Postage stamp die (Spellbinders); TH paper cutter; pop dots; Nuvo glue

Monday, 5 October 2020

Patchwork Quilt


Hello and Welcome.
I picked up a few new stamps and a die a couple weeks ago and wanted to have a chance to use them so this is the card I came up with.
I hope you can see the embedded sentiment....it looks so amazing IRL...pretty simple to do too.

So here's what I did to create my card.
  • I began by looking through my stash of inked papers.  I try to soak up leftover inks when I'm finished working on a background as not to waste any.  This one had soaked up lots of blue Distress Oxide inks.  I'm guessing but I think the colours were Peacock Feathers, Faded Jeans and some Blueprint Sketch.  
  • I placed the inked piece into my Misti and stamped this new to me stamp called Grungetangled (fun name isn't it!) with some Faded Jeans Archival ink.  It really made for a fun look.
  • I die-cut the sentiment Live, Love, Laugh from the panel and set aside being sure to keep all the piece together. 
  • I die-cut the sentiment 4 more times then glued them all together.
  • I glued the stamped panel onto a piece of white cardstock, then fitted the die-cut back into place and glued in all the little extra pieces that made up the pattern.
  • I added some matching blue gems for interest, then glued it onto a heavy white card base.


Thanks so very much for all your kind comments and for coming by and taking a look.
Hope you have a great week.

Supplies
Stamp- Grungetangled (Sentimentally Yours) 
Inks- Archival, Distress Oxides
Paper- heavy white (Scribes Nook)
Accessories and Tools- Live, Love, Laugh die (Frantic Stamper); Cuttlebug; blue gems;
Misti (My Sweet Petunia)