Tuesday, 2 April 2024

Swirl Around


Good Morning
It's an exciting day at A Colorful Life Designs as the newest release is up.
I used this lovely new stencil to create my card called 
I paired it with an older stencil called Simple Mosaic for a fun rainbow type card.

So, here's what I did to create my card.
  • I placed a piece of white cardstock onto my Make Art Station and put the Swirl Around stencil over that.  I inked from top to bottom with these Distress Oxide colours:  Fossilized Amber, Ripe Persimmon, Picked Raspberry and Peacock Feathers.
  • Leaving that stencil in place, I put the Simple Mosaic stencil right over the top and inked again using the same colours in the same areas.  It added such great interest to the design.
  • I removed both stencils and used the ink left on my blending brushes to add some colour around the outer edges of stenciling.
  • Next, I placed the card front into my Misti, rubbed it with my anti-static bag before stamping the sentiment.  I clear heat embossed it to help it pop.
  • I covered the sentiment and splattered the panel with my white Posca pen.
  • I glued the stenciled panel onto a piece of white cardstock, then onto a piece of red and then finally, onto an A2 sized card base.  I also added 3 black gems around the sentiment.

Here are the stencils I used:


Discount Code for A Colorful Life Designs
(Affiliate with no extra cost to you) 

Thanks so much for coming by and taking a look.

Adding my card to these challenges:
Simon Says Wed.- ANYTHING GOES
Simon Says Monday- WHATEVER THE WEATHER
(rainbow)
Crafts Galore- ANYTHING GOES

Supplies
Stamps- Life is Art (STAMPlorations)
Inks- DOX, Versafine Clair
Paper- heavy white (Scribes Nook- Waterloo, Ont.)
Accessories and Tools- stencils (A Colorful Life Designs); Make Art Station (Ranger);
TE Blending Brushes; white Posca pen; black gems

Sunday, 31 March 2024

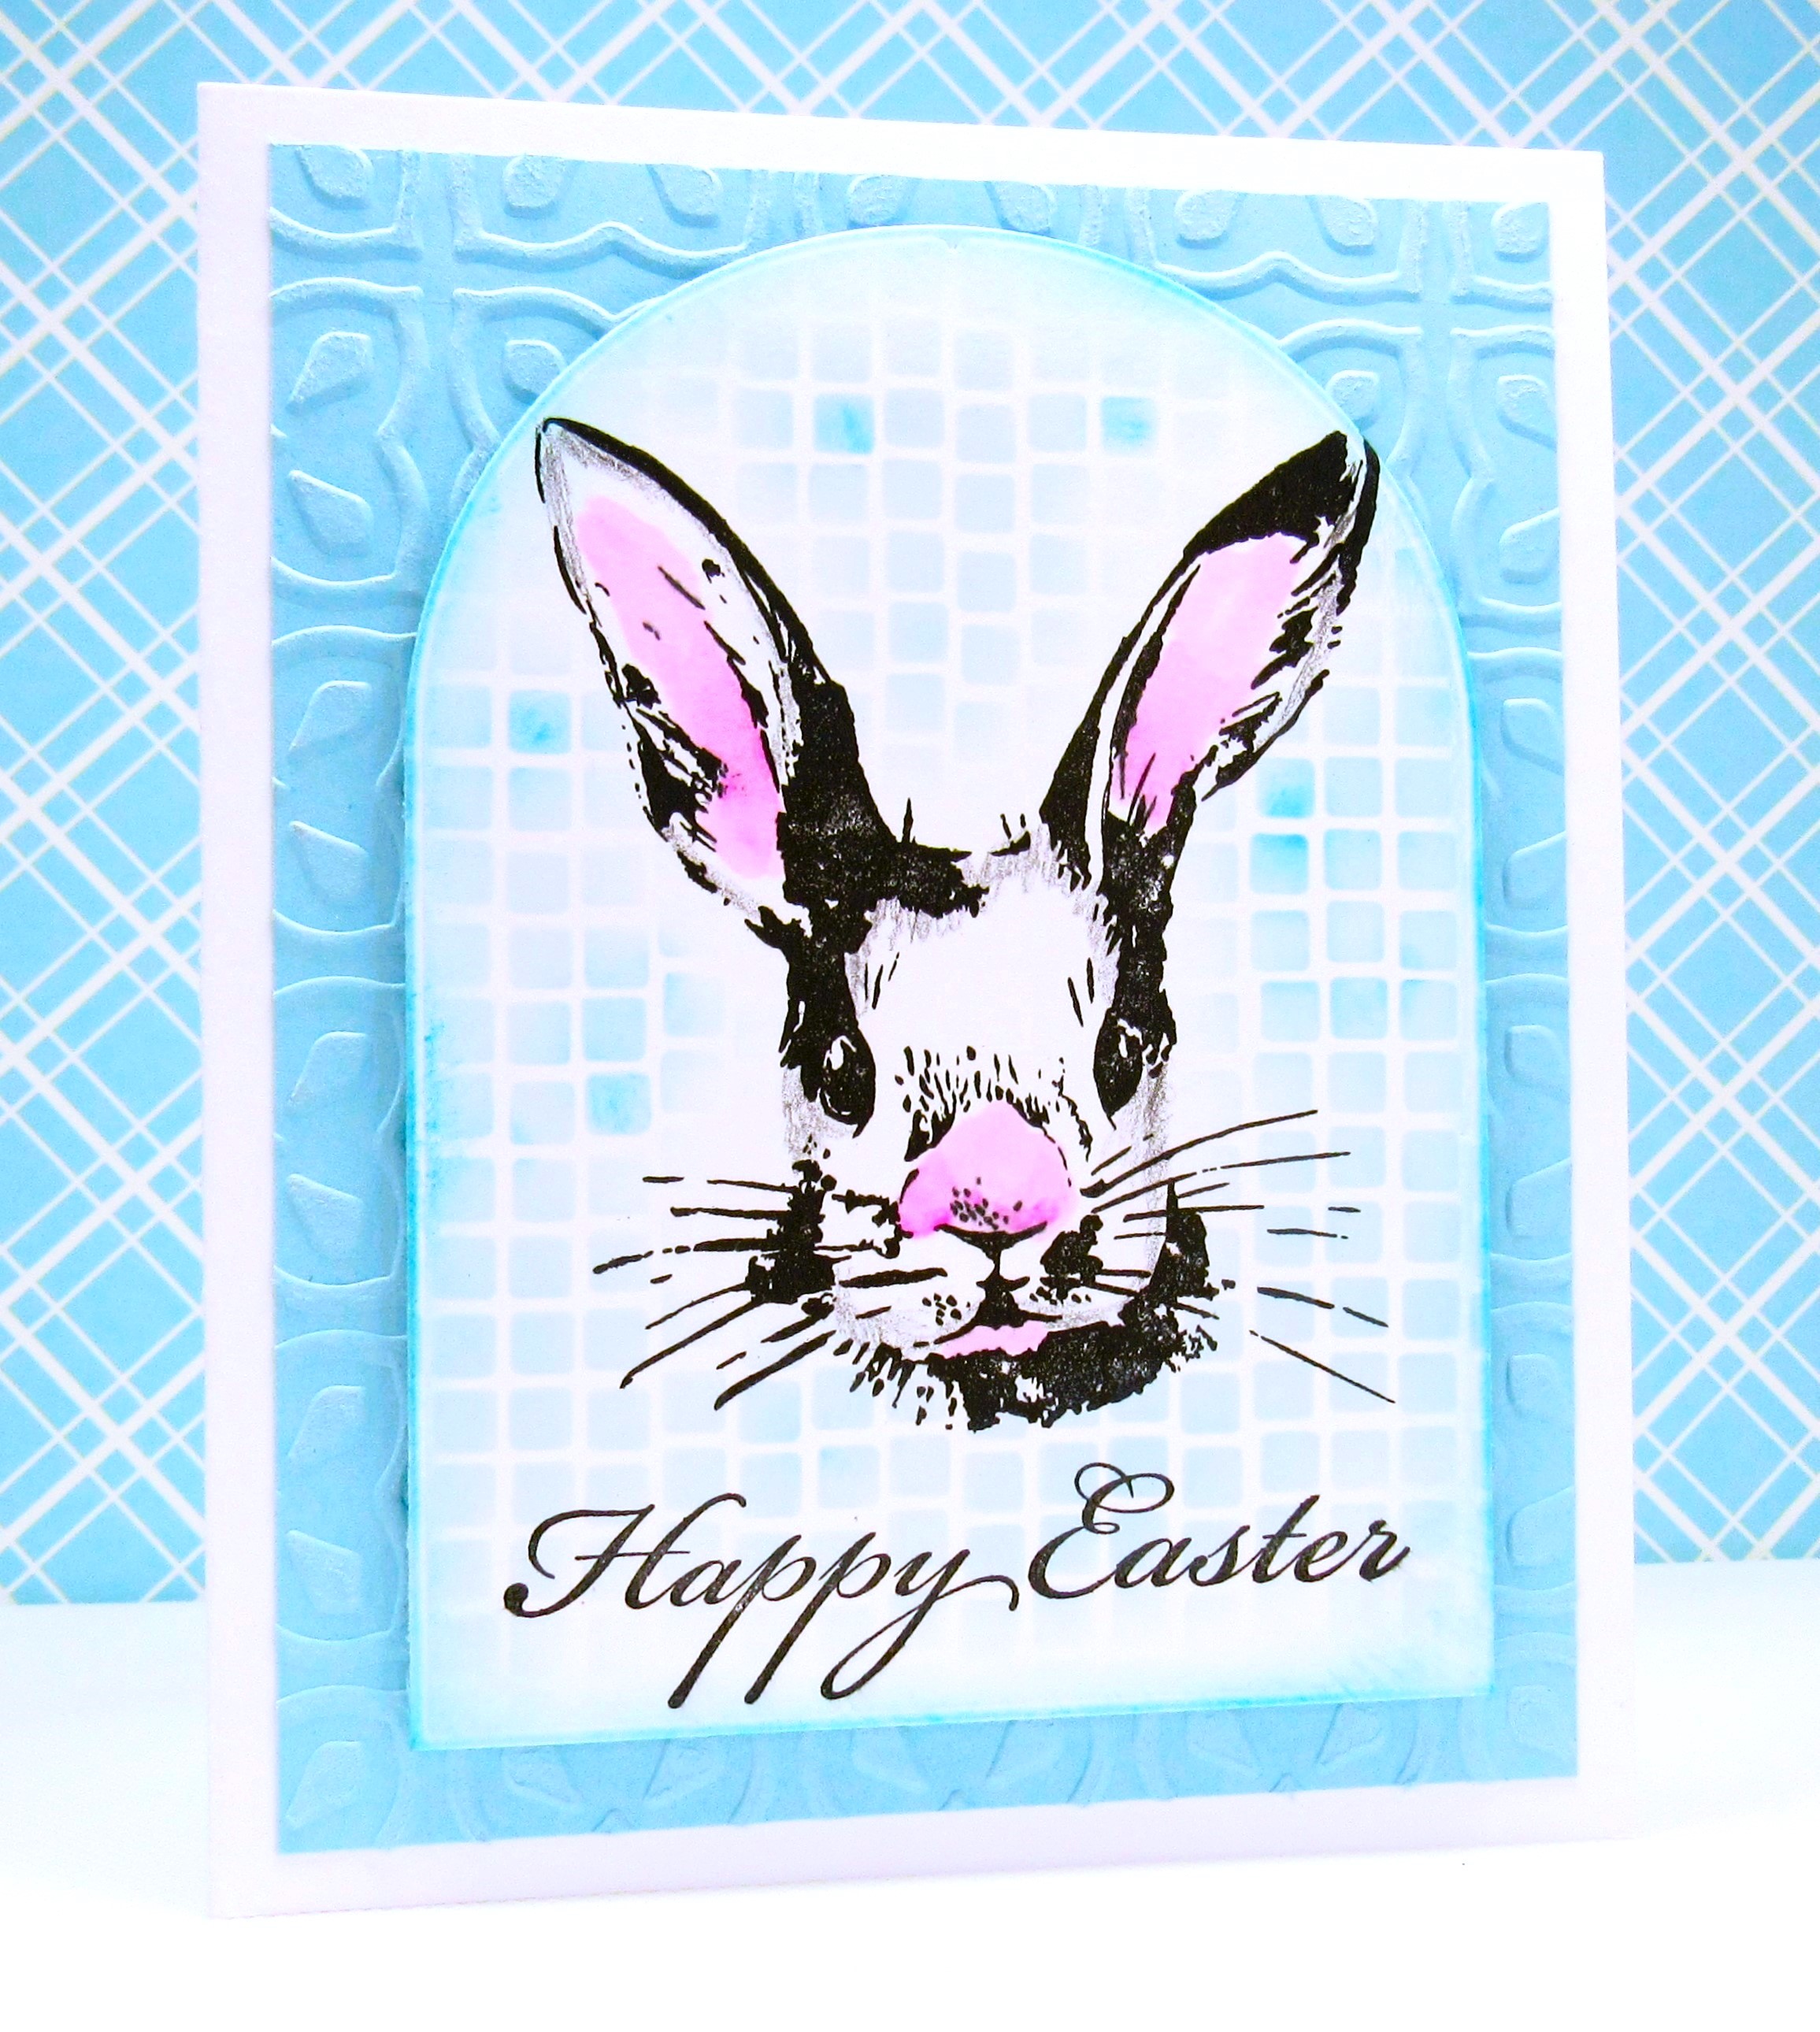
Happy Easter

Happy Easter!

I hope your day is filled with many blessings.
I created a fun card using some new and older supplies.

So, here's what I did to create my card.
  • I placed a piece of white cardstock into my Misti and stamped the new to me bunny face with Versafine Clair black ink.
  • I die cut around the bunny head with the arched die, being sure to leave enough space at the bottom to stamp the Happy Easter greeting.
  • Next, I used some watercolour pencils to add the pink to the ears and nose and fill in some areas.
  • To add detail to the background, I used the Simple Mosaic stencil and some Broken China Distress Oxide ink to help ground the bunny.  
  • I used the ink left on my blending brush to ink the edges of the arch as well.
  • I dry embossed a piece of pale blue cardstock and sanded it slightly to give it a bit of a distressed look.
  • I glued the embossed cardstock onto an A2 sized card base and then used some foam tape to pop the bunny arch over that.  

Here is the stencil I used:

Discount Code for A Colorful Life Designs
(Affiliate with no extra cost to you) 

Thanks so much for coming by and taking a look.

Adding my card to these challenges:
Simon Says Wed.- ANYTHING GOES
Little Red Wagon- ANIMAL ANTICS
Daring Cardmakers- EASTER THEME
Just Us Girls- ANYTHING GOES STENCIL WEEK

Supplies
Stamps- Happy Easter (Craftsmart); Hipster Bunny (TH)
Inks- Versafine Clair; DOX, watercolour pencils
Paper- heavy white (Scribes Nook- Waterloo, Ont.)
Accessories and Tools- stencil (A Colorful Life Designs); TE Blending Brushes;
Arches die (Photoplay); EB folder (Darice)

Saturday, 30 March 2024

Easter Bunny

Welcome
As we celebrate Easter and Spring, it's time to meet the new for March stencil from A Colorful Life Designs called 
I used the bunny along with the Marvelous Masks Hexagons in the background.

So, here's what I did to create my card.
  • I placed a piece of white cardstock onto my Make Art station and then put the Bunny Profile stencil along one side and inked it up with some Rusty Hinge and some Aged Mahogany Distress Oxide ink.
  • This stencil comes with a mask so I placed that over my stenciled bunny and secured in place.  
  • I put the smallest Marvelous Mask Hexagon over the bunny mask and inked it up with some Cracked Pistachio ink.
  • I added the next sized Hexagon and inked that with some Peacock Feathers DOX ink.  I repeated that all using the next largest sized Hexagon and inked with some Uncharted Mariner DOX ink.
  • I removed the Hexagon Masks, but left the Bunny Mask in place so I could splatter with my white Posca pen.
  • I stamped the sentiment along the bottom, then glued the panel onto a piece of blue cardstock, then onto an A2 sized card base.
  • Lastly, I added 2 black gems beside the sentiment.

Here is the stencil and masks I used:


Discount Code for A Colorful Life Designs
(Affiliate with no extra cost to you) 

Thanks so much for coming by and taking a look.

Adding my card to these challenges:
Simon Says Wed.- ANYTHING GOES
Shopping Our Stash- SPRING HAS SPRUNG
Just Us Girls- ANYTHING GOES STENCIL WEEK
Little Red Wagon- ANIMAL ANTICS

Supplies
Stamps- Hippity Hoppity (Craft Smart)
Inks- Versafine Clair, DOX
Paper- heavy white (Scribes Nook- Waterloo, Ont.)
Accessories and Tools- stencils (A Colorful Life Designs); TE Blending Brushes;
Make Art Station (Ranger); white Posca pen; black gems

Friday, 22 March 2024

Bright Hello

Good Morning
Today's fun card features a new and older released stencil from A Colorful Life Designs.
Meet the new for March stencil called:
I paired it up with the older one called:
Basically, one is a solid and one adds the details.

So, here's what I did to create my card.
  • I cut a piece of white cardstock, placed it onto my Make Art Station and put the Groovy Flowers Mask stencil over my paper.
  • I inked over the whole stencil with some Fossilized Amber Distress Oxide ink.
  • I moved the stencil over and down a bit, then inked again over the whole panel with some Ripe Persimmon DOX ink.
  • I repeated the above process one more time, inking with some Picked Raspberry DOX ink.  
  • Next, I placed the Groovy Flower Solid Mask over the flowers and inked it all up with some Uncharted Mariner DOX ink.  It made for such an interesting background.
  • I die cut the 'Hello' sentiment from some black cardstock, then die cut the shadow of the die from some vellum and glued those together.
  • I glued the stenciled card front onto a piece of yellow and then orange and then onto an A2 sized card base.
  • I added glue behind just the sentiment letters so it wouldn't show on the vellum and added that over the center of my card front.
  • Finally, to finish off my card, I added some black gems to the flower centers.

Here are the stencils I used:


Discount Code for A Colorful Life Designs
(Affiliate with no extra cost to you) 

Thanks so much for coming by and taking a look.

Adding my card to these challenges:
Simon Says Wed.- SPRING/EASTER
(optional- SPRING/EASTER)

Supplies
Stamps- none
Inks- DOX
Paper- heavy white (Scribes Nook- Waterloo, Ont.)
Accessories and Tools- stencils (A Colorful Life Designs); TE Blending Brushes;
Make Art Station (Ranger); die (Concord and 9th)

Tuesday, 19 March 2024

Finding Happiness


Welcome
Meet today's card.
It's just one of the new for March stencils from A Colorful Life Designs called
I added some details to the flowers using just one of the stencils from the 
Layered Tulip Field stencil set, a release from last month.

So, here's what I did to create my card.
  • I placed the new Heart Flowers stencil onto a piece of white cardstock and inked it up with my Distress Oxide inks in these colours:  Fossilized Amber and Ripe Persimmon
  • I wanted to add an interesting center to the flowers, so I got out the flower centers (stencil #3) from the Layered Tulip Field and inked with some Picked Raspberry DOX ink.
  • I decided to fill in some of the white space, so using an eraser on the end of a pencil and the same colours mentioned above, I added all the dots to the background.  It added to the whimsical look of the flowers.
  • I stamped the sentiment into the bottom corner.
  • I glued the card front onto an piece of pink cardstock, then onto a piece of yellow and then onto an A2 sized card base.
  • Lastly, I added some black gems around the sentiment to finish off my card.

Here are the stencils I used:


Discount Code for A Colorful Life Designs
(Affiliate with no extra cost to you) 

Thanks so much for taking a look.

Adding my card to these challenges:
Little Red Wagon- EASY PEASY
Make My Monday- SPRING, FLOWERS, WEATHER etc
Beautiful Blossoms- ANYTHING FLORAL GOES

Supplies
Stamps- Live Well (Stampabilities)
Inks- DOX; Versafine Clair
Paper- heavy white (Scribes Nook- Waterloo, Ont.)
Accessories and Tools- stencils (A Colorful Life Designs); Make Art Station;
TE Blending Brushes; black gems; pencil eraser

Saturday, 16 March 2024

Thinking About You


Good Morning.
Today's card features a new for March stencil from A Colorful Life Designs called
By shifting and changing the direction of a simple stencil, you are able to create so many designs.

So, here's what I did to create my card.
  • I placed a piece of white cardstock onto my Make Art Station and placed the Curvy Path on top of that.  I inked it up with some Peacock Feathers Distress Oxide ink.
  • I took the stencil off, wiped it clean, then repositioned it and inked with some Villainous Potion DOX ink.  The overlapping pattern made for a nice background.
  • Next, I stamped in some of the open areas using the eraser on the end of a pencil with the same colours as mentioned above.
  • While that dried, I die cut out the sentiment with some white cardstock, then inked it up with the same colours that I had used for the stenciling.
  • I die cut the sentiment shadow right from the middle of the panel and then glued the inked sentiment onto it.
  • I glued the panel onto a piece of light blue cardstock, then onto an A2 sized card base.
  • I used some foam tape to add the sentiment back into place in the middle of the card front.
  • Using my white Posca pen, I added a few dots and then I put some silver gems around the sentiment.

Here is the stencil I used:

Discount Code for A Colorful Life Designs
(Affiliate with no extra cost to you) 

Thanks so much for coming by and taking a look.

Adding my card to these challenges:
Cut it Up- COLORS OF SPRING
(blue skies/ my purple crocus are coming up)
Crafty Catz- ANYTHING GOES
The Crafty Addicts- ANYTHING GOES
OPTION SPRING/EASTER

Supplies
Stamps- none
Inks- DOX
Paper- heavy white (Scribes Nook- Waterloo, Ont.)
Accessories and Tools- stencil (A Colorful Life Designs); TE Blending Brushes;
white Posca pen; sentiment die (SSS); silver gems (Dollar Store)

Friday, 15 March 2024

Layered Whirligig

Meet today's card.
This new for March stencil from A Colorful Life Designs is called 
This is a 2 part stencil set.
It's so fun and easy to make a quick card using it.

So, here's what I did to create my card.
  • I placed Stencil #1 from the Layered Whirligig stencil set onto a piece of white cardstock and inked it up with some Picked Raspberry and some Lumberjack Plaid Distress Oxide ink.
  • I removed that stencil and positioned Stencil #2 from the set into place.  I inked up the next sections using some Ripe Persimmon and some Fossilized Amber DOX ink.
  • While that dried, I die cut the sentiment from some yellow and orange cardstock and glued the two together, offsetting them a bit.
  • I glued the stenciled card front to a piece of yellow cardstock, then orange, then red and finally to a white A2 sized card base. 
  • I glued the sentiment to the middle of the card front and added some red gems around it.

Here is the stencil I used:

Discount Code for A Colorful Life Designs
(Affiliate with no extra cost to you) 

Thanks so much for coming by and taking a look.

Adding my card to these challenges:
Little Red Wagon- EASY PEASY
optional- Easter/Spring
Crafty Gals Corner- ANYTHING GOES

Supplies
Stamps- none
Inks- DOX
Paper- heavy white (Scribes Nook- Waterloo, Ont.); Miscellaneous (Dollarama)
Accessories and Tools- stencils (A Colorful Life Designs); TE Blending Brushes;
gems (Dollarama); die (Frantic Stamper)