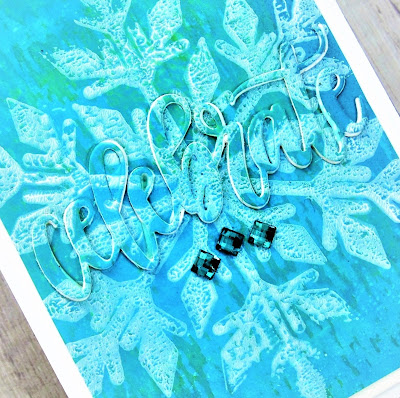
Welcome
I hope you are having a good week.
I was on holidays so I had time to create which has been so great.
I've been so inspired by the DTGD Challenges over at Splitcoast Stampers. They host this huge event every year with so many challenges and new techniques to try.
It's been so fun to play along and I'm especially happy to be adding to my stash of cards for the holidays.
So here's what I did to create my card.
- I wanted to make a snowflake card using my Gel Plate so I got out all my supplies. Acrylic paint, brayer and my Gel Plate. I brayered some blues and greens onto my plate and then pressed the Big Snowflake mask from A Colorful Life Designs onto the plate. It is one of my favs! (I like to use the handle end of a paintbrush to gently press in all areas of the mask so it gets good contact.)
- I carefully removed the mask and set it in the sink to soak. TIP: I soak mine in Oxiclean to get all the reside and paint off. I let the paint dry for a bit on the plate, then I brayered on some white acrylic paint, covering the plate, then rubbed my cardstock over that to lift the print. I let is all dry completely before moving onto the next steps.
- I die-cut the 'Celebrate' sentiment from the panel, set that aside and die-cut it 3 more times from some white cardstock so I could stack them all together.
- Next, I glued the snowflake panel onto a piece of cardstock, leaving the die-cut portion out.
- I glued the white die-cuts together, stacking them together as best I could, then glued the one I had cut from the snowflake panel on the very top of the stack.
- I glued the stacked sentiment back into place over the snowflake.
- I glued it all onto a heavy white card base, then added the 3 little square gems.
Here is the mask I used for my card:
Discount Code for A Colorful Life Designs
Thanks so much for coming by and taking a look.
Adding my card to these challenges:
Simon Says Wed.- ANYTHING GOES
Addicted to Stamps and More- CHRISTMAS
Little Red Wagon- STENCIL
Supplies
Stamps- none
Inks- none
Paper- heavy white (Scribes Nook-Waterloo, Ont.)
Accessories and Tools- Gel Plate, Brayer, Basics Acrylic paint, Big Snowflake mask (ACLD);
Celebrate die- MFT, square gems


11 comments:
THIS IS GORGEOUS, KAREN!!! 💙💚💙💚💙
OH! That is BEAUTIFUL. A stunning card. xxx
Beautiful snowflake design and I love the addition of the gems.
So dramatic with the big snowflake ♥
So pretty and I love your eclipse die cutting.
Hugs Monica
WOW!! what a gorgeous card Karen, I love that huge snowflake and your wonderful colours, enhanced with those little gems, Kate x
This is gorgeous using your gelli plate and a big snowflake stencil Karen, and there is something that I really love about the sentiment die cut with several white layers and with the coloured layer on top which is inset but at the same time stands out beautifully, and love the added gems to finish too. x
A lovely snowflake.I like the addition of the diamond shaped gems. [Bunny]
What a gorgeous snowflake Karen - and I love how you used the geliplate to create it.
When I am stacking die cuts, I often glue the first cut layer onto the next while it is still in the die, so it lines up perfectly, and is a bit more stable to glue other layers to
Stay safe
Blessings
Maxine
Your snowflake card is really, really beautiful. tfs
Karen, this is such an amazing card! I love that it is a gel print. Thanks for sharing your technique and thanks so much for joining us this week at Little Red Wagon!
Post a Comment