Showing posts with label Colorado Craft. Show all posts

Sunday, 30 October 2022

Holly Jolly Snowflake


Welcome
It's my turn to host the TLC Challenge (Technique Lovers) over at Splitcoast Stampers this week.
I'm calling my challenge Stripped Down.
I saw a video by Jennifer McGuire that inspired my card.

So, here's what I did to create my card.
  • First, I inked up a piece of white cardstock with some Distress Oxide ink.  No special technique here...just put ink all over your cardstock.  The colours I used were: Wilted Violet, Broken China, Uncharted Mariner and Prize Ribbon
  • I dried the ink on the panel and die cut it into strips, keeping them together in the order that I had inked them up.
  • When they were all cut, I glued them onto another piece of white cardstock, flipping every other strip around to face in the opposite direction.
  • I glued them all down and set aside to dry.
  • After the glue dried, I placed the piece into my Misti, rubbed over the panel with my anti-static powder and stamped the snowflake into the top corner with some Versamark ink and white heat embossed it.
  • I splattered with my white Posca pen to give a snowy effect.
  • I used some foam tape to stick the finished piece onto a piece of white cardstock, then onto a piece of shimmer purple and then finally, onto an A2 sized card base.
  • I popped the sentiment over the panel.

Thanks so much for coming by and taking a look.

Adding my card to these challenges:
Simon Says Wed.- ANYTHING GOES
Simon Says Mon.- CHRISTMAS

Supplies
Stamps- Warm Wishes Snowflake (Colorado Stamp); Christmas Sent strips (TE)
Inks- Distress Oxide; Versafine Clair; Versamark
Paper- heavy white (Scribes Nook- Waterloo, Ont.)
Accessories and Tools- TE inking brushes; white eb powder; heat tool; 
white Posca pen; anti-static powder; Slim Strips die (Pinkfresh Studios)

Tuesday, 14 December 2021

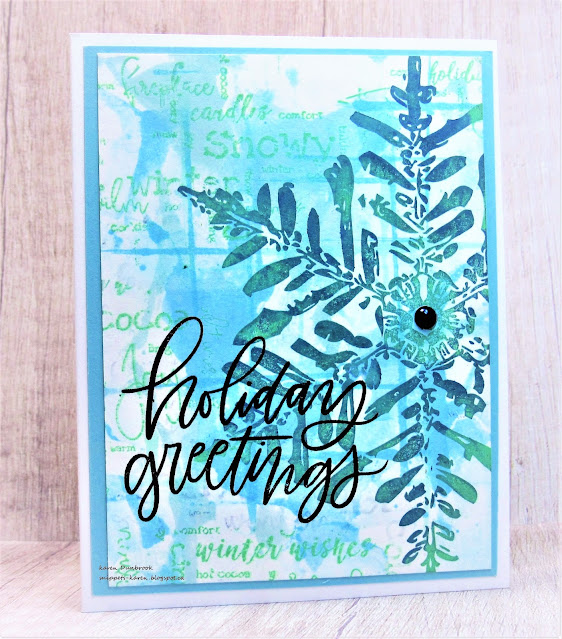
Snowy Afternoon


Welcome
Meet my today's snowflake card.
Lots of inks, smooshing and fun.

So here's what I did to create my card.
  • I cut a piece of white cardstock for my card panel.  I rubbed some Broken China Distress Oxide ink onto my non-stick mat, sprayed with water and rubbed the panel into the wet ink.  I used the leftover ink on my mat to create the lines using the edge of a gift card dipped into the wet ink.
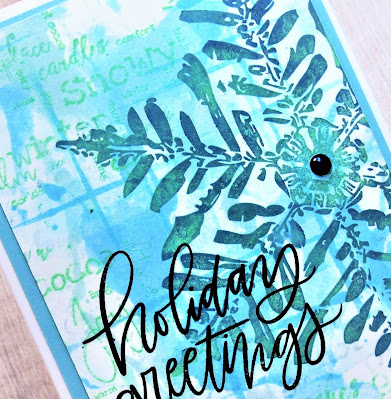
  • After drying the panel, I stamped over it with the Snowy Afternoon background stamp using some Cracked Pistachio DOX ink.  The words added a lot of interest.
  • I placed the dry panel into my Misti and positioned the large snowflake to one side.  I randomly pressed on some more Broken China DOX ink over the snowflake, sprayed with water and stamped.  I repeated that process using some Rustic Wilderness and Lucky Clover ink.
  • Lastly, I stamped the sentiment in the left hand corner with some black Versafine Clair and clear heat embossed it.  I added the black gem to the center of the snowflake.
  • I glued it onto a pale blue piece of cardstock, then onto a heavy white card base.

Thanks so much for coming by and taking a look.
I hope you holiday preparations are going well.

Adding my card to these challenges:
Simon Says Wed.- COLD AS ICE
A Place to Start- ANYTHING GOES OPTION BLUE
Love to Craft- ANYTHING GOES

Supplies
Stamps- Hand Lettered Holiday Greetings (MFT); Snowy Afternoon (Studio Light); 
Warm Wishes Snowflake (Colorado Craft)
Inks- Distress Oxides; Versafine Clair
Paper- heavy white (Scribes Nook- Waterloo, Ont.)
Accessories and Tools- Misti (My Sweet Petunia); old gift card; non- stick craft mat; 
clear eb powder; Mister (TH)

Monday, 18 January 2021

Snowy New Year

Hello and Welcome

I need an intervention....put down that snowflake stamp!!!
I love it because it's big, easy to use to fill a card front and I love the look of it.
I told myself, 'embrace the things that make you happy'.  This snowflake and bubbles...yes please!

So here's what I did to create my card.
  • I decided to make a bunch of 'bubble' backgrounds.  I did this one using some Blueprint Sketch and some Peacock Feathers Distress re-inkers.  Simple put some water in a cup, add some dish soap then drop in some ink.  Mix well then blow some bubbles with a straw and catch them onto the paper.  So fun.  *when I bubble paint, I add one colour of re-inkers to my soap mixture, then instead of dumping that out after a few backgrounds are made, I just continue to add different colours to the same mixture to create different bkg.*

  • When the background was totally dry, I placed the panel into my Misti, inked up the snowflake with some Versamark ink and pressed it onto my panel.  I added some white embossing powder and heat set it.  
  • I left the piece in my Misti and stamped the sentiment with some black Versafine Clair and clear heat embossed that to help it pop against the background.
  • I took my white Posca pen and added splatters all over the panel to give it a really snowy look.
  • I mounted the panel onto a heavy white card base and added a black gem to the center of my snowflake.
 

Thanks so much for coming by and taking a look.

Supplies
Stamps- Christmas Cheer (TT); Warm Wishes Snowflake (Colorado Craft)
Inks- Versamark, Versafine Clair Noir; Distress Re-inkers
Paper- heavy white (Scribes Nook)
Accessories and Tools- dish soap; straw; white eb powder; clear eb powder; white Posca pen; black gem

Sunday, 17 January 2021

Snowflake Thanks


Good Morning
I hope you are well during these difficult times.  
After Christmas I like to take some time to make thank-you cards and this is one I came up with.
I've really tried to think of the many ways I can use this snowflake stamp to create different looking card designs.  This one was pretty simple to do.

So here's what I did to create my card.
  • I began with a panel of heavy cardstock and got out the Marvelous Masks Circles from A Colorful Life Designs.  This set has the stencils and the masks included.  I placed the smallest stencil to the side of my card base and rubbed on some Peacock Feathers Distress Oxide ink using a blending brush.
  • I covered the area I just inked with the circle mask and laid down the next size of circle and inked that with some Shaded Lilac DOX ink.  I repeated that process using a bigger and bigger circle stencil and mask and applied more DOX inks; Cracked Pistachio and finally more Peacock Feathers.
  • I dried the ink, then placed it into my Misti and stamped the snowflake from Colorado Craft using some Versafine Clair ink.  
  • Next, I stamped the sentiment from Your Next Stamp right down in the corner.
  • To add interest to my card, I randomly stamped some text and then added some markings using an old gift card and more Versafine Clair ink.  
  • I splattered using my Posca pen, then added a black gem to the snowflake center. *it's amazing how much these little additions add to the interest of the card!*
  • Lastly, I mounted it onto a piece of black cardstock, then onto some soft lilac then onto a heavy white card base.

Thanks so much for coming by and taking a look.

Discount Code for A Colorful Life Designs

Adding my card to these challenges:
Simon Says Wed.- LAYER IT UP
As You Like It- FAV COLOUR COMBO and WHY?
(I love blue with greens and purple...feels so soothing to me)
Sweet Stampers- SNOW/ WINTER


Supplies
Stamps- Warm Wishes Snowflake (Colorado Craft); Everyday Sentiments (YNS); 
Overlapping Texture (ALL and Create)
Inks- Versafine Clair Noir; DOX 
Paper- heavy white (Scribes Nook); coloured cs 
Accessories and Tools- Marvelous Masks Circles (ACLD); blending brushes (TE); old gift card;
Misti (My Sweet Petunia); Posca pen; black gem