Friday, 16 November 2018

Collaged Christmas- CAS Watercolour Challenge

Hello and Welcome
Time for another card for the 

Our theme this month is Christmas Florals and or Greenery.


This is the perfect challenge to get a few more holiday cards made.
I love making collage-style cards but I don't think I have ever done one for Christmas so today was the day.

It is such fun to see how many stamps you can add and is a great way to get more mileage from your stamp collection.  I find that this technique works best if you stay in the same colour palette.  It is easy and fun to try too.
So, I began by masking off my card front to help give me a defined area to stamp inside of.
I have been very happy using the Post-It Tape that my DH picked up from Staples.
I placed the masked piece inside my Misti and positioned the poinsettia called Red Star along the bottom edge.  It was the biggest stamp I would be using and I wanted it to be the focal point.
I coloured the stamp using different shades of red Tombow markers, sprayed with water and stamped onto my cardstock.  I clear heat embossed to help the colours pop and to create a resist for the other stamp I was about to do around it.
Next, I did some Acetate inking on the background to add colour.
Then, I went ahead and stamped in the background being sure to leave a little 'white' relief space. I also did some stenciling using this great stencil called Simple Mosaic.  I love the smaller size of the squares on this one.   
When I was happy with the collage stamping, I stamped the sentiment in black and sponged along the masked edges with some more of the red.  I splattered the whole piece with some white acrylic paint,  removed the Post-It tape and then I scored a border all around the inked area.


I hope you check out all the inspiring cards from our talented DT and our guest Maura this month.
Thanks so much for coming by and taking a look.

Adding my card to these challenges:
Addicted to Stamps and More- HOLIDAY
Craft Stamper Magazine- ANYTHING STAMPED GOES
CRAFT- CHRISTMAS

Supplies
Stamps- Red Star (Penny Black)= Stillness (Penny Black)= Weathered Clock (Hampton Arts)= Texture Mini(Carabelle)= Collage Des Ronds (Carabelle)
Inks- Tuxedo Black Memento= Distress Oxides- Candied Apple, Fired Brick= 
Tombow Markers
Paper- heavy white (Scribes Nook)
Accessories and Tools- ScorPal= Post It Tape= white acrylic paint= Misti (My Sweet Petunia)=
paint brush= Mister (TH)

Thursday, 15 November 2018

Birthday Wishes- The Flower Challenge


Good Morning
Time for another card for
The Flower Challenge.

Our theme this month is 'A Special Occasion'.


I created a birthday card for the theme.  I am always in need of cards to celebrate birthdays.
I was playing around with some Canon photo paper and applied some Ranger Alcohol inks to the paper using a piece of plastic wrap.  By scrunching up the plastic wrap, dabbing it into the ink and then onto the paper, you are left with an interesting textured looking background.

I wanted to compare the photo paper to using Yupo.  They both have a shiny surface but with the photo paper, I found the ink didn't move after applied even if I dropped on some Blending Solution or some Rubbing Alcohol.  By using the plastic wrap, I was able to get a mottled look instead of blobs of colour.

I die-cut the scalloped edge frame from Your Next Stamp and the flowers from Poppystamp.
I glued the alcohol inked bkg behind the frame and then added the flowers.  I stamped the sentiment then pop dotted the framed piece over that.


Thanks for coming by and taking a look.


Supplies
Stamps- Happy Birthday (Studio G)
Inks- Wilted Violet Distress (TH)= Ranger Alcohol ink
Paper- heavy white (Scribes Nook)= Canon Photo Paper
Accessories and Tools- Scalloped Stitched Frame (YNS)= Misti (My Sweet Petunia)= 
Meadow Flower die (Poppystamps)= plastic kitchen wrap= pop dots= Cuttlebug

Sunday, 11 November 2018

Twelve Tags of Christmas

Hello and Welcome
It's time for Day Seven of Loll's Twelve Tags of Christmas event.


I have the huge pleasure of being a part of Loll's tag event again this year.  


All the tags are so inspiring and I hope you get a chance to check them all out and be inspired to play along with us.

So onto the details of my tag.
I began with a piece of Yupo paper and I applied some Ranger Alcohol inks in greens over my paper then added some Blending Solution to get the colour moving.  
After it was nice and dry, I die-cut the tag shape using a die from MFT,  placed the inked piece inside my Misti and stamped the Poinsettia Sketch using some Versamark ink. Next, I silver heat embossed the image being sure not to overheat as your Yupo paper will melt.  I keep moving my heat gun around and it seem to work fine.  
To help make the flower pop against the monochromatic background, I lifted some of the ink by dipping a paintbrush into some Blending Solution and painted just a touch over the flower, using a paper towel to wipe off my paint brush every time.  It really helped make the flower the star of the show.


When I was happy with the way the flower looked, I rubbed my Versamark pad along the edge of my tag and did some more silver heat embossing.  
Using the smallest tag die from the set, I cut, then stamped the sentiment onto it again using my Misti.
I glued my inked tag onto a plain white one for stability and added the sentiment tag at the top with some silver ribbons.
The finishing touch was 3 clear jewels that I added to the center of the poinsettia.


Thanks so much for coming by and taking a look.

Adding my tag to these challenges:
Craft Rocket- CHRISTMAS IS COMING
Creative Craft Cottage- CHRISTMAS IS COMING
Simon Says Mon.- MAKE YOUR OWN BKG


Supplies
Stamps- Poinsettia Sketch (Impression Obsession)= Winter Wonderland (Recollections)
Inks- Versamark= Ranger Alcohol inks
Paper- Yupo= heavy white (Scribes Nook)
Accessories and Tools- Misti (My Sweet Petunia)= clear gems= Ranger Blending Solution= 
paintbrush= heat tool= silver embossing powder= silver ribbon= Stitched Tag Die (MFT)

Monday, 5 November 2018

Holiday Greetings

Hello
Meet today's card.
A very simple CAS holiday card using a new greeting set I just picked up.

I began by masking my card front with some Post-It Tape.  I like the look of a clean, white border.
Next, I placed the masked piece into my Misti, inked up the tree branch with some Evergreen Bough DOX ink, sprayed with water and stamped.  I repeated that process with some Lucky Clover DOX ink right over the first stamping.
Next, I stamped the sentiment and clear heat embossed it to help make it pop..
To add interest to the background, I then stamped using the PB Script stamp.
I sponged the edges with some Peacock Feathers DOX but it just needed something more.  So, I grabbed the Grunge Dots stencil from A Colorful Life and randomly stenciled in some of the circles.  It added the perfect finishing touch.
Using some red Nuvo Drops, I gave the evergreen branch some red berries and splattered the whole piece with some white acrylic paint.  
I removed the tape and mounted it simply to a white card base.


Thanks so much for coming by and taking a look.

Adding my card to these challenges:
Simon Says Wed.- ANYTHING GOES
613 Avenue Create- ANYTHING GOES/ OPTION CHRISTMAS

Supplies
Stamps- Pine Leaf (Darkroom Door)= Hand Lettered Holiday Greetings (MFT)= Script (PB)
Inks- DOX= Tuxedo Black Memento
Paper- heavy white (Scribes Nook)
Accessories and Tools- Misti (My Sweet Petunia)= clear eb powder= heat tool= 
Grunge Dots stencil (A Colorful Life)= Red Nuvo Drops= Sponging tool (TH)= Post-It Tape


Sunday, 4 November 2018

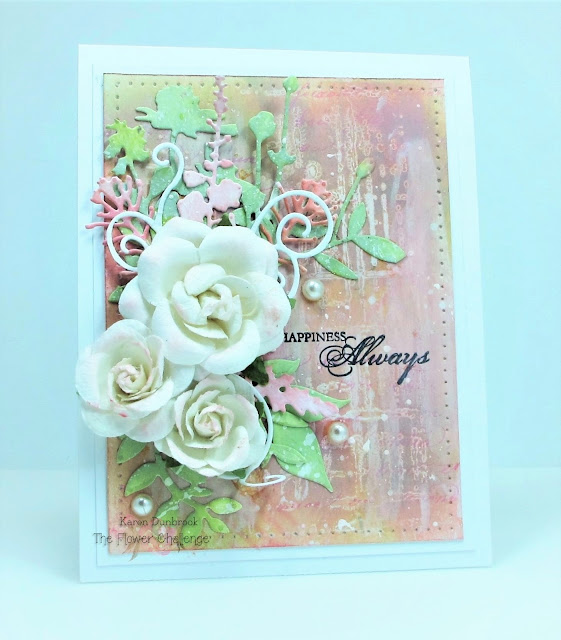
Special Occasion- The Flower Challenge


Hello and Welcome
It's time for more fun at 

Our theme this month is 'A Special Occasion'

My special occasion was a wedding we attended.  I wanted to create a special mixed media card for a special couple.  I did lots of layering and was very pleased with the final results.
So here is what I did.

I began with a piece of white cardstock and using a stencil from TCW, I applied some clear Gesso over it and set it aside to dry.
When it was all dry, it was time to apply a few different layers of ink.  I rubbed on some Worn Lipstick, Seedless Preserves, Peeled Paint and a touch of Picked Raspberry Distress Oxide inks using a foam applicator.  I wanted the flowers to be the star of the show, so to mute down the colours a bit, I took some white acrylic paint and rubbed it on using my finger.  I set is aside to dry and got working on my flowers next.
I die-cut the flowers, leaves and branches from white cardstock then using the same colours as mentioned above, I dabbed them into some wet ink I placed onto my non-stick craft mat.  To give them a bit of extra interest, I splattered them with some more white acrylic paint.  
When the bkg was all nice and dry, I laid out the leaves and branches until I liked the configuration, then I glued all the die-cuts in place, layering them to give lots of dimension. 
The white roses made from paper, were purchased at Michaels.  They were very stark white so I rubbed some Worn Lipstick onto them to add just a hint of pink, then glued them over the leaves and branches.  I added some pearls and then pierced around the whole front edge of the panel which really helped to frame it all in.  The sentiment was nestled in beside the flowers.


Thanks so much for coming by and taking a look.
I hope you get a chance to check out the wonderful creations the DT's have made.

Supplies
Stamps- Stampin Up (sorry, don't know the name of the set)
Inks- Distress Oxides (TH)= Tuxedo Black Memento
Paper- heavy white (Scribes Nook)
Accessories and Tools- Media Clear Gesso (Ranger)= Mini Sketch Grid stencil (TCW)=
pearl dots- Sponge applicator (TH)= white acrylic paint= Scrolls Half Edger (PB)= 
Wildflowers 1 & 2 dies (TH)= piercing tool (Ranger)

Saturday, 3 November 2018

Christmas Doodling

Happy Saturday!
This week I hosted the TLC over at Splitcoast Stampers and the challenge was to create some 
I wanted to make another card using this technique so here it is. 
Very simple CAS design, I think the red is very festive.

I began by masking off my card front with some Post-It Tape. I then placed the Simple Grid stencil onto my card front and taped it down too so it wouldn't move.  I applied some DOX inks in reds over the stencil then removed it to reveal the grid pattern.
I set that aside to dry a bit and die-cut the deer head and the leaves with my Cuttlebug.
Back to the grid.  Using a fineline black marker, I doodled in the lines, then removed my Post it tape and added the border giving the whole piece a very whimsical look.  
I stamped the sentiment from Hero Arts then pop-dotted the deer head over the grid.
I think this would make a great card for a guy.


Thanks so much for coming by and taking a look.

Adding my card to these challenges:
Simon Says Wed.- ANYTHING GOES
Craft Stamper Magazine- ANYTHING STAMPED GOES


Supplies
Stamps- Season's Greetings (HA)
Inks- Candied Apple, Fired Brick DOX (TH)= Tuxedo Black Memento
Paper- heavy white (Scribes Nook)
Accessories and Tools- Grid Pattern Stencil (A Colorful Life)= Inking Tool (TH)= 
Deer Die (Recollections)= pop dots= Pigma Micron blackline pen

Friday, 2 November 2018

Christmas Florals and Greenery- CAS Watercolour Challenge


Hello and Welcome
It's time for another great challenge at the 

Our theme this month is 

What a great theme to help motivate those of us that need to get working on making some holiday cards!  Please check out what our talented designers have created and we welcome the most talented friend Maura this month as our GD.

So onto my card.
I began with this great stamp from Impression Obsession called Poinsettia Sketch. It has such a great 'scribbled' hand drawn look to it.  I placed the stamp into my Misti, inked with some Versamark and stamped it onto my heavy white cardstock.  I then sprinkled on some silver embossing paper and heat set.
I stamped again on another piece of white cardstock and repeated the process, this time just embossing the flower area and not the whole image.
I then took the embossed flower and sprinkled it with red Brushos, sprayed with water and watched the colour emerge.  I then sprinkled a bit of a darker red Brushos onto my non-stick craft mat, added a bit of water and picked up some of that shade with a paint brush to give the flower some extra details and interest.
Using my Misti again, I stamped the simple sentiment and silver embossed that as well.
When the flower was totally dry, I fussy cut it out and pop dotted it over the first silver embossed image on my card front, being sure to match it all up.
I added some black shiny pearls to the flower center to help give it more dimension.


Thanks so much for coming by and taking a look.
I hope you will come and play along with us.

Adding my card to these challenges:
Crafting By Design- CHRISTMAS
4 Crafty Chicks- CHRISTMAS
Simon Says- ANYTHING GOES


Supplies
Stamps- Poinsettia Sketch (IO)= Joyful Greetings (Paper Smooches)
Inks- Versamark
Paper- heavy white (Scribes Nook)= red cs
Accessories and Tools= Misti (My Sweet Petunia)= silver embossing powder= Marvvy Heat Gun= 
black pearls= Brushos (Brilliant Red and Scarlet)= paintbrush= non-stick craft mat= Mister (TH)