Showing posts with label Paper Smooches. Show all posts

Wednesday, 18 August 2021

Reindeer Greetings


Welcome
I tried something new-to-me today....napkin art.
Simply put, use a napkin to create a card.  
I was off to search for a napkin with a picture on it for my card.

So here's what I did to create my card. 
  • After I found this cute little paper napkin in the drawer, I pulled the backing away from the image side of the napkin.  Using a glue stick, I glued it onto a piece of white cardstock and set aside to dry.  (I did that with 2 separate napkins, as I knew I wanted to cut the pieces out of one of them)
  • When they were dry, I coated them with some Vicki Boutin Gel Medium to seal them up and bond them to the cardstock background.  I left them to dry again before going onto the next steps.
  • When dry, I trimmed up one of the reindeer panels to fit on the front of a 4 1/4 x 4 1/4" square card base.  
  • I placed the panel into my Misti and stamped the sentiment from Paper Smooches in the bottom corner.  
  • I pop dotted the stamped panel onto the card base, then using the second piece I had added the Gel Medium over, I cut out the reindeer's scarf and pop dotted that back into place.


Thanks so much for coming by and taking a look.


Supplies
Stamps- Holiday Cheer (Paper Smooches)
Inks- Versafine Clair
Paper- white cardstock (Scribes Nook- Waterloo, Ont.)
Accessories and Tools- Misti (My Sweet Petunia); napkin (Dollarama); VB Gel Medium; 
paint brush

Tuesday, 13 July 2021

Christmas in July


Welcome
Christmas in July seems to be everywhere of late, so I decided to make a very simple card to get my holiday creating started.  I guess it's never to early to begin!!
This card would be a simple one to recreate especially if you are doing multiples.

I dug into my stash of inked papers and this is what I came up with.  

So here's what I did to create my card.
  • I found this piece of inked paper in my stash.  I love the colour blends, it reminded me of a cozy sweater.  I made it while playing with my Gelli Plate.  I always keep extra paper nearby to roll off my brayer when inking the plate and this was one of those roll off sheets.  Like I said in a previous post, use your roll offs for creating backgrounds.  For this one I used my Distress Oxide inks (Broken China, Wilted Violet, Seedless Preserves)
  • I took the inked panel and die-cut it using the Nordic Winter die from Tim Holtz.
  • I glued that onto a piece of white cardstock, then onto a white card base.
  • Using a leftover strip of white cardstock, I stamped the sentiment from Paper Smooches in my Misti and then pop dotted it over the die-cut background.

Thanks so much for coming by and taking a look.

Adding my card to these challenges:
Little Red Wagon- MID WAY TO CHRISTMAS
Shopping Our Stash- CHRISTMAS IN JULY
The Male Room- CHRISTMAS IN JULY


Supplies
Stamps- Holiday Cheer (Paper Smooches)
Inks- Distress Oxides (colours listed above); Versafine Clair
Paper- heavy white (Scribes Nook- Waterloo, Ontario)
Accessories and Tools- Nordic Winter die (TH); Misti (My Sweet Petunia); brayer; 
Spellbinder Platinum die cutting machine; Nuvo glue; pop dots

Saturday, 29 August 2020

Greetings


Welcome
Hope you are not totally sick of my posting another Christmas card!!
With me getting back to work and having little to no time to stamp, I'm glad I had some time to get ahead of the game during the lockdown and get some cards made.  

I always have a hard time trying to give my cards a name.  I think I should have called this one the power of inking, DOX inks and adding water.  The results you can achieve with water lifting are truly amazing when using these inks on a simple piece of cardstock.  
I've been watching a lot of Vicki Boutin's FB lives and she's such an inspiration.  She loves playing with all the 'stuff' as she calls it.  I love that she's a Canadian too!  She's been doing lots of inking and blending so if that's something you like to do, go check out her videos.

So onto my card details.
  • I began with a piece of heavy white cardstock cut into a panel.  I like to cut them 3 3/4 x 5".
  • Using my Tim Holtz inking tool, I rubbed on Broken China, Speckled Egg, Blueprint Sketch and some Salty Ocean onto the panel, blending as I went along.
  • When I was happy with the inking and the whole piece was inked, I started to water mark.  I lifted some ink using water through the Tim Holtz Mosaic layering stencil, splattered with water and dried.  I also picked some colour up by spraying a script from the Faded Text stamps by TH and stamping it over the inky background. You can continue to layer and lift colour by drying each layer before adding more ink and water. 
  • When I was happy with the look, I placed the dry panel into my Misti and stamped the large snowflake down in the corner with some Versamark ink and then white heat embossed it.  *Be sure your panel is totally dry and rub with an anti-static bag before embossing or the powder will stick to anywhere wet and you won't get a crisp image.
  • While that cooled, I stamped the sentiment with some more Blueprint Sketch and clear heat embossed it.  
  • I splattered my panel with white paint using my Posca Pen.  I just tap it over my project with a heavy duty metal ruler to deposit the paint.  
  • I pop dotted the sentiment over the snowflake.
  • I mounted the piece onto a heavy white card base.

Thanks so much for coming by and taking a look.

Adding my card to these challenges:
Stinkin Inkers- MONOCHROME
Allsorts- GOING ROUND IN CIRCLES
Christmas Card Throwdown- MAKING SHADOWS


Supplies
Stamps- Greetings (Paper Smooches); Faded Text (TH); Warm Wishes Snowflake (Colorado Stamp)
Inks- DOX (TH); Versamark
Paper- heavy white (Scribes Nook)
Accessories and Tools- white EB powder; heat tool; pop dots; inking tool (TH); Posca Pen; 
stencil (TH)


Monday, 24 August 2020

Snowflake Fun


Welcome
Slimline cards are all the rage right now, so I thought I would give it a try and this is what I came up with.
I was pleased at the result and I like the look of working on something different for a change.

So here's what I did to create my card.
  • I began by cutting my card base as a starting point.  My finished card is 3 1/2" x 8 1/2 " and will fit nicely into a legal sized envelope.  Apparently from what I read, postage is the same as a smaller letter so bonus!
  • I cut a piece that I would use as my focal panel.  (Sorry, I didn't measure that)
  • Using some ScorTape...it is very low tack, I laid a piece down the center of my card panel and masked one side.
  • I used my mini Distress ink cubes and swiped along the line.  I didn't go all the way to the outer edge as I wanted some white space left behind.  Here are the colours I used:

  • After one side was all inked along the tape edge, I removed the tape and replaced it one the other side and repeated the same process.
  • I removed the tape, dried and then splattered with some water to lift the colour.
  • While that dried, I die cut the snowflake 2 times and glued them together for stability.
  • The center part of the snowflake was inked with the same colours and pop dotted back into the center of the snowflake.
  • Before gluing on my snowflake, I splattered using my white Posca pen.
  • I place the panel into my Misti to stamp the sentiment and clear heat embossed it. 
  • I added a black gem to the center of the snowflake 
  • I mounted the panel onto a piece of black cardstock, then onto the white card base.


Thanks so much for coming by and taking a look.

Supplies
Stamps- Christmas Greetings (Paper Smooches)
Inks- Versafine Clair; Distress
Paper- heavy white (Scribes Nook)
Accessories and Tools- Misti (My Sweet Petunia); clear eb powder; snowflake die (SSS); 
ScorTape; black gem, white Posca pen

Sunday, 15 December 2019

Greetings

Good Morning.
Just when you think you have it all under control, you find out that you need a few more cards.
I don't know where the time went!?
Time for a quick and easy one.

I began with a piece of heavy white cardstock, placed it into my Misti and stamped the plaid with some Versafine ink.  Next, I die-cut the deer head, pressed it onto my Versamark ink pad and silver embossed it.  I decided I wanted to add a simple frame and this hemstitch edging worked great for that..  I glued the deer head over the plaid bkg., then added the stamped sentiment with pop dots.  I added that to a heavy white card base.
Pretty simply right?


Thanks so much for taking a look.

Adding my card to these challenges:
Brown Sugar- ANYTHING GOES
CAS on Sunday- CHRISTMAS
Cut it Up- ANYTHING GOES CHRISTMAS

Supplies
Stamps- Plaid (Concord and 9th); Joyful Greetings (Paper Smooches)
Inks- Versamark, Versafine Clair Noir
Paper- heavy white (Scribes Nook)
Accessories and Tools- Misti (My Sweet Petunia); Hemstitch die (Spellbinders);
Deer die (STAMPlorations); Cuttlebug; pop dots; silver eb powder


Friday, 15 November 2019

Christmas Poinsettia- The Flower Challenge


Welcome
Time for a reminder card for 

You still have time to play along with us!!


We are being sponsored by Top Flight Stamps this month. They are kindly giving our winner an e-gift card for $25. Please check out there website as they have some amazing crafty things there.  
Our guest this month is Tracy from whoistracy.


So here are my card details.
I picked up a few new goodies and wanted to play with them.  I love this poinsettia stamp from Picket Fence and just had to add it to my collection.  
I placed the flower into my Misti and stamped it with some Versamark ink, then white heat embossed the image.  Using my Zigs and a wet paintbrush, I coloured and painted in the flower.  I splattered the whole flower with some white acrylic paint for my spots.
When it was dry, I fussy cut it out and set it aside.

I also just picked up this stitched square die from Paper Smooches.  Using a piece of heavy white cardstock, I die cut the square close to the top of my paper once, then moved the die down and cut the rest of the card front as I wanted it to be all covered.
I pop dotted the flower over the die-cut bkg then added the sentiment from Penny Black at the top.
I simply mounted that onto a heavy white card base.


Thanks so much for coming by and taking a look.

Supplies
Stamps- Christmas Poinsettia (Picket Fence Studio); Christmas Sentiments (PB)
Inks- Zig Watercolour Markers; Versafine Clair Noir
Paper- heavy white (Scribes Nook)
Accessories and Tools- Stitched Square (Paper Smooches); Cuttlebug; paintbrush; 
Misti (My Sweet Petunia); pop dots; white acrylic paint

Friday, 2 November 2018

Christmas Florals and Greenery- CAS Watercolour Challenge


Hello and Welcome
It's time for another great challenge at the 

Our theme this month is 

What a great theme to help motivate those of us that need to get working on making some holiday cards!  Please check out what our talented designers have created and we welcome the most talented friend Maura this month as our GD.

So onto my card.
I began with this great stamp from Impression Obsession called Poinsettia Sketch. It has such a great 'scribbled' hand drawn look to it.  I placed the stamp into my Misti, inked with some Versamark and stamped it onto my heavy white cardstock.  I then sprinkled on some silver embossing paper and heat set.
I stamped again on another piece of white cardstock and repeated the process, this time just embossing the flower area and not the whole image.
I then took the embossed flower and sprinkled it with red Brushos, sprayed with water and watched the colour emerge.  I then sprinkled a bit of a darker red Brushos onto my non-stick craft mat, added a bit of water and picked up some of that shade with a paint brush to give the flower some extra details and interest.
Using my Misti again, I stamped the simple sentiment and silver embossed that as well.
When the flower was totally dry, I fussy cut it out and pop dotted it over the first silver embossed image on my card front, being sure to match it all up.
I added some black shiny pearls to the flower center to help give it more dimension.


Thanks so much for coming by and taking a look.
I hope you will come and play along with us.

Adding my card to these challenges:
Crafting By Design- CHRISTMAS
4 Crafty Chicks- CHRISTMAS
Simon Says- ANYTHING GOES


Supplies
Stamps- Poinsettia Sketch (IO)= Joyful Greetings (Paper Smooches)
Inks- Versamark
Paper- heavy white (Scribes Nook)= red cs
Accessories and Tools= Misti (My Sweet Petunia)= silver embossing powder= Marvvy Heat Gun= 
black pearls= Brushos (Brilliant Red and Scarlet)= paintbrush= non-stick craft mat= Mister (TH)

Saturday, 23 December 2017

Holiday Cheer

Good Morning.
I had some time to play and make a few extra cards to have on hand so of course, I dragged out my Distress Oxide inks and got down to inking.

For those of you that may have missed my little pictorial about how I did what I called 'Acetate inking' then go here!  It is very easy to do and you can place the ink wherever you want it to go.
I began by inking up my acetate sheet with DOX 's in blues, sprayed with water and pressed onto my card front.  I dried it using my heat tool then laid a piece of drywall tape across the front and stenciled through that.  
I stamped the circles to the side to add interest to the overall design, then I die-cut the deer head in black.  I doodled in some lines around the area where I wanted to put the deer then pop-dot mounted it over the doodles.  I added some black gems then stamped the sentiment from Paper Smooches.


The big day is almost here....are you ready??
Thanks so much for coming by and taking a look.

Adding my card to these challenges:
CAS Mix Up- STAMPING PLUS TWO
(watercolouring, stenciling)
Winter Wonderland- ANYTHING GOES
CRAFT- ANYTHING GOES
Stamps and Stencils- IT'S BEGINNING TO LOOK A LOT LIKE CHRISTMAS

Supplies
Stamps- Grunge (PTI); Joyful Greetings (Paper Smooches)
Inks- Iced Spruce, Peacock Feathers, Salty Ocean Distress Oxides (TH); 
Tuxedo Black Memento
Paper- heavy white (local store); black cs
Accessories and Tools- heat tool, acetate sheet; fine line marker; black gems;
drywall tape, sponge applicator (TH)

Friday, 3 November 2017

Holiday Wishes

Good Morning.
Here is another Christmas card I made for the holidays.
 I tried to keep it very CAS but added layers of stamping to give interest.

I began by inking up my long rectangle shape acrylic block with Distress inks, sprayed with water and pressed onto the paper keeping the ink concentration in the bottom corner of my card front.
When that was dry, I stamped the sentiment from Paper Smooches using my Misti.
To add more interest to the bkg, I stamped the ABC and the Texture Mini over the inked areas.
The snowflake was die-cut then I pressed it onto my Versamark ink pad and heat embossed it with silver powder.  I added a blue Nuvo drop to the center which gave a lovely effect.


 Thanks so much for taking a look.

Adding my card to these challenges:

City Crafter- LITTLE SNOWFLAKE
Craft Stamper Magazine- ANYTHING STAMPED GOES
As You Like It- CHRISTMAS OR NON-CHRISTMAS
(Christmas- it gives me a chance to re-connect with all my friends by
sending out cards)
Craft Rocket- CHRISTMAS IS COMING
CAS Watercolour- HOLIDAY
CAS(E) this Sketch- #246

Supplies
Stamps- Joyful Greetings (Paper Smooches)/ Texture Mini (Carabelle)/ ABC (Carabelle)
Inks- Broken China, Salty Ocean Distress (TH)/ Tuxedo Black Memento
Paper- heavy white
Accessories and Tools- Misti/ long acrylic block/ Mister (TH)/ Caribbean Ocean Gloss Nuvo
Silver eb powder/ heat tool

Sunday, 22 October 2017

Graffiti Christmas

Hello and Welcome.
Meet today's card.  
I wanted to make a masculine holiday card and this is what I came up with.

One of my favorite techniques that is fun and easy is called
Basically what you do is ink the inside of your eb folder, spray with water and press onto your paper.
Here, I used an embossing folder from Carabelle and inked it with Distress inks to create my background.  Love how it came out and a wonderful way to get more mileage from your folders!
Next, I die cut the snowflake from SSS and heat embossed it using silver powder.
To help it pop, I mounted it over a small piece of vellum that I rounded the corners on to match the shape of the die.
Stamped the sentiment from Paper Smooches using my Misti and done.


Adding my card to these challenges:

Craft Stamper Magazine- ANYTHING STAMPED GOES
613 Avenue Create- ANYTHING GOES/MASCULINE OPTION
The Corrosive Challenge- ANYTHING GOES
Simply Papercraft- ANYTHING GOES

Thanks for coming by and taking a look.

Supplies
Stamps- Joyful Greetings (Paper Smooches)
Ink- Distress Peeled Paint, Forest Moss (TH)/ Tuxedo Black Memento
Paper- heavy white (local store)
Accessories and Tools- Misti/ EB folder-Texte Grunge (Carabelle)/ snowflake die- SSS/
silver eb powder/ heat tool/ Cuttlebug/ vellum/ Corner Chomper (We R Memory Keepers)

Friday, 12 May 2017

Reflections

Happy Friday.
Meet today's card.  
Spring has arrived and the garden and trees are abounding with shades of greens.

I began my card by placing the leave stamp inside my Misti.  I coloured directly onto the stamp using my Zig markers, sprayed with water and stamped.  
After the leaves were dry, I stamped the sentiment using my Misti again with black Memento ink.
I cut the panel down to a smaller size then scored lines top and bottom of my card front to give more interest when I added the stamped panel.
That's it....a very clean and simple card.


Adding my card to these challenges:


City Crafters- ARRIVALS
(arrival of Spring)

Craft Stamper Magazine- ANYTHING GOES STAMPED


Thanks so much for coming by and taking a look.

Supplies
Stamps- Reflections (Paper Smooches), Life's Path (High Hopes)
Ink- Memento black
 Paper- Strathmore Bristol
 Accessories and Tools- Misti, Zig Realbrush markers, misting bottle (TH), ScorPal

Friday, 30 December 2016

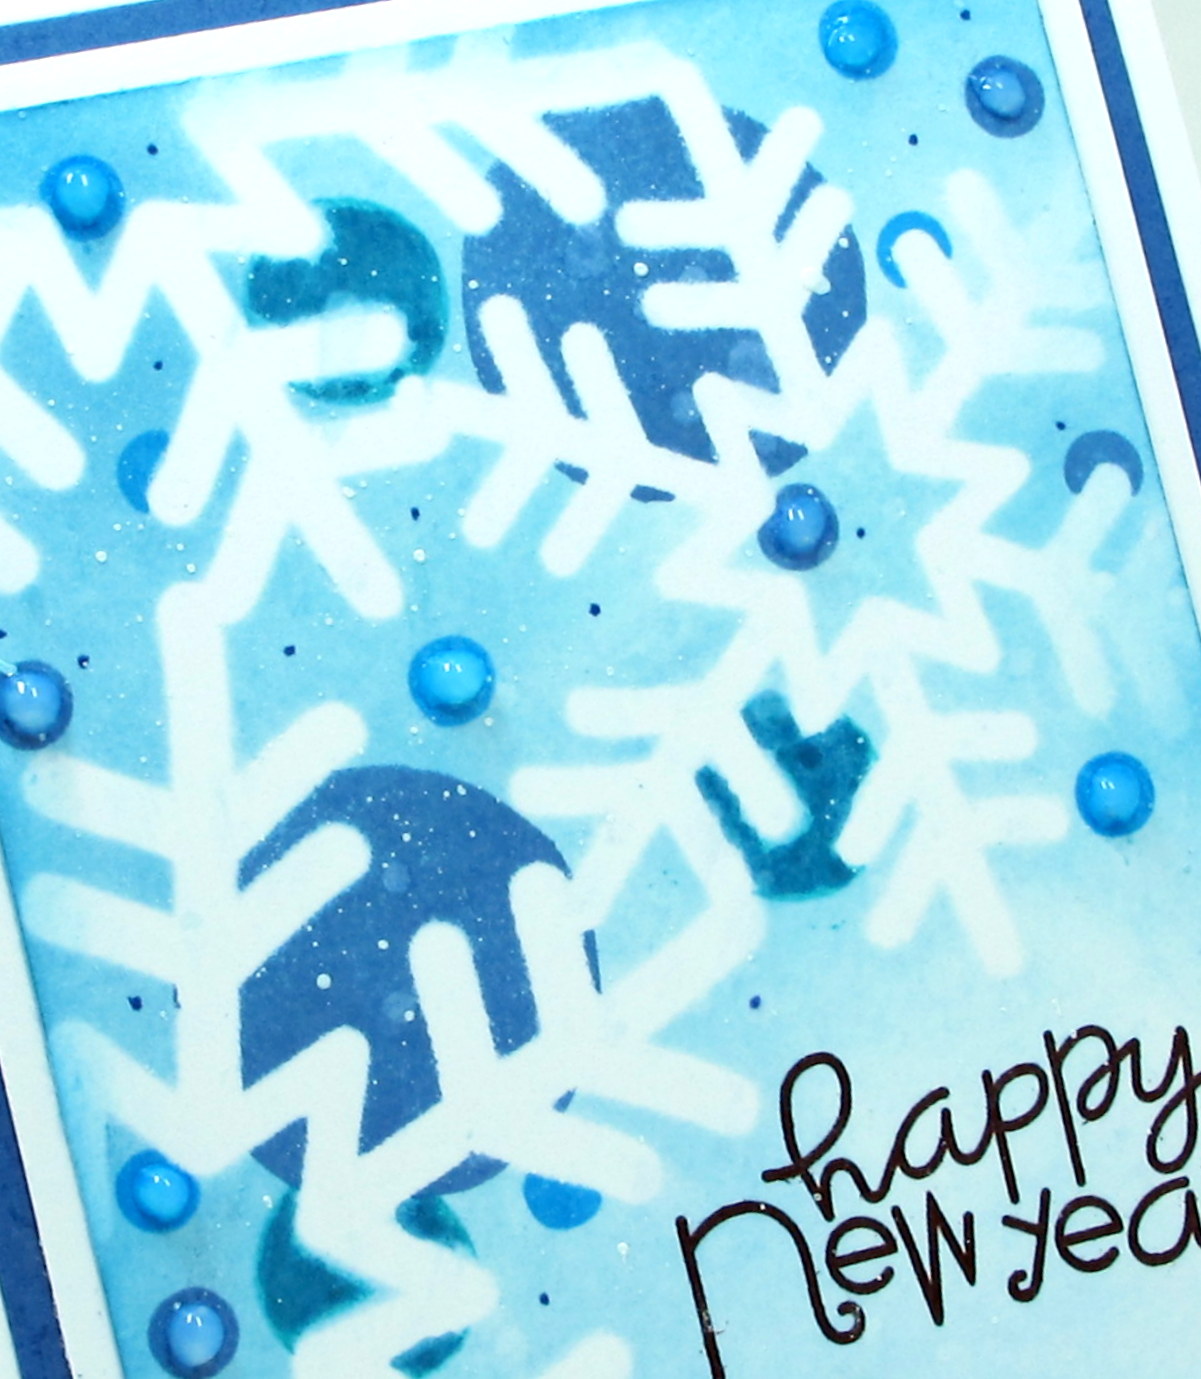
Happy New Year


Meet today's card. 
I hope you enjoyed a wonderful Christmas.
With the New Year almost here, I created a quick and easy card.

I began by using the snowflake stencil from SSS and rubbed Tumbled Glass Distress ink over the top.
To add some more depth and interest, I left the stencil in place and using various sized circle stamps, I stamped over it using darker shades of Distress inks.
I splattered on some acrylic paint, more blue ink and lastly some water to lift a bit of the colour.
I stamped the sentiment from Paper Smooches in the bottom corner.
To add to the festive, celebration theme, I applied some shiny Nuvo Drops over some of the small circles.


 Adding my card to these challenges:

Simon Says Wed.- ANYTHING GOES

Little Red Wagon- HELLO 2017

Shopping Our Stash- WINTER WONDERLAND

Paperminutes- New Year's Cards

Simon Says Monday- PARTY TIME


 Thanks so much for coming by and taking a look.

 Supplies:  stamp- Paper Smooches/ ink-Memento, Distress/ stencil- SSS/ circle stamps- HA, pencil eraser/ clear Nuvo drops/ applicator tool

Thursday, 15 December 2016

Sleigh Ride

 Morning. 
With Christmas music all around us, often a song will come on the radio that reminds us of our childhood.  For me it's 'Sleigh Ride'.  
So here is my card inspired by that song and I wanted to get a chance to use this adorable little bunny from Lawn Fawn on one of my holiday cards too.

I began by placing the sentiment from Paper Smooches into my MISTI and inked it with Memento ink.  I repeat stamped it across my card front on an angle for interest.
I scored a border on the top and bottom of my stamped area using my ScorBug.  
I stamped that bunny then colored him with Copic markers and fussy cut out.  I pop dotted him over my bkg. for a fun card.


 Adding my card to these challenges:

Little Red Wagon- CHRISTMAS CAROL/SONGS

The Male Room- CHRISTMAS/ WINTER WISHES


ABC Christmas- 'Z' ZOOM 

Crafty Creations- MASCULINE


Hope your holiday preparations are going well and thanks for taking the time to come for a visit.

Supplies:  stamps- Lawn Fawn, Paper Smooches/ Copic markers/ Scor-Bug/ MISTI/ ink-Memento/ pop dots

Monday, 21 November 2016

Winter Landscape

 It's beginning to look a lot like Winter at my house.

So meet today's card.  
A very simple one for Christmas and easy to mail too.  

I began by stamping the image from Flonz with black Memento ink.  I watercoloured in the open areas using some Distress inks and let dry.  
I wanted to add snow to the trees and did that by using a Versamark pen and embossed it with white powder.  I splattered the open area with white acrylic paint to add to the snowy feel.
To finish off my card, I stamped the sentiment from Paper Smooches.


Adding my card to these challenges:

Stamping Sensations- CHRISTMAS GREETING

The Paper Players- CAS CHRISTMAS

Allsorts Challenge- O CHRISTMAS TREE

Daring Cardmakers- INSPIRED BY CHRISTMAS SONGS
(I'm Dreaming of a White Christmas)


 Thanks so much for visiting...I so appreciate it!!

Supplies:  stamps- Flonz, Paper Smooches/ ink- Memento, Distress/ paintbrush/ Versamark pen/ wh Eb powder/ white acrylic paint

Saturday, 30 January 2016

Woodland Scenery

Happy Saturday!

This morning I am playing along with the Inspiration Challenge at Splitcoast where we are being inspired by the China Online Museum.
Here is the lovely painting that I used as inspiration:

lin-fengmian- Mountain Forest


I began with a piece of heavy watercolor paper I got from a friend so not sure what the weight is.
Using my MISTI, I inked the trees stamp from Mark's Finest by coloring it with Memento and Crayola markers.  After spraying with a generous amount of water, I stamped, added more colour, sprayed with water and stamped again.  The rest is a watercolor wash.
I cut the piece into panels and pop-dot mounted it to my card front.
I stamped the sentiment from Paper Smooches under one of the panels.

Adding my card to these challenges:

Simon Says- ANYTHING GOES

Little Red Wagon- THEY SAY IT'S YOUR BIRTHDAY

Just Add Ink- JUST ADD NATURE 

Crafty Girls- ANYTHING GOES

Addicted to CAS- HOLIDAY
 

Thanks so much for coming by and taking a look

Supplies:  stamps- Mark's Finest, Paper Smooches/ watercolor paints/ Memento and Crayola markers/ pop dots/ watercolour paper/ Mini Mister

Saturday, 19 December 2015

Nordic Red and White

What's better then a cozy, warm sweater on a cold winter day?
We got snow last night!
Meet today's card.  The pattern reminds me of a sweater.  The stamp is from Simon Says and I just love seeing it done in red and white....so classic looking.
 Today, I am being inspired by the challenge at Splitcoast and a Pinterest board of vintage buttons.
Here are the buttons that inspired me:


I began by stamping the middle panel with Versamark and heat embossed it with white.  I masked that area off and rubbed on Fired Brick Distress ink.  I removed the masked and stamped the panel 2 more times using the same Fired Brick DI.  I then scored the top and bottom to define and add  interest to the stamped area then stamped the sentiment from Paper Smooches across the top.
I die-cut the snowflake from Spellbinders and added it to my card front with a red pearl.

I am adding my card to these challenges:

Less is More- HOMESPUN

Simon Says- DIE CRAZY

Shopping Our Stash- LET IT SNOW

Christmas Cards All Year Long- CAS

 As You Like It- FAV CHRISTMAS COLOURS 
(the red reminds me of my Dad as he was Santa)


Hope you are staying cozy and warm.

Supplies:  stamps- Paper Smooches, SSS/ Distress ink/ Memento bl ink/ Spellbinder die/ pearl/ MISTI/ wh Embossing powder/ heat tool/ ScorPal

Thursday, 10 December 2015

Dancing Santa

Greetings of the Season.

This morning I am playing along with the challenge at Splitcoast where the theme it 'dance'.
Every time I see this little Santa it makes me smile and think about the song 'Rockin Around the Christmas Tree'.  Here is what I did to create my simple card.

I began by embossing a square in the center of my card using a die from Spellbinder.  I then masked the edges and stamped the sentiment from Paper Smooches a number of times in the masked area.  
Next, I printed off Santa, coloured him with Copic markers and fussy cut him out.
*Santa is a Birdie Brown digi that is no longer available in that format but is available in a stamp set from MFT. 
I pop dot mounted him so he looks like he is dancing and jumping up to point at the sentiment.

I am adding my card to these challenges:

(this unfinished bkg and Santa have been sitting in my pile)

The Male Room- THEME CHRISTMAS


Use Your Stuff- STAMPING

Crafty Creations- Happy Holidays


Thanks so much for coming by and taking a look.

Supplies:  stamps- Paper Smooches, Digi/ Copics/ Spellbinder die/ Memento ink/ pop dots/ Cuttlebug