Welcome
Meet the new stencil from A Colorful Life Designs called
This stencil set is a 4 part layering stencil.
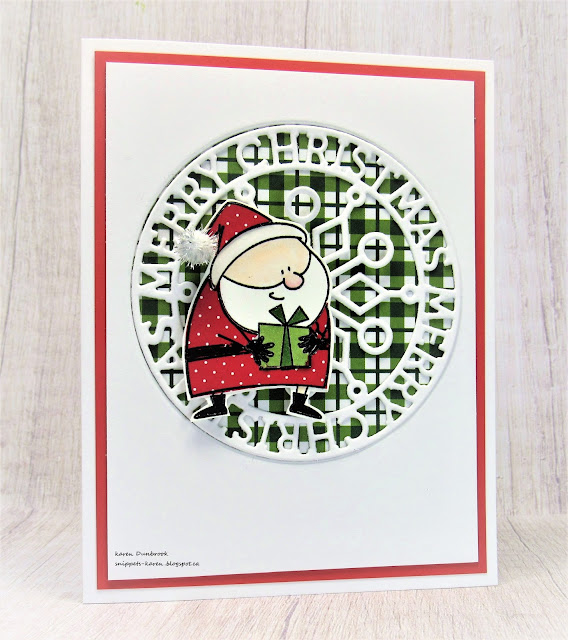
So, here's what I did to create my card.
- I decided to stencil over some patterned paper so I started to look through my stash until I found this green with the yellow dots on it.
- I laid the patterned paper onto my Waffle Flower Stencil Mat and placed stencil #1 from the Layered Ho Ho Ho stencil over it. I inked that up, removed that stencil and continued to add colour using the 3 other layers to create the text on the background. The colours I used were: Lumberjack Plaid, Rustic Wilderness, Lucky Clover and some Uncharted Mariner Distress Oxide ink. **HELPFUL HINT: I used my Stencil Mat because it has an edge to perfectly line up the layers. You could also use your Misti for this so the layers match up.
- Next, I die cut the sentiment in white 3 times and glued them together to give some more stability and build it up a bit. I also die cut the cute little hats that came with the set with some white and red and glued them together.
- I looked at the stenciled card front and decided to give it more of a 'marquee' look, so I added some white dots over the letters using my white Posca pen. It really gave it a more festive look.
- I glued the card front onto a piece of red cardstock, then onto an A2 sized card base.
- I glued the sentiment onto the middle and added the 2 little Santa hats.

Here is the layering stencils I used:


Discount Code for A Colorful Life Designs
*Just use the code KarenFan10 to get a discount on your entire order.*
(Affiliate with no extra cost to you)
Thanks so much for coming by and taking a look.
Adding my card to these challenges:
The Holly and Ivy Christmas Challenge- ANYTHING GOES
Use Your Stuff- ANYTHING GOES
Crafts Galore- ANYTHING GOES
Supplies
Stamps- none
Inks- DOX
Paper- Scribes Nook- Waterloo, Ont.
Accessories and Tools- stencils (A Colorful Life Designs); white Posca pen;
Stencil Mat (Waffle Flower); HoHoHo die (Amazon); TE Blending Brushes