Saturday 31 August 2024

Christmas Wishes


Good Morning and Welcome
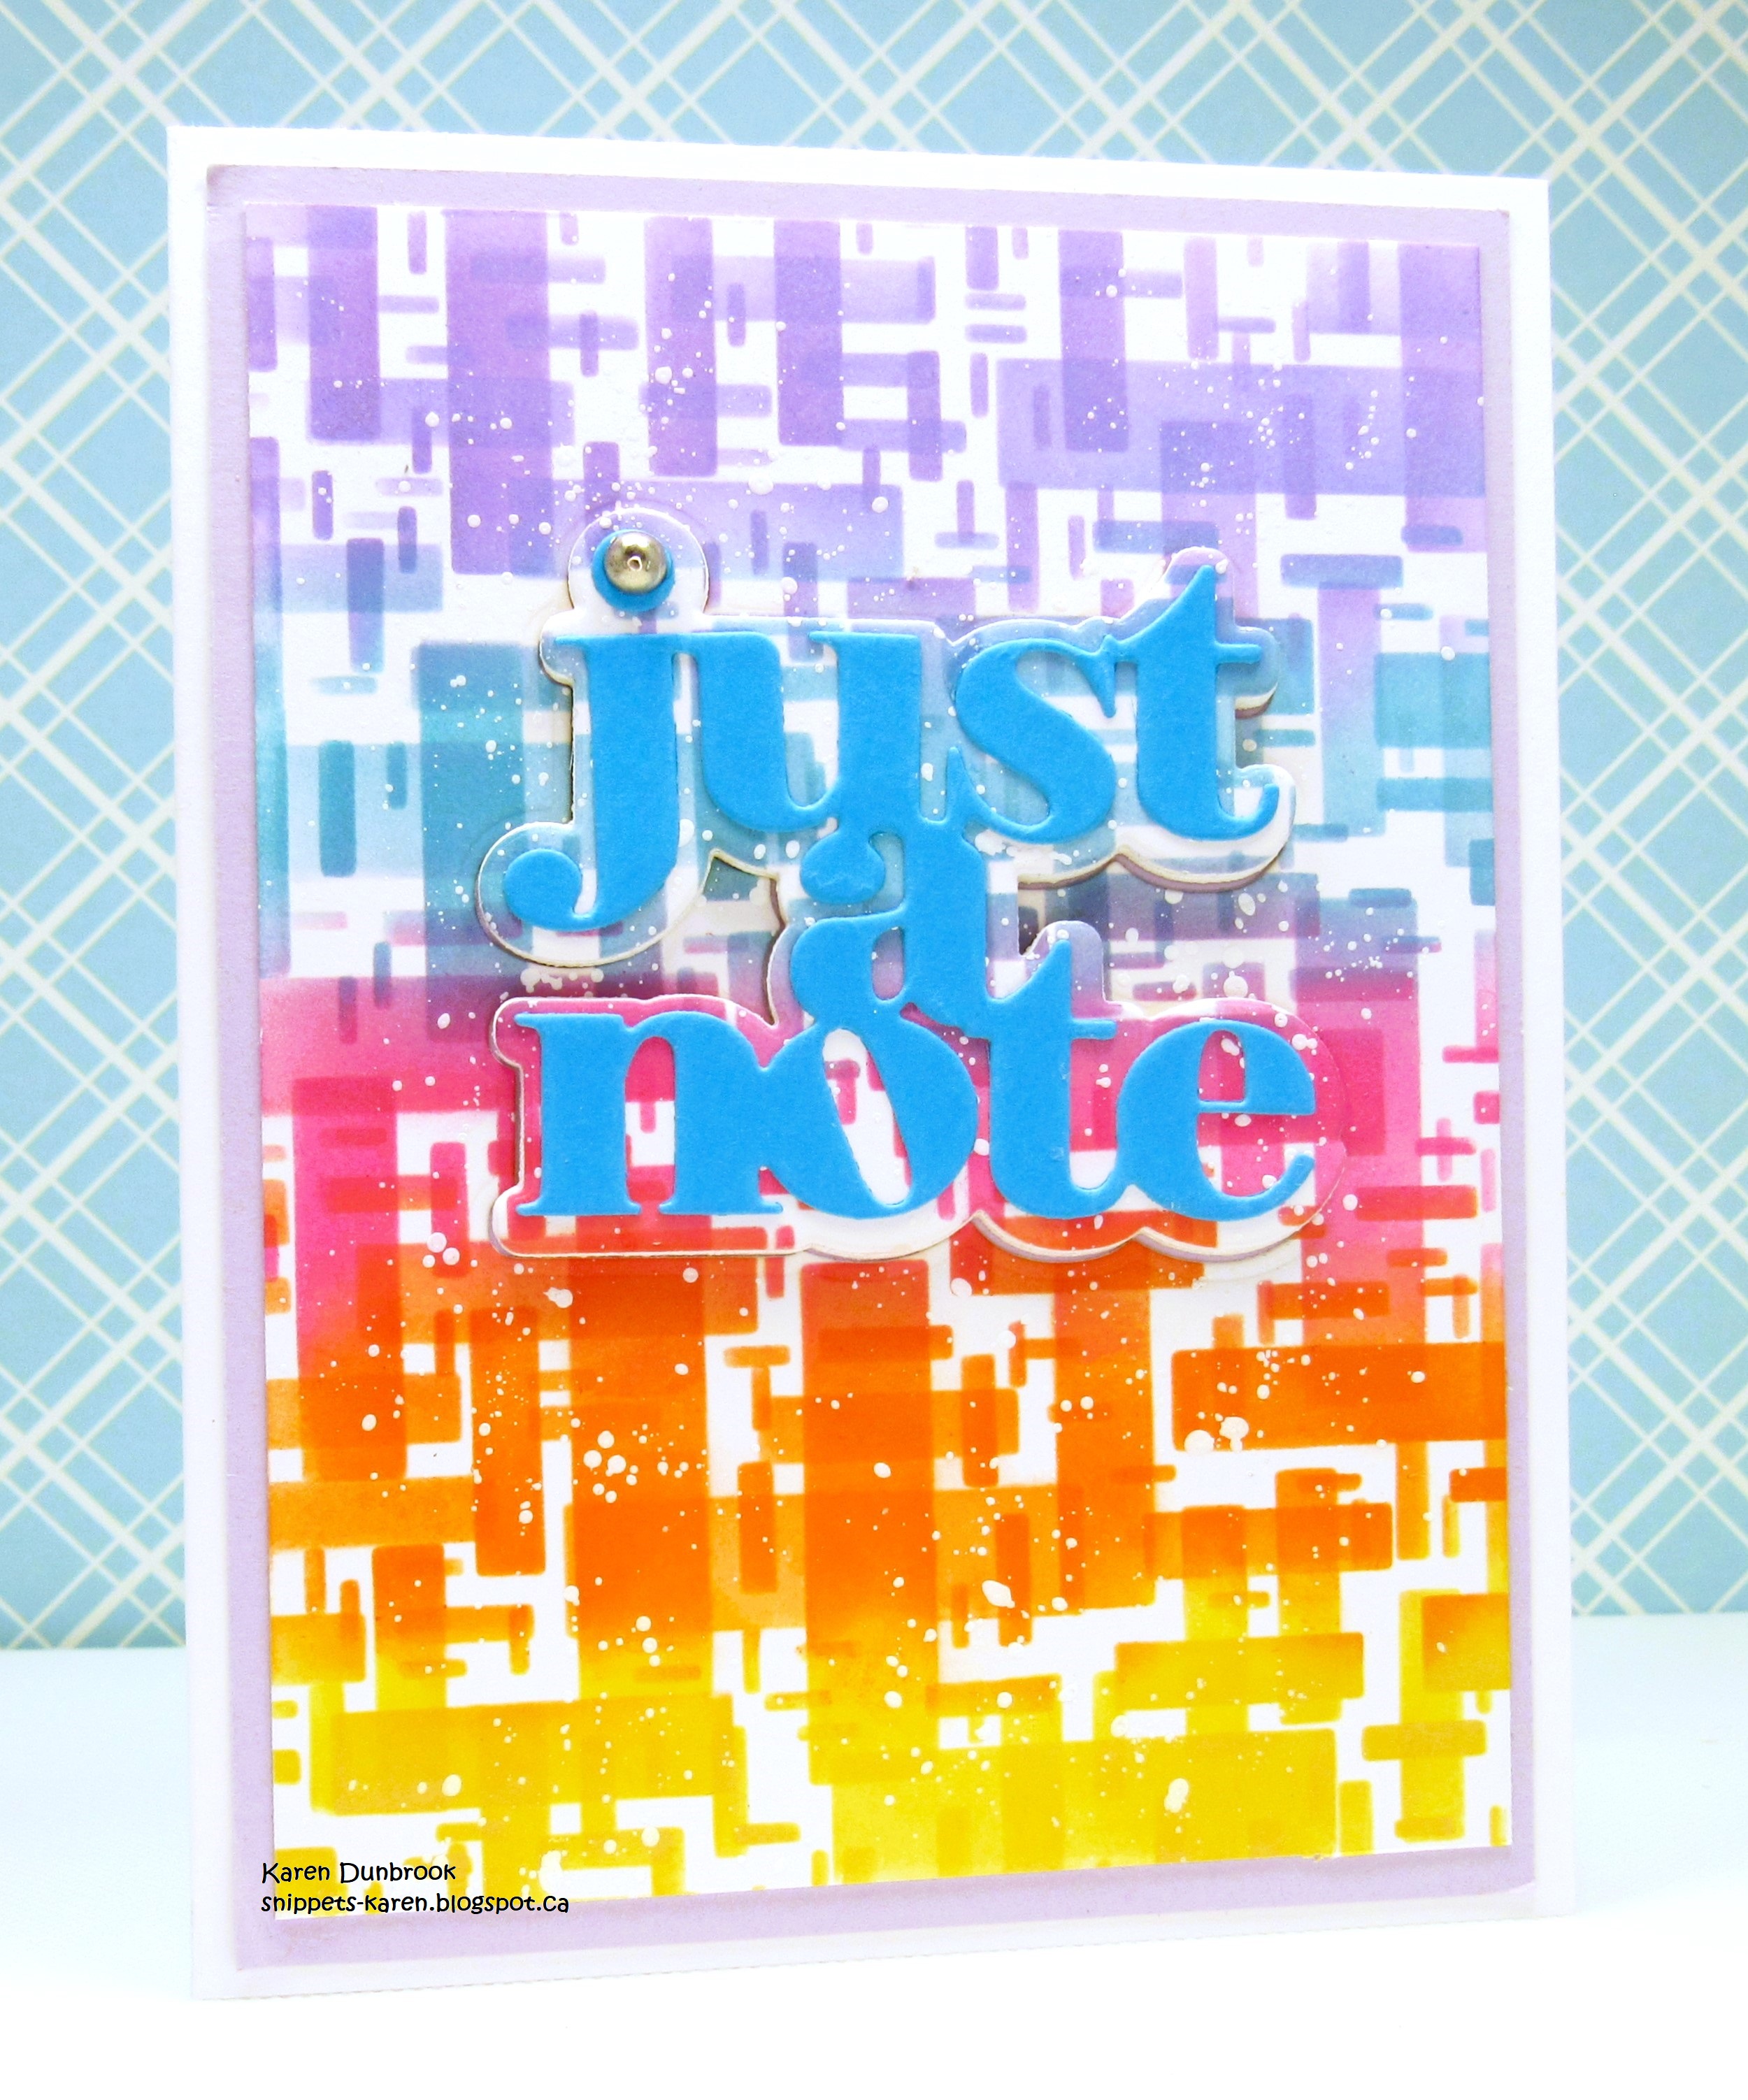
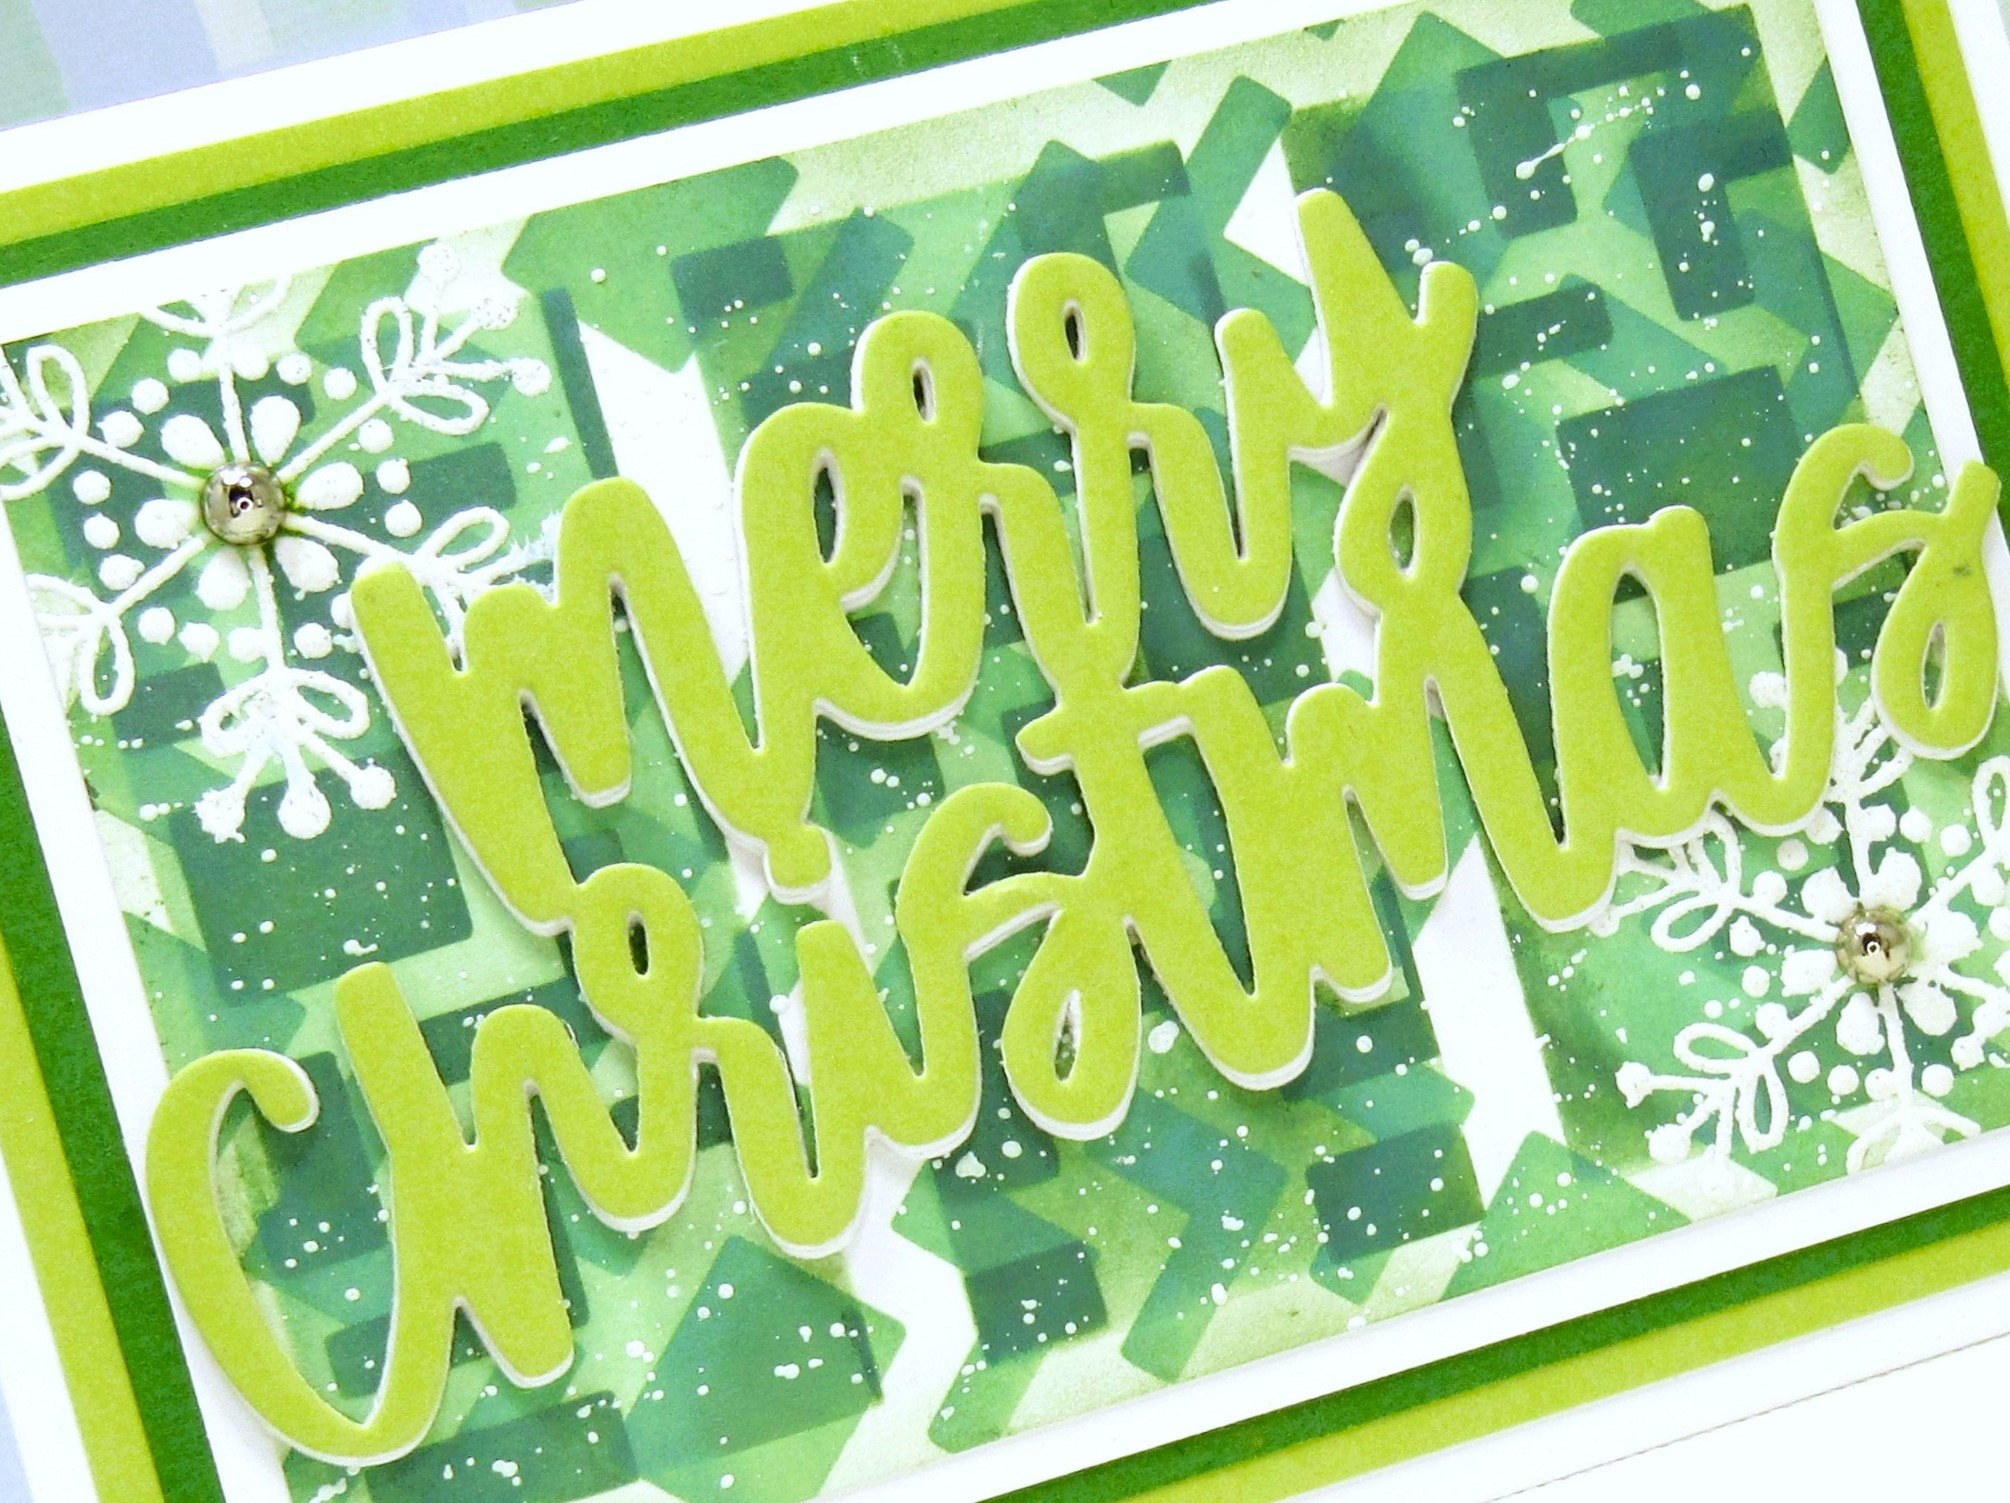
I had fun creating today's card combining a new stencil called 
with an older stencil called 3 Rectangle Shadow from A Colorful Life Designs.

So, here's what I did to create my card.
  • I placed a piece of white cardstock onto my Make Art Station and then placed the Slanted Angles stencil on a diagonal over that and inked with some Cracked Pistachio Distress Oxide ink.
  • I removed that stencil and placed the 3 Rectangle Shadow over my stenciled panel.  I put the Slanted Angles stencil back over that but positioned it straight this time.  I inked that up with some Rustic Wilderness DOX ink.
  • I removed both stencils and splattered with my white Posca pen.
  • When the panel was dry, I added some anti-static powder to the front and then stamped the snowflakes on the top and bottom corner with some Versamark ink.  I white heat embossed them.
  • I die cut the sentiment with a piece of pale green cardstock and then some white.  I glued those together, offsetting them a bit so the white would show.
  • I glued the stenciled panel over a piece of white, then dark green, then light green and then finally, a white A2 sized card base.
  • I glued the sentiment across the front and then added some silver gems to the center of the snowflakes.

Here are the stencils I used:
Slanted Angles


Thanks so much for coming by and taking a look.

Adding my card to these challenges:
Simon Says Wed.- ANYTHING GOES
CRAFT- CHRISTMAS 
TicTacToe- (MULTIPLES- snowflakes; RECTANGLE- stenciled; GREEN

Supplies
Stamps- Snowflakes (MFT)
Inks- Versamark; DOX
Paper- heavy white (Scribes Nook- Waterloo, Ont.)
Accessories and Tools- stencils (A Colorful Life Designs); TE Blending Brushes;
Make Art Station (Ranger); white eb powder; white Posca pen; silver gems
Sentiment- (Photoplay)

Saturday 24 August 2024

Happy Holidays


Good Morning
When I saw this new stencil for August from A Colorful Life Designs, I thought Christmas.  
And since it's never too soon to start on our holiday cards meet the new 
This stencil has so many possibilities.

So, here's what I did to create my card.
  • I began by putting a piece of white cardstock onto my Make Art Station and put the Changing Triangles stencil over my paper.  
  • I inked it up with some Cracked Pistachio and some Rustic Wilderness Distress Oxide ink.
  • I splattered the panel with my white Posca pen and set aside to dry. 
  • Next, I inked up another panel exactly the same way as I wanted to cut up the triangles for my design.
  • While that dried, I stamped and die cut the sentiment using some more of the Rustic Wilderness DOX ink.
  • I cut the stenciled panels up to create the design.  I wanted a large tree in the middle to represent Christmas tree.
  • I glued the cut pieces onto a piece of white cardstock, then onto a piece of dark green and then finally onto an A2 sized card base.
  • I use some foam tape to pop the sentiment over the bottom and then found this silver snowflake in my stash to add to the top of the tree.

Here is the stencil I used:

Discount Code for A Colorful Life Designs
(Affiliate with no extra cost to you) 

Thanks so much for coming by and taking a look.

Adding my card to these challenges:
Cut it Up- ANYTHING GOES

Supplies
Stamps- Holiday Sentiments (Photoplay)
Inks- DOX
Paper- heavy white (Scribes Nook- Waterloo, Ont.)
Accessories and Tools- stencil (A Colorful Life Designs); Make Art Station (Ranger);
small inking brushes (Amazon); white Posca pen; foam tape; snowflake die (SSS)

Friday 23 August 2024

Parasols

Welcome
This new stencil for August called
from A Colorful Life Designs is a fun one for sure.
I used it a bit differently then how it's designed to be used.

So, here's what I did to create my card.
  • I cut a piece of white cardstock and marked the center point.  I placed the Parasols stencil along the center point, covering just half of my card front.  I inked it up with some Ripe Persimmon Distress Oxide ink.
  • I lifted the stencil off and repositioned it to the other side and inked again with the same colour.
  • Next, I took another piece of white cardstock and inked just the center circle with some Picked Raspberry and some Lumberjack Plaid DOX ink.  I used a circle die to cut it out and placed that into my Misti to stamp the sentiment over it.
  • I glued my stenciled card front onto a piece of red cardstock, then onto an A2 sized white card base.
  • I used some foam tape to pop the circle over the center of my card front and added 3 black gems under the sentiment.

Here is the stencil I used:

Discount Code for A Colorful Life Designs
(Affiliate with no extra cost to you) 

Thanks so much for coming by and taking a look.

Adding my card to these challenges:
Cut it Up- ANYTHING GOES
Addicted to Stamps and More- DIE CUTS AND STENCILS
Paper Minutes- BIRTHDAY

Supplies
Stamp- Sending You (Avery Elle)
Inks- DOX, Versafine Clair
Paper- heavy white (Scribes Nook- Waterloo, Ont.)
Accessories and Tools- stencil (A Colorful Life Designs); TE Blending Brushes;
Misti (My Sweet Petunia); black gems; foam tape; HA Infinity Circle die

Tuesday 20 August 2024

Twisty Grid

Good Morning
Today's card features a new stencil from A Colorful Life Designs called

So, here's what I did to create my card.
  • I placed the Twisty Grid stencil over a piece of white cardstock on an angle, then inked it up with some Shaded Lilac Distress Oxide ink and the middle area with some Uncharted Mariner DOX ink.
  • I lifted the stencil off and then replaced it straight this time and inked with some Villainous Potion DOX ink.  I made such a fun looking pattern with just using that one stencil.
  • While my card front dried, I stamped the sentiment in some more of the Uncharted Mariner DOX ink and then die cut it out.
  • I glued my card front panel onto a piece of white cardstock and then onto a piece of pale purple.  I glued that onto an A2 sized card base.  
  • I used some foam tape to pop the sentiment over the middle grid area, then finally, added 3 silver gems.

Here is the stencil I used:

Discount Code for A Colorful Life Designs
(Affiliate with no extra cost to you) 

Thanks so much for coming by and taking a look.

Adding my card to these challenges:
We Love StampingFocal sentiment or quote or Anything Goes
The Creative Crafters- ANYTHING GOES
Crafts Galore Encore- ANYTHING GOES

Supplies
Stamp-  Big and Bold Stamp and die (SSS)
Inks- DOX
Paper-  heavy white (Scribes Nook- Waterloo, Ont.)
Accessories and Tools- stencil (A Colorful Life Designs); silver gems;
TE Blending Brushes; foam tape

Sunday 18 August 2024

Beautiful Chrysanthemums

Welcome
This month is just flying by.  This is the new mid-month release from A Colorful Life Designs called:
This stencil has 3 different sized flowers on it.

So, here's what I did to create my card.
  • I placed a piece of white cardstock onto my Make Art Station and positioned the largest Chrysanthemum into the bottom corner.  I inked it up with some Picked Raspberry, some Lumberjack Plaid and some  Distress Oxide ink
  • I moved the stencil with the next sized flower over to the side and inked again with the same colours.  I repeated that process one more time, adding the smallest flower into the bottom corner.
  • I placed the panel into my Misti to stamp the sentiment into the top corner.
  • Next, I placed the Simple Mosaic stencil over my card front and inked around the flowers and the sentiment with more of the Picked Raspberry DOX ink to add more interest.
  • I splattered with my white Posca pen and set aside to dry.
  • When the panel was all dry, I inked along the edges with some Lumberjack Plaid DOX ink to add a bit more interest.
  • Finally, I glued it onto a piece of red cardstock, then onto an A2 sized card base.

Here are the stencils I used:
SALE
Was $6.99
Now $4.00


Discount Code for A Colorful Life Designs
(Affiliate with no extra cost to you) 

Thanks so much for coming by and taking a look.

Adding my card to these challenges:
Allsorts- SUMMER DAYS
Stamping Sensations- SUMMER IN THE GARDEN
Try It On Tuesday- KEEP IT SIMPLE

Supplies
Stamps- To Everything (IO)
Inks- DOX, Versafine Clair
Paper- heavy white (Scribes Nook- Waterloo, Ont.)
Accessories and Tools- stencils (A Colorful Life Designs); TE Blending Brushes;
white Posca pen; Misti (My Sweet Petunia)

Saturday 17 August 2024

BIG Merry Wishes


Welcome
As a cardmaker, is it ever too soon to start making cards for the holidays?
When I saw this newly released stencil from A Colorful Life Designs called
 I knew exactly what I wanted to use it for.

So, here's what I did to create my card.
  • I placed a piece of white cardstock onto my Make Art Station and put the Calibrated Lines stencil over my paper.
  • I inked over the whole stencil with lots of Lumberjack Plaid Distress Oxide ink. To add a bit more richness to the dark red, I randomly inked with some Dusty Concord DOX ink to deepen the colour.
  • I added some perforated dots between the rows to add more interest.  (Sorry, that is a bit hard to see in the photo)
  • I die cut the 'Merry' from a piece of matching red cardstock, then glued it onto the white cardstock shadow outline.
  • I found a scrap piece of silver cardstock in my stash and die cut the snowflake from that.
  • I glued the stenciled panel onto a piece of matching red cardstock and then onto an A2 sized card base.
  • I glued the sentiment across the front and then tucked the silver snowflake under the corner of the sentiment.
  • I added a gem to the center of the snowflake and then around the bottom edge of the sentiment to help balance it all out.

Here is the stencil I used:

Discount Code for A Colorful Life Designs
(Affiliate with no extra cost to you) 

Thanks so much for taking a look.

Adding my card to these challenges:
Little Red Wagon- SPARKLE AND SHINE
Simon Says Monday- SPARKLE AND SHINE
Word Power- WORDS AS FOCUS

Supplies
Stamps- none
Inks- DOX
Paper- heavy white (Scribes Nook- Waterloo, Ont.)
Accessories and Tools- stencil (A Colorful Life Designs); Merry die (The Stamp Market);
Snowflake die (SSS); TE Blending Brushes; gems; Make Art Station (Ranger)

Thursday 15 August 2024

Groovy Hello

Hello there!
Meet today's card.
A fun one using another one of the newly released stencils from A Colorful Life Designs called:

The technique I used for my card is referred to as 'Joseph's Coat'.
So, here's what I did to create my card.
  • I wanted a bold and bright look for this card so I took a piece of white cardstock and inked it with my Distress Oxide inks in these colours: Picked Raspberry, Peacock Feathers and some Ripe Persimmon.
  • I set that aside to dry and before going on with the next step, I used an anti-static powder all over the card front. (This step is very important or you will not be able to achieve the results.)
  • I placed the Twisty Grid stencil over my inked background and went over it with some Black Soot Distress Oxide ink and then clear heat embossed it.
  • I die cut the "HELLO THERE" 3 times with some black cardstock and glued them together.  I die cut it again with some white and glued them together, offsetting the white a bit to help the sentiment show up better against the dark background.
  • I glued the stenciled panel onto a piece of black cardstock, then onto a piece of blue and then finally, onto an A2 sized card base.
  • The last step was to glue the sentiment to the middle of the card front.

Here is the stencil I used:

Discount Code for A Colorful Life Designs
(Affiliate with no extra cost to you) 

Thanks so much for coming by and taking a look.

Adding my card to these challenges:
Simon Says Wed.- ADD A SENTIMENT
Simon Says Monday- SPARKLE AND SHINE

Supplies
Stamps- none
Inks- DOX
Paper- heavy white (Scribes Nook- Waterloo, Ont.)
Accessories and Tools- stencil (A Colorful Life Designs); TE Blending brushes; 
Hello There die (Amazon); Clear EB powder (Lawn Fawn)

Tuesday 13 August 2024

Cheerful Note


Good Morning
Just a note card today featuring the newly released stencil from A Colorful Life Designs called:

So, here's what I did to create my card.
  • I placed the Changing Triangles stencil over a piece of white cardstock. This stencil has so many possibilities.  It is easy to ink just portions or even cut it up into pieces as you will see in an upcoming card I made.
  • I wanted each triangle area to be a different colour, so I masked the first ones off, inked and then continued with that process until the card front was all stenciled.  I used these Distress Oxide colours:  Fossilized Amber, Ripe Persimmon, Picked Raspberry and Peacock Feathers.
  • I set that aside and die cut the sentiment words from some blue cardstock.
  • Next, I die cut the word shadow right from the center of my stenciled card front and glued the 'just a note' words onto that.
  • I glued the card front onto a piece of blue cardstock and then onto an A2 sized card base.
  • I used some foam tape to pop the sentiment back over the front, matching it up in place.

Here is the stencil I used:

Discount Code for A Colorful Life Designs
(Affiliate with no extra cost to you) 

Thanks a lot for coming by and taking a look.

Adding my card to these challenges:
Little Red Wagon- Make it MASCULINE
Crafts Galore Encore- ANYTHING GOES
Love to Craft- ANYTHING GOES

Supplies
Stamps- none
Inks- Distress Oxides
Paper- heavy white (Scribes Nook- Waterloo, Ont.)
Accessories and Tools- stencil (A Colorful Life Designs); TE Blending Brushes;
Just Saying die (Concord and 9th)

Monday 12 August 2024

Get Well Wishes

Good Morning

I hope that today's card will cheer one of my friends up.
I used 2 of the newly released stencils together to create this fun background.
Meet the new  
from A Colorful Life Designs.

So, here's what I did to create my card.
  • I put a piece of white cardstock onto my Make Art Station and then placed the Jigsaw stencil with the Calibrated Lines stencil over that.  
  • Keeping the 2 stencils together, I inked over the layered stencils with 3 different shades of blue Distress Oxide colours: Peacock Feathers, Salty Ocean and Uncharted Mariner.  It created the most fun background.
  • I removed the stencils and used my perforating tool to add the perforated lines between the sections.  It added some nice texture and interest to the background.
  • I found a scrap piece of inked paper in my stash to use to die cut the sentiment.  I also cut the sentiment from white cardstock 4x's and then glued them all together so the sentiment would be raised against the background.
  • I glued the stenciled panel onto a piece of blue cardstock, then onto a white A2 sized card base and glued the sentiment over the middle of that.
  • I found this die cut flower in my stash and glued it just under the sentiment in the corner and added a blue gem to the center.


Here are the stencils I used:


Discount Code for A Colorful Life Designs
(Affiliate with no extra cost to you) 

Thanks a lot for taking a look.

Adding my card to these challenges:
Word Power- SENTIMENT AS FOCUS
Creative Inspiration- ANYTHING GOES
TicTacToe- (FLOWERS/SCORING LINES/DIE CUTS)

Supplies
Stamps- none
Inks- DOX
Paper- heavy white (Scribes Nook- Waterloo, Ont.)
Accessories and Tools- stencils (A Colorful Life Designs); TE Blending Brushes;
Make Art Station (Ranger); perforation tool; Get Well die (Frantic Stamper); 
flower die ?? (gifted to me)

Thursday 8 August 2024

Big and Little Lines

Hello and Welcome
Today's card is featuring a new stencil for August from A Colorful Life Designs called

So, here's what I did to create my card.
  • I placed a piece of white cardstock onto my Make Art Station and positioned the Big and Little Lines stencil over that.  
  • Next, I inked starting at the top and moving my way down with these Distress Oxide colours:  Shaded Lilac; Peacock Feathers; Picked Raspberry; Ripe Persimmon and some Fossilized Amber.
  • I lifted the stencil off, wiped it and then flipped it onto it's side.  I inked again using the same colours as mentioned above.
  • After I removed the stencil, I splattered with my white Posca pen and set aside to dry.
  • While the panel dried, I die cut the sentiment letters from some blue cardstock, then die cut the shadow from the center of my card front panel.  I glued the letters onto the shadow.
  • I glued my stenciled card front onto a piece of pale purple cardstock, then onto an A2 sized white card base.
  • I used some foam tape to pop the sentiment back into place over the card front and added a silver gem to dot the 'i'.

Here is the stencil I used:

Discount Code for A Colorful Life Designs
(Affiliate with no extra cost to you) 

Thanks so very much for coming by and taking a look.

Adding my card to these challenges:
Love to Craft- ANYTHING GOES
Crafts Galore Encore- ANYTHING GOES
(rainbow colours)

Supplies
Stamps- none
Inks- DOX
Paper- heavy white (Scribes Nook- Waterloo, Ont.)
Accessories and Tools- stencil (A Colorful Life Designs); Make Art Station (Ranger);
Small Blending Brushes (Amazon); silver gem; Just a Note (Concord and 9th)

Sunday 4 August 2024

Big and Bold Thank You


Welcome
I had fun creating today's card using 2 of the new for August stencils from A Colorful Life Designs called;

So, here's what I did to create my card.
  • I cut a square piece of white cardstock that was 3 3/4" and placed it onto my Make Art Station.
  • I put the Alternating Squares stencil over that and inked it up with some Lumberjack Plaid Distress Oxide ink.  I like the dark, rich tones of that colour.
  • I placed another piece of white cardstock onto my Make Art Station and this time, I put the Parasols stencil over that.  I inked just the inside round of that one with some more Lumberjack Plaid DOX ink.  To add a bit of dimension, I added some Villainous Potion just in the center area.
  • I used a circle die to cut the round and then I fussy cut around all the spokes to give it more of the look of a flower.  I glued that onto a slightly larger white circle.
  • I stamped and die cut the sentiment with the same red.
  • I glued the stenciled card front onto a 4 1/4" white square card base and used some foam tape to add the circle detail.  
  • Lastly, I used some more foam tape to pop the sentiment up over the center.

Here are the stencils I used:


Discount Code for A Colorful Life Designs
(Affiliate with no extra cost to you) 

Thanks so much for coming by and taking a look.

Adding my card to these challenges:
Simon Says Wed.- ANYTHING GOES
Crafty Calendar- ANYTHING GOES
Crafting Happiness- HOT/HOT/HOT

Supplies
Stamp- Big and Bold Stamp and die (SSS)
Inks- DOX
Paper- heavy white (Scribes Nook- Waterloo, Ont.)
Accessories and Tools- stencils (A Colorful Life Designs); TE Blending Brushes;
Infinity Circle Dies (Hero Arts); foam tape